One or more keys fell off the laptop keyboard and you are not sure how to put them back? Don’t worry, most likely you can fix the keyboard and it’s not necessary to buy a new one. There is no universal repair guide because all keyboards are different. Here’s what I usually do in this case.
Situation 1. The key cap and key retainer fell off the keyboard and you cannot figure out how to assemble them back.

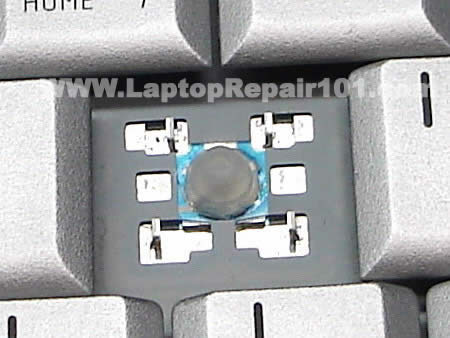
Carefully remove the cap from any other working key so the key retainer stays connected to the keyboard.

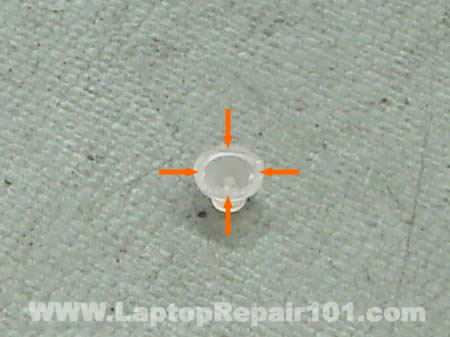
Take a closer look at the key retainer, it’s connected to the keyboard at four different points.

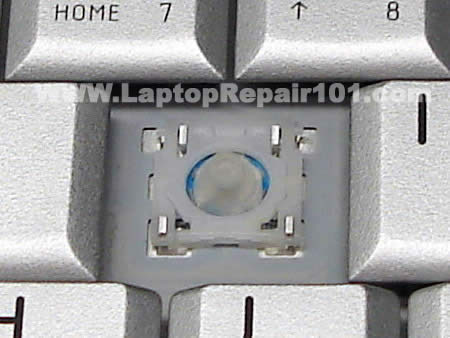
Assemble the disconnected retainer the same way as one on the keyboard and put it back in place.

Put the key cap on the retainer and snap the cap back in place.

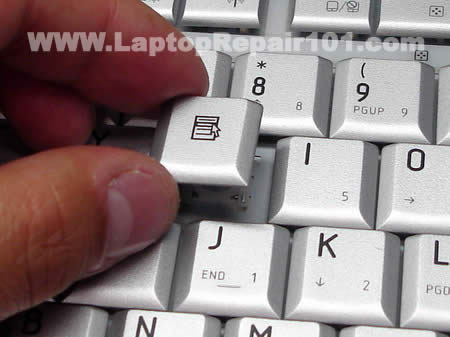
Situation 2. The key fell off the keyboard and you lost the cap or the retainer. In this case you can purchase a single key on the internet, just search for it. (Search examples: “Dell keyboard key”, “Toshiba keyboard key”, “HP keyboard key”, etc… )
After you found a new key, put it back in place the same way as I described in the situation 1.
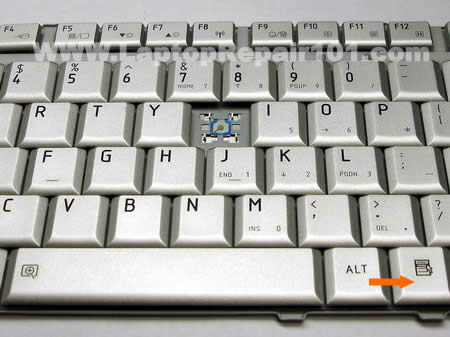
Installing the space bar key.
The space bar key is connected to the keyboard a little bit differently then any other key.

There is a metal retainer connected to the space bar key (on some keyboard models). Separate the retainer from the space bar key with a flat head screwdriver.

Install the retainer back in place as it shown on the picture. You have to engage the retainer with the small hooks on the keyboard.

Put the space bar key back in place and gently press on it with fingers until it snaps back in place.

That’s it. The space bar key is installed back in place and should work as before.
Here’s another technique you can use to fix a broken keyboard key.
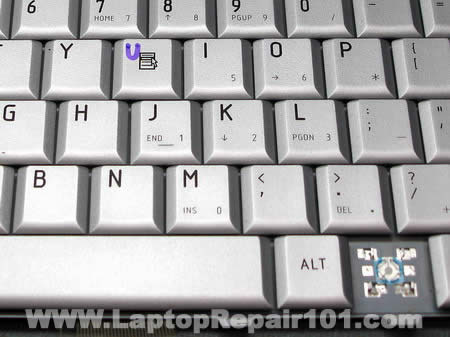
As you see on the picture below the keyboard is missing the U key. The key cap, retainer and even silicone membrane were lost. Let’s see if it’s possible to temporarily fix the U key without buying any spare parts.
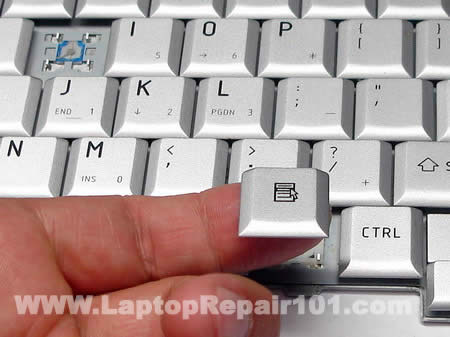
Personally, I cannot use keyboard without U key but I can live without a key located on the side from the right ALT – the “Right clicker” key. In the following guide I will remove one key I never use and install it in the place of missing U.
Carefully remove the key cap with your fingers.
Remove the retainer. The retainer has two pieces connected to each other. If one piece got disconnected from the other, connect them back together.
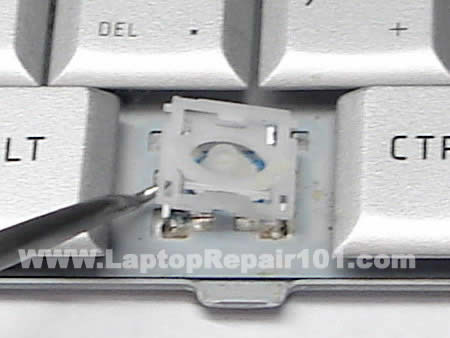
The silicon membrane is glued to the keyboard. Very very slowly separate the membrane from the keyboard with a sharp knife. While creating this disassembly guide I damaged one membrane because I wasn’t careful enough.
Again, you have to be very careful removing the membrane.
If you damage the membrane you’ll end up with two broken keys instead of just one.
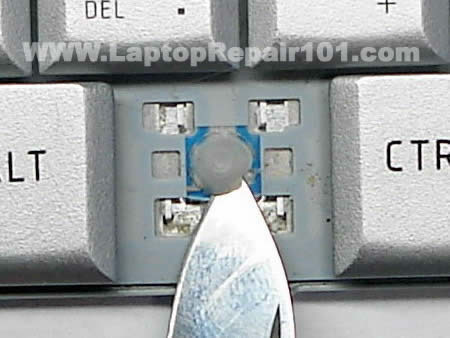
The silicon membrane has been removed.
Now apply some superglue on the bottom edge of the membrane, just enough to keep the membrane in the place.
Carefully place the membrane in the center of the U. Make sure the membrane is positioned correctly. Wait until the glue cures.
Install the retainer.
Position the key cap above the retainer. Gently press on the key cap until it clips in and connects to the retainer.
Now you can use the U key again.
Troubleshooting. Why the key will not clip on.
Turn the key upside down and take a closer look at the locking clips. It’s possible that one of the clips is damaged and because of that the key will not clip on the retainer. If that’s the case, you’ll have to purchase a new key.

On the next picture you can see that one of the clips is missing, it’s broken. This key will not stay connected to the retainer either. If that’s the case, you’ll have to purchase a new key.

It’s possible that the key is fine, but the retainer itself is broken. On the next picture you can see that one of the tips is missing on the retainer. The left tip is OK, but the right one is missing. If that’s the case, you’ll have to purchase a new retainer.

Here’s one more picture. In this case two parts of the retainer will not stay connected to each other. It happens because one of the tips is broken. The left tip is OK, but the right one is missing. If that’s the case, you’ll have to purchase a new retainer.

1,706 Responses
john
my laptop very slow. because of virus . which antivirus is better now iam using macfee
ahib0205
owh… what is the virus in your laptop? i just use avg antivirus.
ling
How to unsnap and snap the cap please?!
Brendan03
Hi, I know this is irrelevant but I couldn’t seem to find a contact anywhere else on the site – I own a Toshiba PSM53A (M50 series) Laptop and I recently started the process of flashing my bios and before I even started, My laptop froze and I had to unplug it to turn it off, when I turned it back on, It did nothing, at all.
Now I’m on a quest to find out if I can fix it, I’ve tried using a USB Flash card reader with the correct bios image on it as well as a CDRW with the image on it, My next option is to go and buy a USB Floppy Drive but I don’t want to spend this money until I can be sure it will work…
I’d really appreciate any information on this matter, Thanks
cj2600
Brendan03,
If I understand right, when you turn on the computer the screen stays black and you get no image at all. If that’s the case, a new USB floppy drive will not help because you will not be able to boot from it. The BIOS is corrupted and you’ll have to replace the motherboard. I don’t know any other way to get it fixed.
cj2600
Ling,
You hold the key cap by the edges with your fingers and start carefully lifting it up. Try lifting up one side of the key first. I cannot explain how much force you have to use because you have to feel it.
Installing the key cap is much easier. You just position the cap the way it should be and then press on the cap until it snaps in (assuming that the key or holders are not damaged).
Angie
I tried to go to the website you have given me to buy a key that has broken. And that link is not working, could you please tell me where I can find a single key. I have searched Google and it seems like I cannot find any results at all. I would really appreciate it if you could help me with this.
Caroline
Hi! How do I replace the space bar key?? The key retainers are both stuck onto the space key.
Jakob
Thanks for the advice to take off another key, that helped incredibly, because I understood how it worked and provided a model; the “c” on my wife’s laptop works again!
Noah
Thank you VERY much for your instructions! I had a key come off about a year ago. I would just snap it back, but it never quite sat right and would eventually fall off again. On a whim, I decided I’d Google to see if there was something I was missing. The retainer always remained on the key. After seeing the pictures here, I removed the retainer from the key instead of trying to attach it at the same time as the key. This allowed the rubber cone to sit correctly for the first time in a year! Thank you!
Justin
Not, bad I kind of new how it was i found for my keyboard, you needed to use pliers to hold the middle one in place while you snaped the outer one in place (my keyboad was a bit different, but your images helped out a great deal
Henry Bevan
I wonder if anyone could help me. The spacebar on my IBM X22 has stopped working for no apparent reason. I have taken it out and cleaned it a number of times but it still doesn’t want to work. Does anyone know how it works exactly or know how to get it working again?
Thank you!
Ken
I appreciate the laptop key replacement information. Thanks.
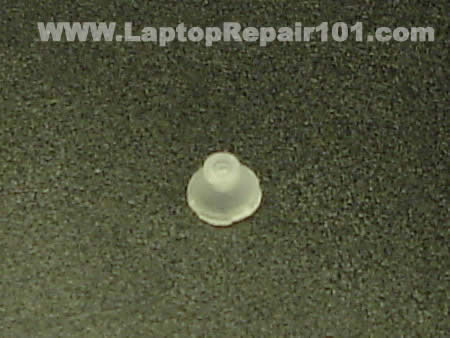
But I have to take this one step further. I had a key pop off and in the replacement process, the little ‘cushion’ tab came off the keyboard base. This is the round rubbery thing in the middle of the retainer on the keypad. I still have it. It is shaped like the head of a missle and provides the spring back for the key.
Can I glue this back on? I attempted my best in just putting it where it is located and replacing the key. It works but does not have the same tension as the other keys. I guess I could try again and see if I get more success.
Any suggestions would help.
Nocturnal
What do you do when a piece of the plastic has broken off or the metal part that is on the base of the kb will not allow the plastic piece to stay in place?
Thommy
Hi,
Thank you for the “S” cap demonstration but could you show me how to do the Spacebar key because that came off with the retainer peices on it.
Bella
Thank you thank you thank you!
I was utterly distraught, and this site gave such a clear and basic way of restoration.
Thank you once again!
sophia
MY SPACEBAFR FELL OF I HAVE TRIED EVERYTHIN TO REPAIR IT N IT NT WORK I DUNO WHAT THESE PAPERCLIP WIRES ARE FOR!
cj2600
Sophia,
I added more pictures to the post. The update shows how to install the space bar key. I hope it helps.
Fern
the pictures were a great help even though my machine is a little different.
thanks for saving hours of frustration in trying to work it out myself
Kevin
Stupid cat jumped onto the keyboard and dislodged two of the keys, it took me 10 minutes to figure out how to fix it! I could have used this guide then.
Anonymous
This guide was excellent! It would’ve saved me an hour if in knew….
Jaye
Thank you… This guide is really helpful…
Toni
Just another thank you. The photos are great. A big DUH! for me. I didn’t realize that all you have to do is simply press down on the key to put back in place. Sigh. I was trying to lift up the two sides of the retainer and fit them in place on the underside of the key somehow, I thought “There must be a special tool you need to do this.” DUH and double DUH.
Stacy
Thank you for this! The spacebar on my laptop inexplicably broke (OK, I may have over-bashed it in one of my many journal rants), it saved me so much time! thanks again
Shamous
Great guide. Many thanks.
xenia
thank you for space bar instructions.. it’s working again.
elise
amazing help.honestly that could not have been any better. i’ve been trying toget my o key back on for months and then finally diecided to look something up on google. funny how i struggled for months without knowing this.
Mauricio (from Brazil)
Thanks a lot! Actually, it was not a fallen out key problem, but a huge grain of dust that didn’t allow the key to work properly (and I coudn’t see why). After following these dis/assembly instructions and cleaning the key socket, everything is allright. Really great pictures. Thanks again!
Jonny
Wow, I spent 2 hours trying to fix this, I read this, and it worked! Thanks alot!!!
Dusty
My kids wanted me to thank your website for saving them. I woke up this morning to find a key torn off. Needless to say I wasn’t happy and after a rather difficult period of trying to fix it I did a search and found this page. Fixed it within two minutes.
Kim
Thanks for the valuable information. I was sure that this was going to be a big problem but your information has saved me a lot of time and trouble.
Kimberly
I lost sleep over my spacebar breaking for two nights now thinking I had ruined a very expensive laptop of my husbands… then I found your site. THANK YOU for bringing hope to my situation. My problem is while trying to put the spacebar back on (before I found you) the two of the plastic retainers broke. I cannot find any replacement parts for the MPC Transport T2400 and when contacting the company was told that they do not offer replacement parts. Any idea of how I can get the little plastic thingies that I so desperately need?
James Bass
The other day when I was cleaning my Vaio laptop, I used a soft cloth across the keyboard and inadvertently snagged two of the keys. Both popped off, and I was able to just snap in one of the keys, but the other “O” key kept coming up on one side. After close examination, it looked like the inside molded little plastic clip had broken off. I’ve been searching for a replacement key, but no luck until I found your site. I’ve now ordered the key on Ebay and hopefully that will do the trick. Thank you for your very helpful website. JB
Brandi
Geeze man, i just broke off my c and god knows i need that, haha.
I was getting a bit nervous at first when i popped off another like you said and everything came out with that one too, but then I looked at it and this tutorial and it really helped. Thanks!
nick
thank u perfect and simple i thought id have to send the hole thing back
mari
I did the process and i have the key on its place again… but is not working well, it feels stuck. Is anything i can do? Do i have to buy a new key?
Laura
I love you! I was so upset when I left my computer open and my daughter “plucked” the “enter” key off (along with the 2 white retaining pieces underneath. I could NOT figure out how to repair this until I found your site and information…. it took me less than 5 minutes! (I did need to take off the “shift” key beneath the “enter” key to see how to reassemble the 2 white retaining pieces)… so thank you for sharing how to do this and giving me the courage to “pluck” off another key, lol! SUCCESS!
william
I hve a ASUS A3E laptop some of the keys do not work ,I hve ordered a new keyboard can u advice me on how to remove the keyboard
thks
mimi
thanks, my nephew took 4 of my keys out and i fixed it thanks to ur website but for one the little gummie thing came off how do i put it back?
sammie
i took my keys off to clean underthem assome were sticking i replaced the space bar as u have said but asu canseeits quite stiff anddoesnt work very well unless ibangit hard in the centre… any ideas?
Sheila
How do you fix the F keys? They’re put together different and I can’t manage to pull another one off to see how it’s put together without breaking it. And when I try to lift one up, I can’t put it back down. Help?!
Heather
You are my hero.
Ashish Jain
Hey, Thanks for the tutorial. It helped me fix one of the keys that had come of my very new Dell keyboard.
jo
I have an Hp Pavillion dv1000, laptop/notebook, and I had to take off my ‘enter/return’ key to retrieve a crisp. I still have the enter key but don’t know how to put it back on. My keyboard is different to your images, please help!
Dave
Thanks so much. It wasn’t ‘exacttly’ the same, but your pics and instructions just helped me to rescue my Thinkpad R30.
Amazing how hard it is to do without a down arrow. 🙂
Thx again
Ryan
You saved my life man. Diff. model, but the concept was all I needed. thanks!!!
Dennis G. Jerz
Thanks for the photos and instructions. My keyboard looked a little different, but your help was enough to get me through the job.
Naveen
Thanks, your tutorial helped me fix my keyboard problem, you rock!!!
Linda
Good Morning,
Thank you for your helpful information, I was able to fix my keyboard quickly and am grateful!
Wishing you a 🙂 day!
Linda
Ellen
Nice! I got my keys back on. Mine have 3 contact points instead of 4, but I got the basic idea. Thanks!
German
Thank you!!! You saved my life, HP Support sucks, but your guide allowed me to repair the key. Thank you a thousand times.
emma
omg!! thank you so much i got a new windows vista acer laptop for £390 pound new yesturday and i was fiddling it fell off and iwas soo scared. thank you sooooo much. my keyboasrd is diffrent but it works the same so i figured it out.
have a greatest of all great days thank you x
Andrew
Hi, been trying to find a site for months now, HOW DO YOU FIX AN ENTER/RETURN KEY?
I’m going to take it to a shop soon if I can’t fix it.
Please help the whole thing is off
Ian
Thank so much for the info.. Was able to put back in my space bar 😀 cheers to you!
Allen A
Thanks for the helpfull info. I would not have been able to fix my keyboard without it.
Jodi Counts
i really appreciate the help!
Mo
Thanks!!! I popped off 2 keys at work…don’t ask…and your repair page saved the day. I fixed it myself! My IT admin was going to call an off site tech support to fix this problem.
Anna
T;HANKS FOR THE GREAT ADVICE
Michelle
YOU’RE A LIFESAVER!! I have two small children who have grabbed at my computer many times and taken a key with them.. a fourth broke today and I couldn’t take it anymore and searched online for help.. thanks to you I have a full functioning keyboard again.. thanks so much
Briony
HI, I found your information very useful but I’m still have the problems with my spacebar. It does not look like my laptop, a Toshiba Satellite A85-S107, has retainers hooks but rather that the retainer bounces off the a piece of metal that has a hole in it, the hole is too small for the retainer and when I tried to place the retainer in the hole, it stresses it out. Plus, when I type, I have to make sure I hit a certain area of my spacebar or it won’t register the key, particulary the corners of the spacebar. Also if I push a corner of the spacebar only that side goes down. Any advice???
Bryan Tuey
This was great help. Thanks so much for putting this info out there.
Christine
Thank you! I finally got my N key back on correctly thanks to this guide.
F-KEY
THANKS FOR YOUR INFO, WHICH HELP ME TO GET BACK TO WHERE I WAS.
I WAS TAKEN OFF BY THE LITTLE KID AND SPENT A COUPLE OF DAYS MEMORIZING THE STEP AND TICKLING FROM MY BOSS.
THANKS A BUNCH
Zack
THANK YOU!!! im 13 and when i broke the ener key my dad was pissed!! you just saved me from never being able to go on he laptop again!
Mario
thankyou for your space bar help! it worked a treat 🙂 thanks again 🙂
Richard
Awesome! Worked like a charm!! Thanks guys!
Fredy
Thanks for your info!
Anyway, I have a HP Pavillion dv6000, and the spacebar got out of place, and I figured out the correct way to assemble it, and for anyone who needs the info>
First, you have to assemble the four key retainers in their place, then lift up the upper part of the retainers that go below (the little ones), and the metal retainer of the spacebar should be placed inside the key. After that, insert the two little sides of the retainer of the keyboard inside the two little holes they should be, then carefully, press the middle of the spacebar (in the place it should be), and, leaving your finger there, press gently the four corners of the key until it snaps back in place.
🙂
mohd zuli
Thanks a lot for the infomation. I manage to put is back. I must say that you are doing excellence job o help otherr save money.
jamie
THANK YOU FOR THE HELP. I WAS ABLE TO PUT IT BACK TOGETHER WITH THE HELP OF YOUR PHOTOS.
I DID HAVE TO TAKE OFF ANOTHER KEY AND LOOK AT IT, AND THEN HAD TO SPEND SOME TIME WORKING ON THAT KEY, BUT I NOW HAVE EVERYTHING BACK ON AND IT IS WORKING!! THANKS FOR YOUR HELP.
Danay
I HAVE BEEN TRYING TO FIX MY KEYBOARD KEY FOR MONTHS NOW. THANK YOU VERY VERY MUCH!!!
Steph.
Oh my god thank you for your help.My new laptops button came off and I was almost crying and this helped me a lot. =)
Denise
Thankyou somuch I was freaking out about my key the instructions really helped alot!!!
Ryan
The enter key for my Dell, with a similar keyboard to the one you have shown, came off. I cant seem to get the stuff to line up right can you help?
Andre
it took me over an hour to get the ctrl key in, but I finally got it
Ruth
ahhh- thank you!!! I thought I would never have my Enter key back on and that just doesn’t work for someone in law school! 🙁 Extremely helpful – thank you!
Jason
Thanks a lot! I would never have attempted this without having pictures to guide me through it. You just solved my 3 year old broken spacebar problem!!!
nicole
Thank you so much. I was so stressed because my dog jumped on the laptop and knocked off the period key. I couldn’t write a sentence properly. Now it is fixed in less than 5 minutes. I am so happy I could kiss you.
debbie
My broken key is on a Gateway laptop and is the backspace key.
It just happened! Grandchild pulled it off. His mother is going to kill me. So! It has a perfectly good key with this little wire on the back… then a rubber bumper dealy bob fell out of a hole I think… then this little square piece that looks like the one to the left of the bigger square that has the hole for the rubber piece, fell off. I think I could get it all to snap back, if that small black plastic piece was in place like the one on the other side. There seems to be nothing that attaches it. Does anyone have a website that has to do with Gateways? Thanks for any help!!!
Tim T.
I popped one key (alt) off to see if I could just pull them all and clean the key contacts from the top. The key came off with the balancers attached. It wouldn’t go back on with the balancers attached. Visions of making a delicate wire gizmo to pop everything back in pace just didn’t work out. Glad to find out the key POPPED onto the balancer after the balancer was first installed on the board!
Edvardas
Hello,
I was just looking for something else on google and found this forum. I just wanted to link you directly to right place where you can get your missing key.
In this shop you will find keys for almost 100 different model laptops and the moment and there will me more soon.
Regards,
Edvardas
RJC
Somehow popped one of the retainers off my spacebar and couldnt figure out how to get it back on my HP Pavillion dv2000 keyboard.
This site was very helpful, everything popped back into place on the first try. Thanks for everything
christopher
i have a window vista laptop and i accidently took out a key from laptop. The containers are different from your picture. Also thanks for the help of showing me how to fix my cousin laptop.
jeepgurl
thank you thank you thank you—i was panic stricken i would never use my “r” key again LOL —your instructions made the fix so simple THANKS again
Raghav
Thanks a lot… your step by step method of explaination along with pictures made it a lot lot easier for me to fix similar problem. Thanks again for taking efforts to maintain a good website like this.
joe
i got a compaq and it nothing like thiz
can u ztill help me?
stephen
Legend!!! Thanks Dude, your advice has been a great help. i did think that at one point the damn key was never going to fit back on to the keyboard!! Phew! Thanks again!!!!!!!
steve r
Incredible! Many thank.
Key clicked on first try!
Geek Squad wanted $75.00
quintet kelbin
i got a compaq and it nothing like thiz
can u ztill help me?
iI afree with this helpo uussss please
Minja
The key that fell off of my board is the enter key (dell laptop) and the metal bar thing is shaped a bit differently from the spacebar. Maybe I can get a little help with that? In the meantime I will try and mimic the spacebar solution. =3
Jess
My space bar fell off and thanks to you as long as I hit the key inthe middle it’s okay
Kristin
My 18-month-old took off the space bar on my almost new Dell Inspiron, and it wasn’t working properly after my husband (a computer engineer) did “the best he could” to put it back on. I had to almost pound on it to make it work. I found your instructions, took apart the space key the way you said, snapped it back in place, and now it’s working perfectly. Thanks! And I’m going to show my husband the proper way to put the space bar back on.
Roman
my shift key fell of my keyboard and i cant seem to get it back in tact. Can you please help me by doing the same diagram type thing but with a shift key(left side) . Please help me!!!!!
Erikajane
OMG Thank you!!! My “O” key completely fell off… brackets and all. Thanks to your instructions and photo demonstrations, I was able to repair my keyboard back to new using just a pair or tweezers. Thanks so much. Hail to you and the internet!!!
Dan
Thanks much! Replaced a “J” key with the nice photos and assistance. Great laptop keyboard repair instructions!
Tony
SweeTT!! I’ve had my laptop for like, 2 or 3 years, then I start playing this game, and i get 4 broken buttons 🙁
I kept on playing after the first 2 popped buttons, but after the 3rd and fourth, I couldn’t ignore it. I searched and found your website, and I fixed them EZ 😀 Thanks soo much, and peace 😀
You people rock 😀
Evi
Thanks a million!!
The first time a key came off I ended up breaking the little clips and had to replace the keyboard – this time I found your site and after just a couple of minutes the problem was fixed!!
Thanks so much.
Raheem sikiru
My laptop has 3 letters on a key but pressing the key display a letter and there is no how i can shift within these keys,even with shift,caplocks key.
Susan
Thank you, Thank you, Thank you!!!! I was able to get my Enter key reattached! The well written instructions and the pictures helped a lot!
david magroune
thank you for your oustanding help, ps memtest86 is better than memtest86+ i found
cj2600
Raheem siriru,
Did you try both Shift keys, maybe one of them does not work?
Let’s take for example one of the keys with three different symbols: ?,/,+
If you press on the key, it should type “/”. If you hold down the Shift and then press on the key, it should type “?”. In order to type “+”, you’ll have to enable NumLk (Number Lock) on the keyboard.
Right now I’m typing on an IBM laptop and I can enable NumLk by pressing two keys: Shift and NumLk. On some laptops you have to press Fn+NumLk.
I hope it helps.
yelena
Do you know of any websites where i can order just a spacekey? I broke mine trying to clean it (cat hair kept if from working properly) and now it wont stay attached because I broke the clip mechanism.
Grace
Your website is very helpful! I honestly didn’t think I’d find a website that would help me do something as easy as fixing a popped key! AND your instructions are easy to follow and your screenshots help alot too! Thank you so very much!
Armando Perez
You are wonderful, the stupid cat jumps on to my wife laptop keyboard and a key pop off.
Honey would you please fix it and honey spent two hours figuring how to fix it. Nothing until I found your site and the first image is the same laptop and the same problem.
My wife thinks now that I am a genius.
Thank you very, very much
parm
thanks man…. this was tons of help
nasim
the key retainer is snapped into 4 peaces for my 4 key. the 4 key is fine, its just the retainer that is broken. do you know where i can find another retainer??
Diff Laptop?
my > and left arrow key are off and both of them are “on on the bottom half but the top half is up. I can’t get it to go down and the laptop are different from the picture. Help please?
chris
thanks. my (s) came of the keyboard but the only problem is that the key is a bit stiff and doent look the smame as the others
uitenshi
Wow, I thought I was going to lose it on my computer and then I was worried I’d have to pay an outrageous bill for putting a key back on my keyboard… not only did you save me from a world of peril, but I also learned how to fix keyboards for friends too! Thanks so much, this was very helpful and a wonderful find!
Angela Jordan
I am having trouble snapping the keys back onto my laptops keyboard. I get the reattached and they sit crooked or “sprung” on one side. Can anyone help me? My toddler decided it was fun to pick off several keys the other day…Thanks for the help.
Sincerely, Angela Jordan
Brandon
My “G” key broke on my laptop (the retainer was broken and unable to be repaired) So I removed the retainer from the “ALT” key on the right side of the keyboard because there’s two of the same button and snapped that into place of the “G” key. It worked great.
Chris
My up key fell off, i put it back on, but it now sits sunkey, and isnt real bouncy like the others are and how it used to be,
Annie
Thank you so much for taking the time to explain with pictures how to put the key cap back on.
To Angela Jordan and Chris: Mine was a little crooked and weird the first couple dozen times I tried also but I realised that it was because it wasn’t fully attached at all ends. Just GENTLY remove and try again until it snaps fully into place and it will look, feel and function like it never came off in the first place. Good luck.
Dave
your solution worked perfectly! My “v” key is back in business and you’d never know it fell off.
THANK YOU! Especially for posting with pics…
Tom Lewer
Thanks thast helped me and my boyfriend alot
jack
Thank you soooooooooooooooooooooo much
It works !!
couldn’t know how to thank you
mayra
hey thanks it really helped i can’t believe i was going to pay to get my ctrl key fixed.the step by step pictures really helped.
Kasia
Thank you so much for saving my laptop!! My baby pulled off the shift keys and I was going nuts with them. My keys are a bit different but your main principle works! Genius idea!!
Thank you again very very much!
Jake
Thanks a ton! I was just typing on my Toshiba Laptop, which I have only had for a few months and the E button popped right off. It took me several tries to get it inline, but I eventually got it in. For the people that said their keys were sunken in still, or crooked, just pop the key back off and try again…I had to several times to finally get it back to the way it was. Great help guide though, especially with the pictures…THANK YOU!
Mark Scott
Awesome instructions! By far the best description I found. Thank you.
Lissa
You Rock!!!!
I thought I had seriously screwed up my laptop. I’ve been fussing with this darn key for the last 2 hours. Your instructions are absolutely perfect. Thank you!!! Now I don’t have to take my laptop into a repair shop.
Again, You Rock!!!
Eduardo
Perfect!!!!
Fantastic instructions!!!!
Thanks a bunch!
Jake
Jake here again, I posted yesterday thinking I had fixed my E key. It keeps popping off though! I get the bracket on or the retainer thing, and then pop on the plastic key part. All seems to be fine, and then it gradually works its way off until I’m typing and it comes out :(. When I put them in, they make a snap into place, and I’ve looked at both pieces and neither of them are “broke” they just seem to be popping out…any help?
Chris M
The spacebar on my Acer laptop has TWO metal retainers, one on the top and one on the bottom. So I’m having trouble with this step:
“Install the retainer back in place as it shown on the picture. You have to engage the retainer with the small hooks on the keyboard.”
I can see where the bottom retainer goes, because there are two hooks it has to slide in to. But I have no idea what to do with the other metal retainer.
Can you please help me? Thank you.
Terri
my partner hoovered up my J and U and i cant find them does anyone know where i can buy replacement keys from???????????? HELP PLEASE
ken n
I have this same problem on my dell precision m50. cananyone help me?
i can pop it back in but the spacebar doesnt spring back out.
125Chris M Says:
November 15th, 2007 at 1:48 pm
The spacebar on my Acer laptop has TWO metal retainers, one on the top and one on the bottom. So I’m having trouble with this step:
“Install the retainer back in place as it shown on the picture. You have to engage the retainer with the small hooks on the keyboard.”
I can see where the bottom retainer goes, because there are two hooks it has to slide in to. But I have no idea what to do with the other metal retainer.
Can you please help me? Thank you.
Linda
I have a Dell laptop and the little rubber piece in the center of the retainer came off the W key on my keyboard. I have all parts, just don’t know if I should glue the little rubber piece or what. Any comments are greatly appreciated.
Ericka Lee
Wow.
Thanks a bunch. 🙂
Vivian Doan
Thanks for saving my life… this article solved what seemed like hours of frustration wonderig why the damn thing wouldn’t fit back onto the keyboard!
Alan Cridge
I dropped a book onto my laptop keyboard & the G & H key caps & retainers flew off. I tried several times to replace them & spent hours trying to work out how the key retailer reassembled.
After just five minutes of studying your photos & instructions. They popped back on.
What excellent clear instructions! Thank you for putting this info on the net & for FREE.
Anon
I have looked at your instructions, and although very clear, I am having a major problem.
The Caps lock key has come off of my laptop – it appears to be in a similar design to the spacebar. However, it is not the metal retainer that I am having problems with. It is the black bits inside, the bits that cover the spongey thing – is this making any sense? They have completely come off of my laptop! I have all the pieces, but I can’t for the life of me figure out how to fix it all.
I would really appreciate the help if you can, else I’m going to have to face my Dad, and tell him I have broken his laptop 🙁
I just hope I don’t have to pay for it…
Thanks again!
Tony
Where do I find replacement keys for my Toshiba laptop?
Cecil Turner
You so ROCK! I had to do an enter key that my kid knocked off . . . the little pieces were completely indecipherable. But the opposite side shift key was similar, and a few minutes later . . . presto!
I can’t believe how complex the little plastic bits were. And I’d never have figured it out without looking at this site (and a good magnifying glass). Thanks a million.
Rebecca
you are the best, i did a live chat with gateway and they told me i needed a new keyboard and that this was not a known problem. I didn’t believe them, so glad i didn’t. i knew it was just a puzzle to put together, thanks
cj2600
Tony,
You can find most replacement keys for laptop keyboards on ebay.
debbie
thanks you are the greatest!!!
Parul
My Alt key came out along with key retainer tied to the cap, I could fix only after looking at your demonstration. Thanks a lot!
Laura Levy
Are the function keys of a Dell Inspiron different than the other keys? One of mine is crooked and I can’t get it to push down in the front. Another one will not snap at all in the front. The back (or top) of both keys is snapped into place. If you could help I would be very grateful!
KH
My baby knocked out the space bar key today. The last time my wife managed to put it back – took her 30 mins. With your clear instructions, it was working within 5 mins. Thanks a million!
Debbie
Our Foster Kitty (with Mega Claws) tore off 6 of my keys!! Thought I’d have to buy a new computer until I googled…Laptop Keys fell OFF – Here I am, and God BLESS you for such GREAT instructions!
YEaaaaaaaaaa you all are the BEST
Debbie
kate
thank you so much you saved my life it took me a while to figure it out but without your site i would not have my “o”. Every other sight either told me to glue it or pay a pro to do it. Thank you so much for your logical solution!!
darren
thanks you just saved me a £50 repair bill
darren
Adem Gashi
thank you very much… It is a much easier way comparing it with the way the “expert” in my neighborhood repaired the lap top.
spencer
tip – when i tried these steps, the retainer clips (and therefore the key as well) remained stuck in the lower, or “pressed key” state. so after installing the retaining clips, make sure they move freely before pressing the key cap back in.
my clips were sticking at the top connect point, where the plastic bar slides under the metal bar. a little poking with a unfolded paper clip, and i got it to move freely – and the key works perfectly now.
Ray
The O key came off my Compaq notebook (wonder if there’s a problem with “o” – see Kate post #143). Anyway, your site and clear pics showed me what was going on. My hinge and key were all together and rather than take another key off (too scary!!) I figured out the hinge attachment points and just located them and pressed. Voila!
So, although I didn’t follow the plan (and I still don’t see quite on my Compaq if and how the key comes apart from the hinge), your site was a life saver. Thanks!!
Terry
I just wanted to tell you Thank You. I dropped something on my laptop keyboard and the letter J popped off with the retainer still connected to the key cap. I pryed it off and got it back on the laptop and I was able to pop the key cap back on. I thought I was going to have to take it tto the repair shop.
Kayly
umm thanks it didn’t help very much though..my c button
came off and i have NO clue what to do. please help me.
your pictures didn’t help very much because my key retainer is a bit different. If you could give me more descriptive help
I would appreciate it.
todd
just wanted to tell you thanks. my son dropped the laptop and i had no clue how the enter key went back on,but with your website i was able to fix it in about 3 minutes thanks and i will be referring my friend with problems to your site.
KATANAFOOL
YOUR TUTORIAL WAS WONDERFUL! IT TOOK ME A WHILE, BUT I FINALLY FIGURED IT OUT. I WAS PLANNING TO GIVE THIS LAPTOP TO MY WIFE BUT I COULDN’T DO IT WITH A BROKEN NUMBER 2. I RIPPED THE KEY OFF AND I COULDN’T GET IT BACK ON. THANKS TO YOUR TUTORIAL, I PUT THE TWO BACK ON AND IF FIXED THE KEY AS WELL.
KC
nahh it doesn’t work… i mean it doesn’t work for my keyboard, because my son managed to snap it off and he kind of threw the retainer away… please don’t tell me i must fix it up, because it caused a lot of money to fix it. please tell me how to fix it up!!!
nicole drost
my space bar fell off and also m key & the key next to it. (the right) of it. I just purchased the in may & I need it for school. the keys around them are affected by this. what do i do?
cj2600
nicole drost,
If you cannot fix the keys, it will be necessary to replace the keyboard. It’s possible the manufacturer will replace the keyboard under warranty. If you are using this laptop at home, you can attach an external USB keyboard and use it as a temporary replacement.
Ed
Thanks for the pictures!!!…..15 second repair…no trip to the shop…..kids are safe for another day!
Horace Grant
Thanks a bunch!
Wheaton
2 keys popped off but the retainer is on the key help?
Wheaton
one key is fixed but the other isnt and it just wont stick
Atomicprince
WOW! good pix dumb head like me took a few minutes to figure out but got it eventually studying the picture. My buttons were same type as shown in your space bar key. A pix is worth a thousand words? (In this case even a million would have not been enough)My compliments to ya
emrah
thnx u so much who ever you are
joel
HEY – WORKED LIKE A CHARM! My girlfriend has to buy me a beer now!
JB
T Millin
Thanks…I spend hours trying to fix the “J” key that had come off my laptop. Finally thanks to your site it seems so simple….. Thanks very much!
Marius
How about when the 2 white small things don’t exist ? I have a Dell Inspiron, a key fell but there’s no mechanism to snap back in (no 3 parts, just the keycap and the sensitive “button” in the keybord. So there are NO white plastic pieces. When I try, it sits there but will not stay.
Harshavardhan
Hey thanks man.. I thought I had to get a new keyboard when 2 of the keys came off my laptop. I fixed it in few minutes after reading ur tip. Great tip.. You rock..!!
K
I cant get my key cap off, i need to take it off bt i dont know how to do it, its a toshiba tecra A9. any advice anyone?
Marina
Thank you for showing the picture keys, very helpful
Perry Ho
thank you so much for your help! i got my spacebar back on! haha
Larry
Thanks for the info – it worked super. FYI, I was referred to your site by an online tech at HP. Keep up the great work!
Bhavesh
Thank you…I spend hours trying to fix the “F” & “down arrow”key that had come off my laptop by my 6month young baby…:) I have fixed it so easily that i could not belive i have done so. I meant to be spending about £50 to fix this… once again Thank you very much. !
Cheryl
Thanks so much for the info. I was able to repair my son’s laptop with you help!
Steve
Horrible instructions. “Take another key off to see how it’s done, and follow suit?” Thanks a lot, I never would have thought of that myself [sarcasm]. Consider this situation:
My key is sticky, so I popped it off to clean underneath it, and now I can’t get it back on. The LAST thing I want to do is to ruin another key by taking it off.
@ Steve
Then why are you looking for instructions on the Internet. Just buy a new keyboard and replace it smart ass.
And stop eating when you work on the laptop, it will help. Good luck!
By the way, read previous 170 comments. These instructions worked great for many people.
Karen
Thanks! The backspace key, with the retainer attached, came off and I couldn’t get it back on. Your pictures showed me that it was actually two pieces, key and retainer, and that the retainer needed to be on the laptop first. I then got the retainer off the key, easily got it back on the laptop, and then snapped the key into place! So simple when you have a little help from someone who knows! Thanks for sharing your knowledge.
Laura
My F key is off and it doesn’t want to snap back on….any other suggestions?
Lynn
THANK you SOOO much! My N key had stopped functioning (junk underneath), and I knew the right answer was to pop off the key (our cockatiel does it, why can’t I?), clean underneath. Only the key retainer came, too, and without your ace photos and instructions I never would have had the nerve. I popped off the B key and this time only the cap came off, and I could inspect the other retainer. Managed to wiggle it in there with the help of a plastic Bic pen top. Everything works perfectly now!
Heather Rego
I have tried many times to put this stupid key in. This treatment does not work. im switching to geico
James
THANK YOU SO FLIPPIN MUCH 😀
lux
THANK YOU THANK YOU THANK YOU!!!!!!!!!!!!
I have been trying to get that thing on for 2 months now. You have no idea the agony I have gone through. THANK YOU!!!!!!!!!
Vicki
YOU ROCK!
Carol
I think you are a complete genius – I’ve been trying to figure this out for ages and you have just made it so easy. Thanks so much.
moh1356
do u also know how to fix a backspace key on a compaq presario v6065ea keyboard? thankyou.
Laura
just wanted to add to the list and say THANK YOU! my “L” key is happily back in its rightful place!
Ming
TY SO much i got my enter key fixed because of this…the pictures helped SO much..
Meagan
Thanks so much for the repair tip! Got my “r” key back on and working
Connie
Thanks so much. The pictures were a great help. Got my S back in place.
Harry
The “F” fell off my keyboard and thanks to your guide I replaced it in a few minutes and quite alot of searching. THANKS so much, it looks as good as new and does not wobble. Saved me £25. THANKS!!!! 🙂
Rosa
Thanks a bunch. I was freaking out to say the least. It usually costs about $300 and I just snapped it back in.
Miriam
Thank you. I was able to put 2 keys back on.
Aly
how bout a way to fix the esc key!
Chris
Hi great site , only problem is all the keys i`ve seen are different than the one on my Compaq presario V6254ea , just wondering if anybody has any info on how to put keys back on to this type .
Regards
Chris
Mariah
It didn’t help(not saying its bad advice but i have a diffrent computer
Leanna
I just want you to know, your step by step instructions on how to put my popped off space bar were exellent! I love you! You saved my company 50.00-60.00 Everywhere i called they were telling me i had to replace my entire keyboard. All I did was follow your pictured instructions a Viola!
Leanna M
Sales & Catering Manager, Marriott
Larry
I have the exact problem with three keys missing on a Medion MD 2900 notebook. Medion no longer sends individual keys for replacement like they did when I was under warranty. The advice here is great and I am now headed to ebay with high hopes that I can find the indidividual keys I need. Thanks for the good advice here.
kelvin
I have a problem with the compaq presario v5000 shift key..it is different than the space bar..i can send you an image thanks
Joyce
Thank YOU! I was just typing away in the “E” key cap (with the retainer attached) just popped off. Freaked out first of all, then searched and found your website. Photos and instructions were great – had it back on in less than 5 minutes. Didn’t even have to pry off another working key, just noticed, when I looked closer, how the retainer must be fitted into the keyboard.
Thanks again!
Joanne
This helped perfectly! Thanks a lot!
Ken
I’m working on a Toshiba Satellite 1405 Series with 6 missing keycaps/retainers. Is there a source to purchase replacement caps and retainers? Or is it time to replace entire keyboard?
(L-Ctrl, Win, D, B, Pause, down arrow)
Lim Tee Heong
Thanks for the pictures. It helped me fix my popped keys. saved me a trip to the repairer.
Melinda
bless you, bless you, bless you!!!!!!!!!
You have saved my dog from a severe skinning.
lesson learned…. never leave laptop on sofa in a housefull of excitable dogs. Think I will take said dog on a walk now, to lower blood pressure and reacquaint myself with the fact that I really DO love this idiot dog. And yes, I was an idiot myself.
Karen
Wow. These instructions were excellent. I was able to fix my son’s laptop within minutes by following the step by step instructions.
Thanks
jen
thank you soooo much..i didnt think that i would be able to put the keys back myself but the pictures were extremely helpful..JEN
Yokoshima Rika
Thank you so very much!!! My little brother was highly upset and banged his fist on the keyboard and I was left with a missing space bar and Alt key! Luckily, I found them on the floor… and Google led me to this site! Kudos to you and to google!!! Mostly to you!
cj2600
Ken,
I think it makes sense to replace the whole keyboard. You can find the replacement keyboard on ebay for about $30-35.
kelsey
ahhh! thank you! :]
no
another victim of leaping dog. tosh 2007:
1) reattach white hinged retainer.
2) press bottom of key on first seems easier, then press top of key.
(u should hear all 4 corners snap on.)
qumer
Hi my dell laptop button (k) had come off and i super glued it back on like an idiot and after 1 day i went to check on it and it had turned rock solid and i couldn’t press the button in. so can anyone help with what to do now pleaseeee??
Steph
Thank you very much for this tutorial. Kudos to you!
Gary
I have a bronken hinge cover and need to replace a hinge cover on a compaq persario v5000. ANy ideas on where I might locate one?
cj2600
Gary,
You’ll find new hinge covers for a Compaq Presario v5000 series laptops here.
Bliss
omg!!
i fixed mine!
thank you so much i feel like a technician lol
Ben
Thanks for the guide was very helpful.
I now have a few keys I had to replace due to a drinks spillage which is very annoying as some keys go sticky to press. Was just wondering if you knew what the backspace was like underneath as I don’t want to remove it incase there is a bar or something really tricky to get back on, the Enter key took me about 2 hours and I don’t want to have to go through that again.
Help appreciated. Thanks. =)
Brandon
My keys look a little bit different and I wasn’t able to snap them back on easily. I am using a gateway notebook and it took me a long time to figure out how to put the key back on. The top two points were the hardest to snap on. I needed to get a knife and put lots of pressure right where the two prongs connect. It did the trick but I tried lots of times with my finger and it didn’t work. I hope this suggestion will help other people who can’t put the key back on just with your finger pressure. Use a knife and put lots of pressure right on the top two points to get the prongs to sit in tightly. Otherwise you will only have half the key connected and it will fall off. Goodluck
Jess
Well done! Thanks so much for your help!
Granted, this site wasn’t easy to find either…
Chris
This was awesome. I would never have figured it out, and certainly would not had the guys to pop a 2nd key off thinking that I would just make a bad situation worse. You definitely saved me. Thx.
Chris
My wife knocked off the right arrow key on her HP Pavilion laptop.
(Lower right corner) The pieces in your pictures above don’t match. Are there more pix of the HP laptops?
Renato Barbieri
Real life saver! Thanks a bunch for the detailed instructions!!
CDoan
This is such an awesome instructional site. My spacbar fell off and one set of the retainers is broken. Where can I find key retainers for purchasing?
Cary Salusky
You helped me greatly with your info on keycap removal and replacement. My daughter dripped one drop of soda on my keyboard and glued down the up arrow and enter key. Your site gave me the confidence to fix it myself. Thanks!
Robin
Hi..
It was great key just came off and i fixed it using this tutorial in no time
cyril
thanks a lot, it worked. I am grateful
Jeremy Davis
AWESOME. After monkeying around with it for a few minutes I got it. I was freakin’ out because my 1 year old got a hold of my laptop and removed a key. But all is good again. Thanks a bunch!!!!
Raj
Thanks a lot… It was soo helpful… thanks again..
Sarah
the left hinge on my laptop has cracked and when i close it the back part sticks out
the fence looking thingy that covers the vent thing broke off.
if i open the screen to far it looks like the crack gets worse.
i have a v5000 compaq and i looked all over the website and there isnt to much there.
wat should i do?
abdulrahman
thanks very much it helped me very much 🙂
and thanks angain
(i have a fixed keyboard again) 🙂
George
Wher can I purchase a key retainer for my HP Pavilion ze5700 lap top? A key came off but the white retainer broke. Instead of buying a new keyboard as suggesed by the Fleece Squad I was hoping I could just replace the key retainer! Thanks
Chris
I was able to put the retainer back on, but the rubber piece also came off, should I just glue it back?
louise
hi i have broke my 1 key before and did that thing great!
but ma space bar key retainer wont clip? and its broken can u helpme?????
sanj
Thank you so much for you instruction, it saved me a trip to bestbuy after my baby pulled the space bar off.
Al
Thanks for this! i never thought i could get the S key back onto my laptop!
David Brinkman
A hair got caught behind the “t” on my keyboard and I popped it off. I could see the retaining clips but did not have the confidence to snap it back on. I snapped it back on per your instructions but Now I really need to press hard on the “T” to get it to register. Any solution?
Amarinder
Thanks a lot
I was freakin out and just then came by ur website grt. I fixed the key myself.
Thanks a ton
Carlos
Hello i lost the bubble pieceon my k key on my dell laptop where can i use to replace that?
Irving
I don’t have a problem cleaning the keyboard to my desktop. I read that you could put it in the dishwasher (topshelf) and just a bit of soap. I tried it with a board I was going to replace and it worked great. But I realize each time I do it I could ruin the KB and I accept that.
Now I’ve spilled a little something on my Laptop’s kb. There is no way I can afford to replace the laptop. Can I just pop a key off and clean under it and then pop it back on? I realize that it must seem like a stupid question but the last time I had a laptop worked on it cost me $120 ($60 to even look at it plus $60 an hour.) When I took it back because it still wasn’t fixed they told me they would be happy to keep looking for the problem. (Like Hell.)
Thanks
ID
Chris
Thanks so much. I didn’t glue back the rubber piece, just placed it carefully after replacing the retainer and tapped down the key cap. It’s working great.
Steady01
Cany anyone help me my o key came off my laptop however the key retainer stayed on, im just clueless about how to snap the key back onto the keyboard
Sasha
OMG i can not belive that this site just fixed my alt button on the left side. I’ve been tryin for like 2 day until u helped me! I have 3 laptop and 1 desk top and I just want tostay on my laptop instead.
it was funny 4 a minuete
lastnight me and my cuzin was playing on our webcam but thats wen the button fell out cuz i thougt i could easily fix it bac but no,no that time. so my dad came and he was like let me see ya cumputer real quick to check sum thin so i took like 20 min to just dont give him my cumputer but my cuzzin’s…………………………………………that wuld of been so many trouble 4 me, he just boughtme this a week ago.
sujit
Really Very Helpfull………………..
cj2600
Irving,
It depends on how much liquid you spilled and most likely the cleaning will not work. Laptop keyboards are different.
What laptop do you have? Make, model? Maybe I can help you to find disassembly instructions and you can replace the keyboard yourself, it shouldn’t be very difficult. If you can find a new replacement keyboard yourself it shouldn’t be expensive either.
Stephanie
I suppose if the tiny little metal hooks that are physically on the keyboard are missing, then I am SOL. I was ending them back up and they broke off.
Thank you for your help.
Cathy
Thank you… that key was driving me crazy!!!!
How easy to fix using your instructions
pelin
hi!
ita about my friends fujitsi laptop.yesterday we spill drink,but wasn’t much!!!
then we tried to use hairdryer!!well we shouldn’t of!and some buttons came off.because of the heat (he was busy talking and got too close to the keybord!) they are out of shape and we can’t snap them back!!hoe do we reaplace it?
thanks
ozzie stafford`
how to replace key cap ibm series
“i” help
veronica
This information GREATLY helped me; my “E” key had been a bit wonky and falling off all the time, so after a yahoo search and navigation to this page, I figured out how to properly snap my key back on…with the help of a piece of band-aid wrapper and super glue (because it had a minor break) and now it is perfectly functional!
I would like to thank who ever made this page; its absence of the ambiguity other sites display saves me from ripping keys off intentionally out of frustration, THANK YOU!
robert
thanks for your instructional pic’s n stuff………made my laptop as good as new again
leonie
thank you. worked for me, because i broke and fixed my mums laptop without her knowing.
JK McZoo
Thank you. My toddler pulled a bunch of keys off my brand new lap top that we can’t even afford. I need to sell a bunch of stuff on eBay to pay for it. Well, can’t easily list items on eBay without a functioning keyboard! I thought I’d do a google search for a “fix-it website” and here it is! Not easy doing the search, either, with missing keys! But, the bottuns still work, yay! I got them all on, and had to look up several pictures of keyboards to figure out where some keys went. Had to prented to type, as well, to remember where some letters went! Then I find some plastic parts under my shift key are busted and bent and the key won’t stay on. HP says I have to buy a new keyboard or laptop, they don’t sell the parts! Nothing remotely on eBay, at all. Set up a Favorite Search, but any suggestions, in the meantime?! They are cracked, and slightly bend, so it’s all there, it just doesn’t function very well, and pops off. It’s livable, but annoying. Can you superglue or tape? Doesn’t seem like that would work, as they are so small, and afraid of what the gook might do to my laptop underneath. Please, advise!
Mindy
I AM DANCING AROUNG THE ROOM ROGHT NOW…IT WORKED. I HAVE BEEN TRYING FOR MONTHS TO GET A KEY PUT BACK ON AND COULDN’T DO IT. YOUR INSTRUCTIONS WERE PERFECT. EVEN WITH LONG NAILS , I DID MYSELF, YOU GUYS ARE WONDERFUL.
THANKS SO MUCH FOR PUTTING THOSE PICTURES UP, ABSOLUTELY PERFECT.
Sherry
Wow! thank you for the photos and making it simple to replace the laptop keys!
Oleh Kusyy
Dear All,
my Toshiba Satellite A60 keyboard stoped working. No button works. I tested the keyboard on another computer and it is ok. The problem is probably in the mainboard.
Could anyone suggest how it could be repaired?
Please, any suggestions.
best,
Oleh
Deubs
Thankyou, This allowed me to fix my girlfriends keyboard. She will be very happy, nice work 🙂
Margaret
Thank you so much! My toddler thought it was a blast to pick the keys off. Your website helped me replace the keys in less than half an hour. I have a little coordination for detailed work such as this. Keep up the great work!
Sandra
It has not really worked. 🙁 I have accidently broke my d key and it will NOT come back on!!!!!! One white bit is off, and the other white bit is on. I’m trying to fix and put the other white bit on. My uncle knows how to do this. I wish he was here right now. He can do it in like, 10 seconds practicly!! He know nearly everything about computers. Please!!! Someone help!!! I try to snap the d bit on, I hear a clicking sound, but then I notice it has still not come on. This has been about 6 keys falling off!!!!!!!!!!!! Boohoo! :'( ;(
Rose
Do you have instructions to put the spacebar back on a leveno t61p?
Jeni
Thanks soooooo much!! I can use my n key now!!!!
Keely Smith
I just need the key retainers. My cat pulled off two keys and I put one back on and the other one was broke. I forgot to close the lid and he even fell asleep next to it and when I got home there he was asleep next to the laptop. I have a toshiba and I have looked everywhere and then I came across your web site how cool is this you even show us how to put them back on. Where do I find the retainer clips for the keys.
Thanks, Keely Smith
natalia
OMG this isnt working! 🙁 and my parents are going to kill me!I need help fast !
natalia
Im hearing the snap when i put the key on but it keeps on falling out anyway
Alicia Busby
Thanks i am like so glad you helped me fix my laptop i was going to freak, by the way i broke my “d” key types so great!
dddddddddddddddddddddddddddd!!!!!!!!!!!!!!
Tae
Ya know, I thought about throwing away my laptop (I could have used another one) until I read your article and saw the pics. Who would have thought to take off a “working” key to see how to reassemble the broken keys? DUH!
I was able to fix my laptop if you hadn’t guessed. Thanks!
Stacey
That was so simple and easily explained. You probably just saved me 80 bucks tech labour charges!
Mary
Thanks for your help! I thought that I would have to live with a missing “:” key, but thanks to your tips, I was able to snap it back on!
daizy
doezn’t work for me :(( HP laptopz zuck!!!
Eddie
What happens if the part that you press down on sorta, kinda, got ripped off? Like the part that is under the key itself? I have to copy and paste my “c” now. Do I have to send my laptop back and get a whole new one? Please reply to me e-mail at 09perrye@wcasd.net. Thanks!
Ansley
Um, yeah. I just want you to know that you ROCK – my spacebar was driving me ABSOLUTELY NUTS…thanks to you, it’s all better….see!
Thomas
Great… any advice on the Enter key? There seems to be a combination of large key & a weird metal u-shaped clip too, very hard to position. Plus it’s on my girlfriend’s laptop (was trying to replace backspace!) & I may soon be lynched if it’s not sorted… :-S
Donnaq Jankowiak
Can someone please help me. I have a dell I borrowed from a friend and one key game off then I followed the directions I quess I done it wron and the second key the retain game of with the key. For some reason when I get to the point of getting the retainer back on I canot snap the key. On this computer the retainer is so thin and slips and slides. Help me please What am I doing wrong
Donnaq Jankowiak
Can I glue the key and will it stil work Help I in trouble
vinil
thanks for this guide. was very helpful. keep the good work running
dianne
Thank you so much! I was able to replace my “f” key on a hewlet packard ….the plastic parts were very thin, but i was persistent. they actually have just three connection points: one on the left and two on the right side. merci merci!
Heinrich
THANK YOU !!! It works great !!!
DALE
thank you, thank you…The space bar bit saved the day, I just couldnt figure out how to get it back on, you take the clip off !!!!
Nicha
Thank you!
Thank you!
My A key cover is replaced. Such clarity you provide.
Thank you again.
Location: St. Vincent and the Grenadines
rrrrrrrr
rrrrrrrrrrrrrrrrrrrrrrrrrrrrrrrrrrrr
rrrrrrrrrrrrrrrrrrrrrrrrrrrrrrrrrrrrr
rrrrrrrrrrrrrrrr
YES I DID IT
NICOLE
THANK YOU!!! I WAS TOLD I WOULD HAVE TO SPEND $200 TO HAVE MY KEYBOARD FIXED. I WAS ABLE TO FIX 5 KEYS BY MYSELF WITH YOUR SIMPLE INSTRUCTIONS.
Harold
Easily replaced my ” I ” key on my HP laptop. Thakks ,repair shop wanted $165.00
diana
thanks so much! i didn’t realize the keys just snap back into place!
Rex
Hi,
well i have a problem with the caps lock key it fell off and it’s kind of different from the pictures above i tried to snap it back in but it din’t get proper installed and it’s not steady. so i may need other instrutions to get that fixed any help will be really apreciate.
Thanks in Advance
Rex
hi
just so you know my caps lock key is like the shift key that can be seem in the firts picture you show
Faith
Thank you so much! The Fn key fell off my IBM ThinkPad last night and the mechanism behind it was in 4 pieces. I was totally stuck as to how to fix it but I did as you suggested – carefully prized another key off – and I could see how to reassemble the Fn mechanism. It’s now as good as new!
Rex
Hi,
Please help me with the caps lock key or in your case shift key, i put back to place but is not steady and it is annoying to have that key like that please help.
E W
How do I put the enter key back on if the little white retainer is still attached to the keyboard?
Dian
I got my down arrow to go back on to my Compaq but now it wobbles really bad and wont stay straight it falls to the sides but its still attached. Is there anyway to remedy this or do i have to buy a new one?
Dian
Found the problem. The retainer apparently has a bar in center which keeps it from moving side to side and keeps it flat. I guess im going to have to buy a new one. Is there anywhere i can get one? Just the down arrow key?
SaCorznn
I actually lost 2 keys on my HP notebook.
Where can I buy replacement keys?
Michelle
Thanks you so much. My son was banging on one of the buttons and it actually came off. I managed to get it back on thanks to your guide. I was a little scared to put it back in incase I broke it but luckily after about 10 min. I got it in. My keys were slightly different than the pic but it really worked as a guide. Thanks again.
Jamie
THANK YOU!!!!!!! My 2 year old got a hold of my laptop and pulled about half of the keys off, including the space bar and command keys. It was a headahce just to remember where they went, lol. Most of the buttons were easy, but if it wasn’t for you I never would have gotten my SpaceBar back on. THANK YOU!!!!!
Crystal
Thank you SO MUCH for this page! I probably would have thrown my laptop across the room in frustration if I didn’t find this page. Thank you!
Ravi
I was in need of help to replace the sparebar key and it was very easy because of this website..Thanks
saju
My 1.5 yr old kid managed to grab the spacebar key on to his hand and I was trouble in placing it back. Then I did a google search and came to this site. The pictures and instructions really helped me to put it back – it took about an hr to get it right. my toshiba’s spacebar had a second metal gripper too, (almost an O shaped with a little gap at the top) and I didnt know how to snap it back. But this second one was not really necessary to be taken care of – just left it as is. I just needed to remove the 2 square pieces from the key first and place it on to pad, so also the outher metal c shaped thing and then take the key and snap it back to a click.- SUCCESS !
Thanks once again to this site- and of course google.
Victor
Thnx for the help! You guys have great tips on fixing laptops.
Lisa
Thanks so much for your help! You saved me the $85 for a replacement keyboard. 🙂
Sussy
Thank you this was really helpful, i was able to fix the key that fell off… feel so accomplished… specially since i’am completely clueless when it comes to computers.
Brynja
Thank you very much! My down-arrow key came off but I managed to fix that thanks to your instructions.
Helen
If this has fixed my space key then thanks, just look at the spaces I can make now it is fixed!! Thanks I had lifted completely the wrong bits before the photos are great.
James Butler
Hi
In the pictures for keyboard repairs it shows a while plastic retainer. Where can I find those or where can I order them. I have one that is broke for my spacebar and need a new one
katie
hi
two of the keys have fallen of my laptop and the clip things that attach it back are broke what do i do?
carmen Mills
I went to the web site to replace my spacebar and it do not look like the picture I have to bar onelone and one short and the dont bend the ends are straight can you help me to replace this one thsnks
Eric
my alt key fell off my inspiron 1501 and i can`t get the top of the white thing to go back in
Andreas
Short version, thank you very much!
rose
thanks soo much my spacebar was shaped a little different but ur advice still worked im coming to this site for any other problems i have from now on
sophie
how do i fix a letter on my laptop key board because i am scared 2 take another letter off incase it dont go back on
Heidi
Unbelievably helpful!!! Thank you SO MUCH (she is able to say, with a fully functioning U key)!
Julianne
You are a wonderful human bean. 🙂 I have been missing my “p” key for a couple of weeks. Do you have any idea how many words use the letter “p” ? Thank you so much!
tamara
thanks a million times over and over again! Hope you receive well deserved satisfaction from helping so many with this. You are appreciated!!!!! My “A” thanks you, too. He has been causing me all sorts of distress.
suhair
plesse i have problem on letter H and u and numbers 123 , how can repair.
thank you
cj2600
suhair,
This sounds like a problem with the keyboard. You’ll have to replace the whole keyboard.
Danny
Hi. My up button has this problem and fell off. I did what you said and took one key off and did it with the down button. I have the retainer and the cap but the thing is the little black thing in the middle of a key is off. I have that as well with me. I looked at the down button and the middle black thing is fully attached to it.
Does that mean i can’t do anything about it? If yes, how are you suppose to attach the 2 pieces of the retainer together?
thanks.
cj2600
Danny,
Are you asking about the rubber membrane under the key? Try gluing it in place with superglue, you cannot make it worse as it is right now.
I think that’s why you removed the cap from the down button, so you can see how the retainer is assembled and assemble it the same way for the up button. Am I missing something?
Danny
Is the rubber membrane black? Its a very small black thing… looks like a crump. It is fully attached to another button on my dell laptop keyboard.
Yes, i do not get how you attach the 2 parts of the retainer together. Am i suppose to take one of them and connect it to the other? I tried every way possible. I do not understand how you attach the 2 parts of it together.
In your key cap and key retainer diagram, assuming we just look at the key retainer where we see the 2 parts, assumign the one of left is 1 and the one on the right we call 2. Am i suppose to put 1 inside of 2? I do not get how you stick both of them together before you plug it back into the keyboard.
cj2600
Danny,
I think we are talking about different key parts. Take a look at the third picture in the post. Do you see a black nipple (membrane) in the middle? That’s what I’m talking about.
Yes, they have to be attached to each other.
Yes, the part 1 goes inside the part 2. The part 1 has two small pins on both sides, right in the middle. Do you see them? The part two has two small holes on both sides (inside). When you assemble parts 1 and 2 together, pins on the part 1 go inside the holes on the part 2 and both parts work like a small hinge. Maybe the part 1 in your case has broken (missing) pins on both sides?
Danny
hi again. Yes i see the black nipple membrane.
And yes i see the 2 small pins on part 1. I also see the 2 slots i am i suppose to fit it into part 2.
Its suppose to be very hard to fit it in right? I am trying it over and over again but it is so hard to fit the pin inside.
Mitzi
Thank you, thank you, thank you!!! I have had my key come off before and just snapped it back on but this time the retainer came off as well. I’m in law school and use my laptop every day. I was really stressed about the thought of having a missing key for any extended period of time. I can’t thank you enough. The pics were invaluable!
Shelby G.
I have an Acer leptop with the control key popped off…the retainer does not pop off the key…I can’t get it back on, could anyone help me?
MissAmyQ
This was the most USEFUL page I have ever seen for this. I was panicking when the key fell off and was pretty upset. With the pictures and great directions, the key went back into its place in less than 2 minutes. Thank you so much!
jenna
I have a lenovo, and i can’t seem to get the key to pop back on. the retainer never came off, but the key won’t seem to pop back on for good…it’s all wobbly…help?
Nick L
@jenna, It seems that one side has attached while the other hasn’t you need to push down harder(it will surprise you how hard you have to press) to get the other side to attach.
chris murry
i have a hp dv6500 and some of the keys have fallen off but the retainers are still in place. i tried pushing the keys back on to the retainers but they just snap back out again when i press them. just wondering if anyone could help me with this problem?
Jill
Wow! You just saved my h-key!!! It was really hard to put it back on, but this helped a lot!! Thank you so much!!
Ellie
I have an acer laptop..and i still cant seem to get my 1-key back on the keyboard…
Ellie
Never mind! I got it! :]
Thanks a lot!
C Flann
DO NOT LISTEN TO NICK L!!! So like i tried pushing really really hard to get the other side to attach like he said, well i ended up breaking the retainer!! Don’t do that! I really don’t know how to get the other side to attach but obviously not like that! now i don’t know what to do!! can i get just the retainer?
Thuan
Two keys came off of my PowerBook G4 15″. I found this site via Google, read the instructions. Took me 15 minutes but I did it. Woo Hoo! I’m very satisified. Thank you!
angela
Please, I spilt coffee on keyboard now my (comes after y) key and (comes after u) key don’t work, what can I do?
Sameh
It didn’t take more than 10 min to fix the ‘A’ key in my Dell LATITUDE D620. It was straight forward like the first 4 pics in this page. Thanks a lot.
cj2600
angela,
First of all, don’t use the laptop like that. Unplug the power adapter and remove the battery. I you spilled just a few drops, let it dry overnight. Make sure the keyboard is completely dry before you plug in the laptop.
If you spilled a lot, it will be necessary to disassemble the laptop and take a closer look at the internal parts. I would recommend taking it to a professional repair shop. Liquid spills are very unpredictable.
Manohar
Thank a lot. I could repair my laptop by your guidance. It was wonderful.
harvey hou
Thanks. It is really helpful.
Smellyellybumbum
Legend, fixed it!!!
Susanna
Thank you! I successfully repaired my space bar key! (it took me over 10 minutes, but I didn’t need to pay a technician to fix it for me!
Jay
it didnt help ,me at all u didnt exactly state which goes in first .and i cant afford to remove another cap bcuz what happens if i cant fix it now i wuld have 2 keys that r messed up.plz help me
Jay
and also dat little black thingy came of as well.plz help
cj2600
Jay,
Then it’s time to take your laptop to a repair shop. Most likely they will offer to replace the whole keyboard.
Dean
Thanq you I qan finally use the QQQQQQQQ button on my keyboard again. It took me 20 minutes to figure it out my problem was I was snapping the parts in and then trying to put the key in place. but thanks to your little guide I figured out
That I had to put the parts in place then snap the key onto the parts.
Thanks for the help!
Jay
im just a kid i dnt know any repair shops,i bought this laptop from walmart
Jay
well do you know where i can get a new key retainer bcuz it appears The 2 are suppose to go into each other but one of the small part thats suppose to go into is broken(The smaller center retainer)
cj2600
Jay,
Did you try ebay?
Harald Baumann
what an amazing site!!!!!!!!!!!!!!!!!
the internet, intelligent people and competence
all rolled in one!!!!!!!!!!!
congrats to their effort and a b i g “thanks”
to them
with kind regards
harald baum ann
Jamie
Thanks! My husband will think I am so smart! 😉
xue
thank you so so much! i had four keys that had been coming off for a month now and i just was able to fix the problem. thanks again!
Brent
My method worked just fine. I just sat it on the spot and mashed it by pushing it in various arrangements.
mmiles
Thank you! I spent 2 hours trying to get this to work while looking at your site and it does! Mine was for the backspace key, but it looks similar to the spacebar key in your picture.
Elisabetta
Thanks!!!!!!!!!! 😀
Jane
Thank you soooo much! This really helped!
Kim
Thank you! You just saved me at least $60 and a trip to the repair shop. Much obliged for your very well laid-out instructions!
Megan
I can’t get the key retainer to snap back into place! for some reason, its just slightly too small… In the process of trying to fi_ (haha i can’t type ecks because that’s the offending key) this the springy rubber thing popped off. Now i’m really in a pickle… suggestions?
AJ
THANKS! My spacebar just fell off and I couldn’t figure out how to fix it! I have to take an exam on it in two days and was freaking out! Thanks!
David
Great. I followed the advice, and now I have 2 f%$*ed up keys.
phuq
cheers mate – you just saved my mate killing me & my cat [he jumped on his keyboard!]
julee
ok, but what if the key cap assembly KEEPS falling off? can i use crazy glue or something?
cj2600
julee,
Try replacing both the cap and the retainer (small hinges under the cap).
pam
thanks so much it worked like a charm!
Nick
Wow, glad I found this website! Thanks! worked like a charm
Mike McNamara
Hi,
One of my key caps came of on my Dell D820 and the Key Retainer is broken. Any idea where I can get one on line?
Great web site.
Justin
Thanks a bundle! I kept trying to put the key cap with retainer already attached on. Great photos too. Firm but gentle and your very clear guide did the trick on my Pangolin from system76.
Geraldine
THANK YOU!! I have a 2 year old who can’t stop playing with the keys… Great instructions, and pictures…
Billie
Thanks a million. I can’t believe I fixed it myself!! You are great!
Such clear instructions and pictures. I wish you did directions on everything in life!
Tregan
Thanks vvvvvvv much, by following you clear picture and word instructions, I manage to put my SPACE Bar back into place and it is working in perfect order.
Every blessings
Brent
Thank you! I “knew” I could fix it myself. It only took me a half-hour to realize that I needed help. One Google search, and voila! Thanks again. Great site!
michele robb
THANK YOU THANK YOU! YOU TOTALLY ROCK
hayley
thanks alot .. worked out great .
Dhruv
I was stuck fixing my laptop key for hours and hours. Gosh I should have visited this website before hand. With this website I fixed the problem in 5 mins.
Thanks a Ton!
AWS
To anyone who needs to get new key parts, the link the author tells you to click points to eBay. If for some reason the link doesn’t work just go the main eBay site and type relevant keywords into their search engine.
I got my new key pieces this way and saved myself from having to send my laptop away to HP for them to replace the whole keyboard.
super111
This is an awesome article, thanks for helping me fixing my keyboard!
Ani
Thanks so much! By following these steps, I figured out that the retainer under the “1” key had been damaged when my cat jumped on it, and that’s why I couldn’t reattach the key. I borrowed the retainer from underneath That Key next to ALT that I never used anyway. “1” key is in good working order. Thanks again.
Asher
FYI, the “useless” key is not “useless” at all. It’s the menu key. It acts as a right click when something is selected, so if you click on a file and press that button, it will have the same effect as right clicking. I use it daily.
cj2600
Asher,
Could be. But I don’t use this key at all. So, for me the key is useless. 🙂
Ryan
Thanks sooo much cj2600!! My “t” key fell of with the brace still on but the small metal hinge to hold on the brace was faced up so it was not catching. After looking at these pics I removed the “y” key and found what the metal hinge looked like, this really helped, very happy now!! Thanks once again
justin
thanks man! my W key is working again. although it took me 2 hours as i only had n steak knife and big hands to work with.
Bonnie Talcott
I’m sorry this isnt about this item.
I was wondering if you could get or at least tell me where I can get the plastic thing/retainer? under a lost keybord key? My daughter had a fit and knocked off 3 keys. I have them all but my dumb dog ate the clip. All I need is the plastic thing and Toshiba says I have to replace the whole keyboard. It a Toshiba P205 Any help is appreciated and I understand if you can’t help.
Thankyou very much, Bonnie Talcott
The one’s here aren’t the right ones
Gina
My problem is a little different–my spacebar juststuck after cleaning the laptop and doesn’t work now (I am copy/pasting spaces in).
I tried but can’t pop the spacebar off and didn’t want to force it–any thoughts as to what I could do short of attaching an external keyboard?? I can’t copy/paste forever.This is a Gateway laptop.
Jasmine
THANK YOU SO MUCH. I REALLY APPRECIATE IT I HAD TO REPLACE THE RIGHT ARROW KEY.
THE PICS WERE A GREAT BIG HELP….
andrea
oh my god.
i am so thankful for this website.
i was doing all this stuff and my space key didn’t workk.
but then i read how to do it here and its working like i just bought a new key.
thank you soo much
cj2600
Bonnie Talcott,
You can buy a single retainer for your Satellite P205 laptop here.
Christine Ryan
This was a FANTASTIC help! Genius!
Bob Taylor
Thank you so much for your most helpful instructions. You saved my day. My young son pryed off 3 or 4 buttons and I thought I was headed to the local electronics store maintenance dept. Your pictures were clear and your instructions succinct. You are a blessing.
Marni Chediak
DITTO to 384 Bob Taylor! These instructions saved my sanity. My 2.5 year old just removed the “M” and “O” keys this afternoon and I was not a happy mommy until now! Thank you thank you!
JD
tks for the tip – i was panicking for a bit, until i found this. sometimes it’s a bit more difficult to snap back the key on the retainer, but at least knowing the theory helped me do it. tks
nickolas g
thank you so much! i didnt relize it would be so easy to fix my keyboard!
Jeff
Thanks! You saved me a lot of awkward keystrokes!
mandy
one of my keys is stu_k and i _ant use it. i _ant get it off or put it on properly. what do i do???
Laserbeak43
Thanks!!!!
Saved me BIG TIME. the baby just ripped 20+ keys off of my new laptop!! If only i would have thought about searching for something like this when my older son was ripping apart my older laptop!!
Jessica K.
Hi can you help me with my keyboard on my laptop i pushed some buttons on mistake and know some keys work and some dont im using an on screen keyboard to write this. this is what happens when i press a button nHY^ that was only one button and 3 letters came can you please help?
Mark
Hi im just wondering if any one knows how to type an @ symbol if it isnt working. is there any other way apart from using shift?
Mit
Hi, please could you tell me what glue you used to fix the silicone membrane back onto the keyboard? I’ve heard that there is a “special” glue I’m supposed to use. Any idea? Or is superglue just fine to use if done sparingly?
Thanks!
cj2600
Mark,
I guess you can enable On-Screen keyboard.
For Windows XP: Start button – Accessories – Accessibility – On-Screen Keyboard.
cj2600
Mit,
I’m not sure about a “special” glue. I used just a little bit of regular $1 superglue and it worked fine for me. I guess you can use any universal glue just use it sparingly.
Jennifer
Well, it started with the backspace key. Now it’s the backspace and enter key lol. But I’m gonna keep going. THanks for the tip!
Yenaeos Lykos WolfClaw
Thank you so much! My backspace key fell off while I was investigating why the backspace key wouldn’t work. It works fine now that I put it on correctly. Thank you!
Ian
use the on screen keyboard in windows to type the @
Gene
duude thanks sooo mcuh
Marie K
Thanks for the great instructions on how to reinstall a key. The photos made all the difference!
Thompson
Thank you very much! With the info and the pictures you provided I have been able to fix my key back in the keyboard!
Simone
Thank you 🙂 my toddler broke a key and I was able to fix it following your pictures and comments.
terri
Two kids who love PBSKIDS.org, one toddler who likes pulling keys off and a distracted mom trying to make lunch= three loose keys and one broken retainer clip. The pictures were helpful and the idea to use a “useless” key great. Thank you!
irfan
thanks folks
Jareb Collins
I am soooo happy! I was told I had to replace my entire keyboard, and I was able to fix the key that fell off last night because of this site. THANKS!!!!!!
Paul
Thanks or the tip. I could fix my laptop key myself.. thanks alotttt
Sian
thank you!
My spacebar fell off and when I just out it back on it would only press on the middle
then I found your instructions and followed them and now it’s easy again
=]
nasib
thanx a lot…..it was reaaallly a great help…my cuz gav me to fix sum software prob…but somehow 1 key came off….i wud hav been dead if diz site wasnt here…..thanx a zillion…keep up the gud work
Adios
Michaella Hannant
Your advice is amazing I fixed me keyboard in sec’s.
Thanks a million for your clear, straightforward advice, brilliant.
nick
thanks !!! worked on the inspiron 1520
Diego
Thank you so much!!!! I am not the best at this and was able to do it!!
sanz
Hi,
Thanks a lot. This solves my problem.
keith
very helpful
THANKS!!
Gus
A very simple and effective explanation. I never thought I would find out about the membrane.
Some water spilled on my laptop keyboard, after taking several keys off and blasting them with the hairdryer…one key was still looking worse for wear. The “z” key had what looked like water inside, but I couldn’t tell if it was water or silicone :S… anyway…I cut the membrane off with my girly fingernails and then dried the water out. VOILA!!!!!!!!!!!
Thanks for this brilliant user guide
Ehime
I broke the withe little pieces ToT I don’t have down arrow anymore….
Poor Guy
Man.
You saved my life. My son pulled out a key (and all the multiple pieces user it) to eternity, when I was working on my WIFE’s laptop.
Would have gone without dinner tonite. Thanks for ALLLLL the help.
🙂
pj
Mike R.
Thanks! Helped me fix a friend’s Satellite.
Thanks again.
diane
thanks so much. I struggled for fifteen minutes trying by myself, and fixed it in 5 seconds after I read your post.
Oh noes, my keyboard
When I first ‘accidentally’ broke the key board, i was scared because the computer wasnt mine, it was my dad’s.
I was afraid he’d beat me with a stick if he saw it.
But i found ur website and fixed it b4 he came.
steve
Hi my baby pulled one of my keys off and broke the the corner on the metal clips that is on the laptop.. can this be replaced?
Sorabh Saxena
Dell Latitude D520
Key O which pulled out myself 🙁 trying too much to clean the small grain which i felt went in betwee, i struggeld so hard to figure this out, but to tell you the truth reading through this didnt help much because there werent any four hooks on my laptop, anybody facing issue of such kind with the above laptop. Check the above pics and see how to build a retainer,also remember the key goes last and it HAS TO SNAP to get affixed, but since in the above laptop there are no 4 hooks, there is one hook in the top center and 2 hooks on the bottom half of the key. first fix the top center, which i couldnt make the plastic hook go underneath it, i didnt have any tools and i almost mauled the plastic strip, scare that if it breaks i am done for, i had a presentation and i dont know what would i do. So i used a kitchen knife and gently i mean GENTLY wrenched the top centre metal hook just enough so i can slide the top of the plastic retainer under neath it, i used the same knife to bend the hook back on the plastic, there that was the trickiset part. Then slide the other retainer around and over the one beneath, attach them on their middles, and you would notice the retainer which is underneath the metal hook you just tightened upon is now putting its legs up in the air for you to slide the key on top of it and press to hear the magical sound of Snap !…:) . thanks for the post above , may god bless you.
Thanks
Sorabh
cj2600
steve,
Man! Your baby is strong! 🙂
I think you’ll have to replace the whole keyboard.
Erin
Thank you so much! My X key fell for some stupid reason a couple months ago and I fought with it for awhile, got fed up and gave up so I have been pressing on the little black button ever since… Got tired of it today, found your wedsite and got it snapped back on in no time, thank you for fixing my frustration!
Janet
mine is a panasonic touchbook laptop…and my spacebar fell off;how do i fix it?:(Pls help me!!
lc
thank you!
Jayson
You totally saved me! I missed the metal retainer bar on the space key and your instructions shined light on it.
Tim
“Q” popped off while wiping down the laptop, I just about had a stroke… first return on Google and the photos are excellent, thanks so much!!! qqqqqqqqqqqqqqqqqqq 🙂 works great again
Neha
Many thanks!
Extremely,extremey useful!!!
Nitin Khanna
Hey Thanks Man!!! I just fixed my W key on my HP dv6000 series Lappy with your help… Now I can use my W over and over and over again!!!
WWWWWW hehe
Bhaichung
Thanks for the instructions.
Renee
Thanks so much for this information.. I was able to repair the key myself!!! I’m so thankful!!!!!!
Blaine
THANK YOU! My dog jumped up on my company laptop today and popped off a key, I thought I was dead, but you saved the day!
Thommy
Thanks, it worked on one of my keys but it still doesn’t work on the End key.
Jessica
My Z key popped off my Toshiba laptop and the retainers were all jacked up but I was able to fix it thanks to your photos.
Thank you so much!
vytas
my hp pavilion dv6000 right shift has dropped off and i cant put it back
Melvin
Good and nice guide.
This is really helpful!
Thanks for sharing your experience!
flower
FANTASTIC! thanks!
Ron
THANKS — that was easy … once I saw the graphics.
SOMBODY
SOME HELP YOU ARE. I NEED SOME HELP WITH MY KEY. HOW DO U CLICK IT BACK ON
Cindy
Thanks so much! My dog scratched her paw on my keyboard, trying to get my attention, and took out my down arrow and the little retainer pieces, leaving me with no idea how to put it back together. I was able to fix it with your instructions and photos. You rock!
Angela
OhMyGosh! Thank you so much! I fixed the key before my mom found out. You totally saved my life. Thank you!Thank you! Thank you!
george
thank god i found this guide. i feer i would have ruined my key board forceing keys on wrong 🙂
emery tallon
my laptops space key wont reconnect correctly . what should i do?
Shelly
Thank you SOOO MUCH for putting this information and illustrations on the internet. My space key all of a sudden stopped working today. I searched frantically for quite awhile on google for possible answers and finally came across this. With your helpful advice with the pictures, I removed my space bar key, did a little cleaning, but the spring pieces back on, then snapped the space bar back into place. YES!!! My spacebar now works again!!!
I feel like this article has saved my day and probably an un-needed trip to take my laptop in for a checkup, not to mention possibly buying a new keyboard when it was not necessary! Thank you again!!!!
liam
Great info. Thanks a million.
Thanks to your pics, managed to get keys off for cleaning without actually breaking anything.
liam
Kenya
Thank you so much! I was freakin out, I just kept thinking my husband is going to kill me if I break this laptop.
Cathy
Thank you so much – i had called a local store to ask how much it would cost to repair my keyboard – i would’ve had to pay over $120 just to fix a few keys – i thank the Lord i found this site…God bless..
K
Thanks a bunch. Very helpful.
Edyta
Thank you very much!!! I fixed it… so relief…I struggle to fix then I found this web site!!! Great instructions!!!!
Christa
Thank you so much! my dad tried fixing the keyboard but he couldn’t and then I found your website 😀
Thank you,
Alyssia
Thank you soooooooo much!!!!
Brian
AMAZINGLY HELPFUL!!! I had no idea how to assemble the key until this site!
C Williams
I have a Gateway MX3215 which I totally disassembled to replace the DC Powerjack. It has been 5 months and I can’t remember how to reassemble the darn thing (what needs to go in first or which screws to use for what). Can you help?
Thanks,
ponpon
Great site. nice pics. solved my keyboard problem.
Thanks
petri
this is amazing. Clear photos and instructions and fixed my keyboard in seconds. thank you so much.
Liz Troiani
Thank you so much!!! We love you right now . I would have never figured that out…Thank you again.
Jessica
OMG, this saved my life! Thank you!!
Annet Rajan
thank you so much..
i wouldnt be able to thank you without my “T” hehe!
thanks again 😀
Daniel
OMG! This guide is insanely good, make more of those, i got my space bar to work again 😀
Thank you soooooooo much 😀
rita
i have an averatec laptop, wanting to purchase the “tab key” and the plastic parts that go underneath it. where can i get it?
thank you.
Ricky G.
Man my comma and x fell out and this really didn’t seem to help me…The rubber piece, I cant put it back together Ive been spending 3 hours per day for 4 days and I havent had any luck..Plz help when I assemble it the way the other ones were it still is different..Im so frustrated!!
Emily
Thank you so much!!!!!!
FallenAnjel
Thank you for this site. Just so happens, it was the S key for me too!! LOL… my 6 yr old popped it off, he said it just “fell off” hahahahaha… 😀
Renielle H
I had a little accident with soup and my laptop (I know, thats why its not a good idea to have food and drink near equipment). I found your site in a search and it helped tremendously.
Thanks so much for the info. I thought I would have to pay an arm and a leg to get this fixed.
Great site keep it up!
sch87
thanks a lot..this page helped me a lot!!
kevin
thank you SO much this just fixed my laptop!! it was my F key
Margo White
I was unable to figure out how to fix my “A” key for about 2 months. I am so glad that I found this website. It took 5-10 minutes to fix my keyboard. I loved the fact that there was picture for each step. Thank you soooo much.
Dave
took me 10 mins! Thank you so much. Without this site I would have no “S” key at all and woulnt even be able to write this sentence.
Don M
Glad I found this site…it saved me a lot of agtgavation. I fixed my problem in less than10 min. Thanks.
Bie
THANK YOU SO MUCH ! THIS HELPED ME A LOT ! 🙂
Imad
hi i have a lenovo laptop and there is a cup of coffee came over it and it’s doesn’t work until now i put it in sun and i clean the keys nothing work and while im press on a button it’s write the same button and it’s doesnt respond what should i do i hoe to help me please
new keyboard cost over 200$
thanx
Nissa S.`
Thank You sooo much ! I was sooo scared to tell my mom one of the keyboard keys fell off (Y key ) 🙁 lol… this website helped sooo much… and it went through the steps in such detail ! And she never had to know lol… I loved it! Thank You again 😀
j m j
Thanks a lot!!! my baby daughter crawled to my wife’s laptop and yanked the “m” key off. I didn’t think it was that easy to put it back in place. Thanks again!
Brian
I have a Dell Latitude D420 and my spacebar popped off – your diagram was perfect and I fixed it in less than 5 minutes.
Thank you – Thank you – Thank you!
nick
i need to buy a new key retainer where do i find one?
Demi.
OMG thank you soo much! you made this so easy! i never thought i could use my keyboard again!
thanks again 🙂
btw great website! very useful!
taz
thanks alot man, u saved me loads of cash lol and made my life easier
Dub Roc
Thank you. You are a God.
Kirsten
Brilliant! The retainer remained stuck to the key when it fell off, and I didn’t know you could snap the retainer off the key without breaking it, so I was trying to drop the pieces down and get them under the hooks… Impossible! Your solution was so easy… just snap the retainer off, snap it into the keyboard and press the key down. Key works perfectly. So happy! Thank you for taking the time to take such useful photographs and help everyone out!
Tom
YOU are an actually hero! Thanks a lot! X
Gatack
hey thx a lot !! it really help to fix the problem when my laptop key fell off. THX !!
Paul
Thanks for that one I am running a Linux ditribution so will use the “Windows” key… got no other use for it!
fola
this is brilliant but it is actually my enter button that has come off
frustrated
my U key came off , and I see by your photos that I need to remove retainers, but the 2 pieces of retainer are in the key . I can’t it it out without breaking them.
Joshua Wells
this has helped me a lot. i was writing an english essay, and the i key fell off. now, it works again!
response to frustrated
Hey frustrated the U key on my laptop fell off also 2 days ago..sony trying to charge me $200 for one key. they outta their minds. ima try this as soon as i get home. If this fails anywhere else where they might fix it for cheaper?
SSN
The “V” key cover on my toshiba popped out (I think my cat tried to use my laptop keypad as a scratching post!!!). I was going to superglue it back till I thought abt gooling it. I read here I can just snap it back and saved myself from making a total mess. thanks!!
zara
thank you so much! i was almost in tears when i thought i couldn’t fix it!
vinay
hi where does the round thing go i got aspire 5315
Deb
Helped a lot and saved me $30, thanks a lot! By the way, has anyone noticed the number of women who said their daughters knocked off a key or the number of times a cat has knocked off a key?!
Shannon
Thank you so much. Aside from some fiddling, I got the keys on with no trouble. So much for letting the one and two year olds watch Sesame Street on the laptop! Ha ha
Rick
Thank you !!!
it absolutely worked… my Number 1 key was knocked off…and truly, I tried to follow with only vaguely seeing what needed to happen, but going back and following directions totally made it WORK !!!
and now I don’t have to worry about just pressing a button knob and a gimp looking laptop !!!
🙂
Krista
DAT TOTLLY WORKED!!!!!
I BEEN TRYIN EVERYTHING TA GET MA Y KEY BAC ON …. THANK U SO MUCH!!!!!
Tony Taylor
thanks a bunch i got a brand new computer and i was cheaking it out when i noticed that a key broke(2 months ago) and i noticed it was broken and dident tell my mom because she would have been pissed so i went on yahoo and typed this website ind fixed it as soon as i saw a picture you saved my life
-Tony-
jan willem
Thanks, got it working again!!
missy
do you have a phone or where are you located i can not get the key fixed . it seems you know what you are doing .
Marc Luck
Its so simple when you know how!!!..
I tried for an hour or 2 the other day to repair 3 keys after my 2 year old had a go the laptop, i was going mad.
Found this sit and fixed all 3 keys within 10 mins.
Many thanks mate/
Marc
Kumar
Hey!!! Thanks for the post. After an hour of head banging, I finally was bale to fix my key after reading your post in just 5 minutes. I have put a link to your post on my blog. Thanks for the help…
Joe
HI, thanks for the tut!
I’ve not managed to get the actual button back on yet, but I’m sure I’ll be able to do that with pressure!
Nathan
Thank you! One of my cats chased the other and they had a fight, part of it on top of my keyboard. Three keys got torn off, and I took apart each key with the little plastic things, and although a tab had been broken off each one, after taking them apart, I was able to put the supports back into the keybard and snap the keys back in.
lionheart
Thank you soo very much. You saved me from the hands of a dubious repairer who wanted to charge me £100 pounds to fix my keyboard.
I followed the steps and fix all the keys perfectly cos the keys were coming off so frequently.
That good and God Bless you
Amanda
THANKS SO MUCH! You’re a lifesaver!
Virginia
Thank you so much! You saved my computer & my sanity!
mitch
thank you this helped me soo much..
it is good to see people helping out free of charge, they were going to charge me $25 to fix my A key
vyaas
thanks man,it worked great the screen shots helped a lot
Robert
Where can i get key retainers for my hp dv 9650, key ‘R’ and ‘5’?
Linda
Wow it worked. I actual fixed something!
Thank you from someone who always thought she had been issued with sausages instead of fingers!
Chris
I knew it could be done, just forgot how to do it. You saved me a head ake, thanks!
raymeri edwards
The I button on my laptop popped off and I misplaced it. What can I do. Can I but a new button for it?
Please Help
marama
WOW..I panicked when my daughter pulled 9 keys off. then I found this website.Thanks alot. that saved me $25 per key..
Leon
I popped off my space bar key to remove a piece of a potato chip and when I popped it back on it did not work right. It flexed. Your site showed me that I needed to get that metal bar back in its slots. Great work, much appreciated.
Matt
Thank you so much! This is by far one of the best tutorials I have seen in quite some time! I had my key fixed in a matter of 5 minutes!
Thank You!
sue
Thanks so much, my F7 key fell off last night and with your help i fixed it back on in seconds…… rather than an hour trying on my own xxx
Great help thanks again
sue
dana
thank god! my cat flipped off my P key and i haven’t been able to fix it til now. you’re awesome!
Melissa
Okay so my problem is that my g key fell off and it won’t go back on, like it’ll make a pop noise but then it just falls right off.I have a newer dell laptop…. Please email me.
Adam
That’s just saved my life – in at 6:45 to start overtime, and 0 key was stuck, so flipped the key off and couldn’t get it back in right. Turned out I had the inner connector upside down which I would never have worked out without this site. Thank you so much
Jose
THANK YOU SO MUCH! I have been removing and replacing my enter key for like the whole day and i didnt even bother to TOUCH the metal bar on the enter thing! THANK YOU!!!
Karla
Thank you so much for your website. It was so helpful!
Becca Cole
Thankyou so much
i will be keeping this site handy in case i ever need to pop a key back in again.
The retaner actually needed to be filed down one side to it was actually faulty from the manufacturer, and if it breaks again i will know just how to fix it and where to order a replacement should i have the same problem again.
problem solved in like 3-5 mins after breaking the key off by accident and looking for a solution.
miracool
plss help me i have a old model laptop compaq. . . .
the key board suddenly won work verry well
example: if i press the Letter E the explore comes out
th F the seach comes out
have you encounterde these problems . . . help me pls I need you help guys
Lewis
This was very helpful!
The idea of pulling of another key around the same size and seeing how the retainer works on it.
Thanks alot! You saved my shift key!
kundasen swai
the “Q” key on my dell laptop are continuesly typing letter q after puting on my computer and open microsoft word. so I can not type anything.
when I restart my computer I here several beep as if the key is hold on. please help me to solve the problem.
Jaz
Thanks for the info, now I know what to do with my keyboard, my B key is oftenly want back up again, now I know what is th problem…
Thanks
Rosa Garcia
Thank you very much for your help. my 4 year old son wnated to know what was below the “w indows”key cap, and with your instruction i could place it again on it’s place
jimi
PHEW thank god for Google! 😛 thanks a lot dudes!
jaclyn
thankyou so much for showing me how to do this you saved my 8 key thank god my mom did not find out thak you thak you thankyou.my dog went on my laptop and took it off well once again thankyou
Rosie
Hi, I got a laptop from a friend – it’s a Fijitsu Siemens Amilo Pro. It works great and everything, I’m really happy with it. Apart from the fact that when I got it, the space bar was broken and there are no little spongey/spring things underneath so I can’t fix it, although there are two key retainers at each side. I’ve tried blu-tack and that works but I have to prod the space bar very hard so it’s not really good enough. Can anyone please help me? Thankyou so much!
Jason Hedges
Thanks for your post! It was extremely helpful. My laptop keyboard is back in working order again thanks to your help!
ANNETTTE DILLARD
I still was not able to fix my keybroad. Will I have 2 buy a new one my laptop is very new.
Jess
My “I” key fell off but the retainter and silicone thing are still in tact on the keybored. i just have the ‘i’ key sitting in my lap top bag because after messing with it for a long time and reading a bunch of different things on google I still can’t seem to figure it out. I thought I was decently tech savvi too! ugh.
Jake
Awesome. It helped a lot, but I would like to know if you are able to buy a replacement ‘membrane’ for a key also.
ASHWIN
PLZ HELP ME MY LAPTOP IS DAMAGE WHEN I ON MY NOTEBOOK ERROR IS THEME KEY STICK PRESS F1 FOR SETUP BUT IT IS NOT WORKING THE KEYBORD IS NOT WORKING
Nicki
OMFG thank you soo much (:
brian
thanks for the instructions…they were very useful
Tucker
Great instructions, saved me alot of stress!
Nidhi
thannk you so much for this !! a drink (gin & tonic) fell on my vaio keyboard and the keys stayed pressed for a couple of seconds. i pulled off a couple of caps to clean it, and since the small white retainers came off, i was already on the lookout for a new keyboard ! some patience paid off and my keyboard is as good asnew now !! thanks again !!
Johnson
Thanks a lot. The key problem was successfully resolved. Great instructions…wonder what you get???
Other than our thanks…
Thank you.
Stevie D
Sweet! This worked perfectly. No more missing down cursor key blues for me. 🙂
Blagovest
one of my arows doesnt work is there a chance to change it another button ? thank you in advance
april
ive just sold my dv2000 on ebay and when cleaning a piece of paper towel got under F9, ive accidentally popped it off! i think ive attached the to small pieces right and they atached to the computer in what looks right but the key wont “pop” on. scared to pull off another key, does anyone have a picture of under one of the top keys to see if its on right?
rhea
thank you so much!!!! this was so helpful and easy to follow
Debb
Thank you for posting this! I haven’t had an “M” for so long – now I cant
Mike
Very helpful, thanks.. although it took me a while to get the key back on after it was assembled, but dosent matter. Thanks
Steve and Nichole Taylor
Exactly what I was looking for. I got it fixed quickly and easilly. Thanks for the info!
Samgin
Thanks a lot for the description!
May be you know where it is possible to find (buy) the key retainers? Several of them were broken on my laptop when a book fell down on keyboard.
Besr regards
Samgin
mohammd Rafiq
Excellent peice of information. I could fix my broken key…Thanks a lot…..
Nabzy
this.helps.in.how.to.put.keys.on..but..how..do..i.take..the..space..bar..key
out?..as..you..can.see.i..cant..do.spaces..i..have..to..you..dots.
so..i..press..it..but…nothing..happens..
it..stopped..working..when..i…was..trying..to.cleann…it..lol
HELP..
anyone?
please..email…me:)
Kristen
I have an HP Pavillion dv6000 laptop, and my arrow key that points upward didn’t pop all the way off, but part of it is sticking outward and popped off. It still works if I push down really really hard…Please help me! Is there anyway I can fix it?
keon
thanks alot! i just accidently broke it and got scared but searched it on google and perfect instructions, u saved me !
keon
dear kristen, I have the same exact computer and my up arrow key just came off, what you want to do is take it all the way off , dont worry it wont break, you dont have to worry about the retainers coming off or anything it doesnt matter if it does, so take it off all the way, then follow these instructions, what a coincidence same computer same key =p
Donal Munro
I have a Compaq 1201 model and the keys around the ‘d’ area are not printing to screen. I have found your site very useful though in understanding how the keys are attached and how to detach them.
I cleaned them with air but only two responded. the d and the 3. The silicone knobs on all keys had all been detached from the base. This did not seem to affect the operation of the two I fixed.
I am considering getting a new keyboard. Are there any special tips regarding removing and replacing keyboards for the 1201 Compaq?
Nate The Great
HEY I APPRECIATE the info… my little 1 year old nephew came into my room and attacked my keyboard… and my M key came off….i was frustrated…..but i found this site… i had found that they key just popped back in place..
CCrouch
Thanks, much appreciated – saved me a trip to my IT dept when a staple slid in between the keys. I flicked the key off and had no clue how to secure it back to the keyboard.
Sloan
Oh – I cant thank you enough. My 2 year old popped off 10 keys in a matter of 6 seconds and I thought I was going to have to buy a new keyboard. Thanks a lot!
Kay
Thank you. My 5 year old son popped one key off (he was playing a video game) and I was able to fix it. No more video game on the brand new computer for my son, I guess. Thank you!
Christina
Thank you so much, I have used this website twice when my puppy put his paws on my keyboard and popped two keys off!! Very helpful!
John
hi there..yesterday one of the keys from my laptop popped out. I guess part of the key retainer is broken.I tried most of the search engines where i could buy the retainers but couldn’t get any.I was just wondering if its allright to put it directly back to the keyboard with the help of a superglue. Does anyone know where i can buy the key retainers. I am using Asus laptop A8F model.
Laura E.
YOU ARE A GOD. My hyphen key fell off very suddenly this evening, and I was completely distressed! I tried taking off the 0 key next to it to see if I could figure it out, but was completely stumped. This website helped so much!
Bryan
Thanks for the Help My dog scratched off my keys on my laptop and this website was the first one to come when I searched for a site so thank you for your help and I might have to look for you again.
Ashutosh Mishra
Thank you so much for those great tips! My space key popped out yesterday, and I couldn’t find those elastic things inside either. After reading your post, I just dug out one of my Windows key and that “pointer” key (which you put in place of U), put their elastic in the space key area and it’s working! 🙂
Joey
Thanks. Same story here: 1-yr-old with amazing speed popped off the CTRL key. Key retainter junk was not intuitive to reassemble until I saw the components shown in your photos, which helped me confirm that I wasn’t dealing with broken or missing parts, so I popped of the ALT key for a point of reference. Interestingly, the ALT key assembly was turned 90 degrees versus the CTRL key.
chris
My q button says that it is being held when it isnt, i cant do anything because a bunch of q’s show up.
ahaha!
Thank you so much!
I broke the latch and i have a completely different laptop!
And these instructions helped me get my key back on!
amazing, but since i broke one of the latches, its still very loose!
but half of its on, and it wont be a very big problem.
(It was the Pg Dn key so it was very easy to fix)
Liz
Thank you so very much.
Why is it stuff happens on holidays…space bar now working. Instructions were easy…thks
dave
thanks alot I really needed your help badly thanks again
sarah
i popped off my backspace key nearly half a year ago and *just today* i thought, maybe if i google laptop key repair i’ll get somewhere with this… i got it on the first try after looking at the pics in your article!
WOOOO TRIUMPH! 😀
holly
what if you have a broken tab under the key? can u manage without it? My caps lock key was broke off by my one year old and when she did it broke the little tab that clicks it back in place.
Terra
Thanks- it was an easy fix!!!
Chris Rahl
Thanks for the descriptions and photos. My 2 year old Yanked off my Y but with a little trial and error and Your directions I was able to fix it.
Megan
Hey thanks for this – my 4 year old twins had popped off the O key on my keyboard and lost one of the retainers. I saw your tutorial on cannibalizing parts from that useless menu key (I had to push it to see what it did – never used it!) and got the missing bit, up and running. So thank you very much for the idea! You saved me the 30 bucks for a new laptop to cannibalize for an O key 🙂
Sai Krishna
Thanks a lot.. One of the most useful pages on the web 🙂
I could fix not one but three keys on the laptop keyboard….
Carole
Thanks to this website. I had the V key in my laptop that I have to press several times before it registers. So I decided to take it out hoping that I can easily put it back. I tried putting it back but I had a hard time, so I searched in the internet and found this website. I had to remove one good key to see if my v key is still good and tried the direction in the good key and then to the v key. I thought at first of just taking it to a computer shop but the “McGyver” nature of me decided to do it myself and I’m so proud of myself and did it it! vvvvvvvv That’s my v key working properly!
jamie
thank you so very much for your excellent guide, you have saved me a fortune, keep up the fantastic work and well done.
Arttu Saarela
Thank you so much!! My mom would’ve killed me if she saw one of the keys missing!! Thank youx10000000!!
Sincerely, Arttu
Wendy Vrooman
Thanks so much for the valuable info!!! My space bars works correctly again thanks to the instructions found here. One would think that getting keys to work would be a simple fix, but nothing is ever easy in the computer world. But your simple instructions and pictures are priceless.
mandy
THANK YOU SO MUCH! YOU ARE WONDERFUL!!! THIS HAS BEEN THE MOST USEFUL WEBSITE THUS FAR!!!
emmerick
THANK YOU SO MUCH IM JUST A KID and i recked my keyboard so i had to fix it quickly without my mum or dad knowing thank you so much!
joshua
thaaaaaaaaank you!
joey
mine will not go back on
theo
thanks so much, now my space bar buttom works perfectly again 😀
AJ
How would you fix a caps and tab key – the retainers look very different?
mike paget
Great site..thanks for the help.
emmerick
um my keyboard isn’t working good some keys don’t respond how can i fix it?
skylar
where can i buy key retainers? thats all that i need to fix my key and i can’t find them anywhere
nazda
hi, thanks for the help. its a great site.
Chris
I also need just key retainers… anyone know where to get one?? by the way this is a GREAT tutorial thanks so much!
Leighanne
Thank you SOOOOOOOOOooooooooooooooooooo much!!!
P.S. The “O” key was the one that messed up! Lol! 🙂
Kate Kinder
Thanks You So Much!
This Was Very Helpful!
Amber
So I have a brand new Lenovo IBM Thinkpad and the enter key had popped off… I think I was sucessfully able to put the plastic lock pieces back on the proper way, but now I can’t get the key to snap into place. 🙁 Please help?
Len
I need help on the A key.
I snap it on but it doesn’t spring up.
It just stays stuck to the bottom.
How can i fix this?
Please reply.
Harvey Hou
Thanks. Very helpful!
Sarah Knowles
Thank you very much, my 4 year old took of a key and i couldn’t quite get it back. Very fiddly and much patience required but now works wonderfully.
Mark
You say “Carefully remove the key cap with your fingers.”… How do I do that without braking anything?
Which side of the key has to be lifted first?
dru
THANK YOU!!!
This has been driving me no less then completely crazy for about a week and now it’s fixed.
Dave Gale
Xremely helpful…better than the “troubleshooters at the store”. Will look often.Dave
Paul Fisher
Yes!!! This was driving my nuts and I was thinking I was going to have to take it in for (overpriced) repairs. But then I found your directions. I have a Gateway MX6453 laptop, and strangely enough the key next to the “broken” one is attached at a 90 degree angle. So when I removed a working one I ended up doing a double and triple take before I realized what they did. We’re talking about the H & J keys being attached in such a way that they connect at 90 degree angles to one another. Weird. But thanks so much for the help!
Martin Walsh
Dar Sir, grat wb sit. It has solvd all my problms with my kyboard!
Robert
My keyboard key’s four points are broken off the laptop, what can I do?
Srishti
Thanks a ton for these step by step instructions. thank god i could fix it on my own or else my bro wud hav bombarded me 😉
Thanks !!
Dave
Thanks for showing me how toget a key back on. An arrow key came off my HP computer and at first I was trying to snap it back on with the retain connected to the actual key instead of it being connected to the keyboard. Mission accomplished! The computer had just passed the 2 year warranty.
Very Grateful,
Dave
Sturla
Just remember to try both ways (up/down) when attaching the key retainer.
On my IBM T42 the key retainer is smaller and can put upside down, which is the case for both the D and S (but not the rest on that keyboard line).
Bob Mitchell
Just fixed the spacebar on my Toshiba Satelleite M300 using the instructions here. One end of the spacebar had come loose, and I couldn’t see how it was held on without removing it. The article had excellent graphics that explained how to remove then refit the spacebar. Thanks very much guys.
dylan
THANKS!!!!!!!!!!!!!!!!1111
Marlene
My tab key fell off. I tried to follow directions above but I noticed the tab and caps lock look different from the reg keys shown in diagram above.
Marlene
I fixed the TAB button!!!
But I broke theCaps lock!
This time one of thr\e two metal hooks on the right bent and broke off. Now what do I do?? Any thoughts?
Rubi
I have a Dell Inspiron 700m. I pulled apart my comma key because a piece of food fell into the cracks…i cant get the damn key back on…it wont snap back in!!1 help…im scared to pull off another key because i might not be able to get it back on and i dont want 2 keys w/o a shell!
Vikram Gade
Excellent help Thanks so much
lisa
hi, thanks so much for this, it was my stupid dog also knocked the Alt key, thanks for stoppin my stressing!
Carla
On my 1yr old HP laptop, the number seven key popped off.. the retainer still on the keyboard, got my mag. glass, and neon sun flashlight, only to discover, one of the (tiniest to mankind , I’m sure) tabs at the bottom of inside retainer, (there are two one on left and one on right) broke.. I can get they key back on and use it, but it keeps popping off again. can i get just the plastic retainer parts somewhere?
samantha
wow ..it took me three hours to do it but..i did it ..you are the best,,,
tomorrow i will look at my space bar on my toshiba…today it was the acer w and e keys…
Angela
I redid my space bar but for some reason it won’t bounce like the rest of the keyboard, and it makes a ‘space’ just by touching it. what should ido
megan
I have a gateway laptop and the key with the window’s symbol popped off and i can’t get it back on. I can get most of it back on except for one little part that hooks underneath and i can’t get that on.
NICOLA
Thank you so much!
I was in the dog house for popping off the spacebar on my husband’s laptop but you saved my skin lol!
Thanks again!
Petey Pablo
Thanks so much…I was able to fix my Dell Inspiron Spacebar w/your pics!!
churchill
great help. it took a while b/c it’s so precise, but i finally got it.
Brice
Thanks! with your easy instructions I was able to put the key back on with no trouble at all. I was ready to throw money away having someone else fix it.
Mike
Thank you so much! I spent like an hour trying to get one key back on because the key reatainer got disconnected when I was trying to clean a drop I got under there that made it sticky. This helped bunches. THANK YOU!
Amparou
Thanks a lot! I could fixed my space bar!
natalie
Thanks so much! Saved me a lot of trouble!
amy
thanks so much! my dad would have been so pissed if he found out i broke a key on his laptop. but i popped it right back on! so good job helping others in need, you are a kind lady/man.
Matt Damon
Amazing. Thanks alot. Now I can feel assured on how to reattach my laptop keys when cleaning them. Thanks again, I thought I would have to buy a new key! Ha.
Tyler
the spacebar tip did not work for my compaq laptop, I felt it snap on but I failed to succede in the bar staying on
Sioux Gardner
thanks!! mended and on my way
My 16 year old jack russel dog had just jumped on the works lap top and taken the key off!
no one need ever know!
Martin
wow!!! Your site was so helpful, thanks, I could fix my keyboard by myself.
Jen
Very helpful, thank you!
e.clair11
just what i needed. thanks. the shopvac eventually lost and the clair bear won. oh the letters were “a'”r”e” cool thanks again.
Manu
Just the right hint at the right moment!
Thank you 🙂
Amanda
Best ‘How to” I’ve come across in a while! Thanks a million for your help.
hugaplanet
Thank you so much!
I was able to easily follow your clear instructions and fix my laptop keys.
My dog had jumped onto the computer and taken some out… There seems to be a theme of “dog damage” on here?
Warmest Regards,
Hugaplanet.
dj underwood
THANK YOU!!! I appreciate your kindness! I did not know this would be so simple!
Carla
This is great, but i only need the retainer clip, mine is broken, so although i can get the key back on, it keeps falling off, because the lower left corner is gone on retainer clip.
anyone know where to get one? I’ve looked so many places
tom
thank you, thank you – a lifesaver!
ADAM
brilliant!!! thanks very much.
robusto
dude…you rock! it’s so true: a picture’s worth a thousand words…thanks a bazillion!
Cameron
Thank you so much! I fixed my Enter key that my 11 month old daughter ripped off my keyboard. She was so cute doing it, but I didn’t know how to fix it! Thanks again. You saved the day.
Rb
My retainer is broken, so it will not clip into the keyboard. There are little ears that are missing compared to other retainers. Where can I get a new one?
steven campbell
THANKS!
Your advice worked great.
Steven
Jkendr46
Thank you very much for the walkthrough. The ESC key had managed to pop off. Following your instructions, I was able to reattatch the key. You saved me many dollars!
andrew rodriguez
thankyou very much but there is a problem, i managed to fix the “i” on my hp pavillion dv9000 but the “i” is in place and firm but it is crooked, do u have any idea how i can fix it?
DAZ
10 min o go the the p button fell off but then i found this now its fixed
hira
thankyuoo sooooooo much….my “2 and Q” key fell off…..n when i saw ur website it got fixed thankyouoooo so much,.,,
my all prayers are with u!
Angelica
thanks soooo much^^ ive only had my laptop for like 8 months… this was soooo quick and easy and the pictures were amazing… especially when you are a visual person like myself. thanks again! =D
Jackie
Hi,
The Shift key popped out.. The information was very helpful however the solution did not work. Do I need to purchase a new keyboard? If so, do they have special laptop keyboards?
Thank you
sara
Thanks so much! this was absolutely amazing and saved me from totally freaking out!
jenny
i didn’t realize it was this simple to fix a key. i had four keys off and was about to pay £70 to send it away and all. this saved my life. i can get my redecoration started early 🙂
Stuart
Great, thanks m8, just the job on a HP 6530b.
stan
okay. so i dropped me keyboard and the left control key came off. i took out other keys next to it, for those didn’t work very well. five keys in total aren’t functioning. the caps lock, left shift, left control and left window.
caps lock can be press down, but i have to press it down very hard in order for it to work. left shift wouldn’t go down, when pressed. the same thing goes for left control, left window. and my left alt is the same as caps lock.
i also noticed for the non-moving(that wouldn’t go down) keys, when i turn the keyboard upside down, those keys pop up. when i return it to the original position, they go back down.
can someone teach me how to replace the key caps? my keyboard is a bit different than the ones pictured. only the key caps fell off. i tried replacing them many times, but results aren’t good.
stan
never mind! i fixed it! the frame itself popped up. i just had to push the whole thing down. and all the keys were fixed. yay!
ten
My dog jumped on my keyboard knocking off the delete key, spent two hours trying to put it back on. Within two minutes of visiting this site it was so easily fixed Thanks
THE RUDA
Thank you so much!!
This website helped me fix my keyboard very easy and because of that it saved me money. You should really put up some Youtube videos, I bet you would gain much traffic because of it.
again Thank you for the great page..
ThE rUdA
Jean
I need replacement keys for a desktop computer keyboard. Where can I find those?
Claudia
im just wondering if it is nesessary to use crazy glue to stick the key back into the keyboard. i own a dell vostro 1000 and for some reason, the key is not snapping back in place im just wondering if i can use crazy glue. i want to know first before i mess up my computer even badly… please help thanks =]
twee
Thank you for this tutorial! I’m not handy at all and had been trying to put it back together without taking it apart… A very frustrating endeavor. Turns out I’d busted my retainer, and pinching the parts from an unused key did the trick! Having my ‘R’ key back is a huge relief, and I couldn’t have done it without you. :]
Daryn
Thank for ur explanation, otherwise i wud’ve never put it back 😉
Serenity
Yup, here its explained in detail with pictorial representations.
Thank you.
Au revoir.
cj2600
Claudia,
If nothing is broken, the key should snap back in without any glue. If it’s not snapping back in, apparently something is broken. If that’s the case, using the glue will not help, you’ll just make a mess.
Take a closer look at the key and retainer and find which part is broken. Search for a replacement.
V.P
THANKS ALOT YOU REALLY SAVE MY BUTT ON THIS ONE HAHAHA BUT THANK YOU YOU WERE VERY SPECIFIC AND ANSWERED ALL MY QUESTIONS WITHOUT ME EVEN ASKING THANKS ALOT AGAIN
eric
i snaped of the key retainer off but i cant get it to got back in and stay please help
Chuck
I have a Microsoft 4000 wireless keyboard/mouse. The space bar came off the keyboard and I cannot put it back on so it has a spring to it. the picture you showed wasn’t like the spacebar I have. All I have are the spacebar and the wire that attaches to it. Do you have a picture for that type of keyboard?
Robert
The letter q on my Dell Latitude D620 integrated keyboard all of a sudden stopped responding — doesn’t type. I looked under the key and everything looks in place (although perhaps uni_uely, there is a factory drilled hole in the metal platform under this particular key). What can I do to fix this? Overseas, far from a computer shop. Thanks.
cj2600
Robert,
There is not much you can do to fix the keyboard.
You’ll have to buy a new keyboard and replace it. It’s not difficult.
batman
Okay, so i am having trouble clicking the key back into place. Could you give me some more advice on how to easily do it? I know I am batman and everything, but sometimes, even superheroes need help! PLEASE HELP ME!!!!!!!!!!!!!!!!!
~ Batman
thankful
these instructions are awesome. thanks so much. god sun bless you
Aaron Fisher
These directions did not work at all. In fact it made it worse it broke my E key and Space. Now I’m going to be with out my computer for a good week.
marlene
help with spacebar clip.looks like mine may be newer / older #compaq 5107 desktop. my clip is a elongaded u shap much like what is pictured. though no bend in ends just straight. hepl
elli
im still havin trouble with the spacebarkey itsstillnotworkingforme
Elyse
Yeah, my shift button came off. Its is on a dell laptop! I need some serious help!
Please and thank you. 🙂
kapil
hi!!!
i have a hp dv6000 and the c key fell off the keyboard while i was cleaning it!!!
the retainer is stuck in the fallen key and im reluctant to take it off as im scared of breaking it!!!
so could you please tell me how to take the retainers off the fallen key!!!
dan the marine
i spilled liquid on the keyboard of a toshiba laptop. many keys are not responding. any idea the price too change out the keyboard plus the part? thanks
cj2600
dan the marine,
What is your laptop name and model number? If the laptop was sold in the USA, I can help you to find the part number and maybe point to the right disassembly instructions.
c.canning
i am looking for a backspace key for an acer aspire 3680 where can i find one?
thCs
you’re a life saviour. thanx a lot !
ara
wow, those totally helped!
I used a bent paper clip to get the retainer out of the keyboard, which was a bit difficult since the hinge was unlocked XD
thx a lot
Phyllis Dunn
I had a key pop off as well as the retainer. I put the retainer together and put it back on the keyboard. However I have spent an hour trying to get the cap to pop on it. Is there something I should do that isn’t mentioned to make it pop on?
gatorbate1 AT hotmail DOT com
richard dandrea
Hi, I went through the entire tutorial and a ton of the questions but I didn’t see a solution to my problem. I own a gatway notebook, no help from those a**holes! The space key was being a problem so I gently popped it off to clean underneth it. The platic clips were fine the membranes had peeled loose so I reapplid them and connected the metal rod correctly and snapped the key into place but the spacebar still does not generate a space in text! Any thoughts or hints would be appreciated! Thanks!
Rick D.
ali
Just the other day, my “V” key from my laptop fell off and the key retainer is still on the key, but the problem is the four points, two points of the right side is broken and the left side is still fine.
What do i do? I know you would suggest to get a replacement keyboard, but is there a way if I can buy just a new key retainer?
cj2600
ali,
Did you search on eBay. Some sellers sell replacement keys with the retainer.
Eddie
Thanks, for your guide to reinstalling a key which can off. It worked out perfectly!!!!
Dev
Thanks a lot it helped to solve the problem.
Sudarsan
Thanks a lot for your step by step detailed instructions to repiar and reinstalling the key for Laptop.
bryan
thank u i broke my dads laptop key you saved me from alot of trouble
Jaglover
Very easy to understand instruction, and very helpfull!
Livla
Thanx soo much was very easy to understand and i fixed my R key in no time !!! 😀 Thanx agen!!
tania
it still neva worked
ii think im doing it rong
Phil
This was a great wonderful thing. I am so glad to have my B key back.
Laura
Thankyou for the informative guide. I could not have finished my essay without a space-bar key! Also, the L key was getting a bit dodgy so i took it off an removed some fluff. Thanks again!
Nigel
Absolutely brilliant! I’ve just fixed three keys on two laptops within half an hour! I can’t say thanks enough, great site.
DIY, take back control and save your money!
The World's Dresser
Duuuuuuuuuuuude, I’ve been rocking a jacked up laptop for 3 months. I’m so happy I found your site. Thanks man!
JCMcGee
Thanks. This helped me fix my keyboard.
Emmanuel Ortega
Great help, better then that of Dell support.
help
hi,my retainer and all is still in place,just the cap came off.But i cant seems to snap it back. 🙁
crystal
Thank you! This page was so helpful. I would have never looked for two pieces that snap back on before the key.
Cant say
This page was perfect for my problem and the way things turned out.
Spot on instructions and images for the laptop at the top. My laptop components were *exactly* like that from the connecting pins to the retainers etc and was exactly what the doctor ordered.
However I had already contacted tech support as its under warranty. This was the third time this computer keyboard had developed this fault and each time they simply replaced the keyboard.
This time when I reported it they told me as I had had so much trouble (hard drive failed last year and RJ45 became loose requiring a new motherboard 4mths ago) they would totally replace the entire laptop. In addition, as the model in question was no longer in production, I got a free upgrade.
From an AMD Turion 2.13 to an Intel Core 2 slightly faster, 2GB ram to 4GB, 60GB hard drive to 250GB and a dual layer DVD writer wheras the current one has a CD writer/DVD player. In addition its got goodies like built in bluetooth.
However it kinda seemed they werent too keen on getting this discontinued model back and it seems not only do I get the new one I get to keep the “ahem”, broken one… quick google search brought me here and I’ve fixed the original problem of a key coming off
So, hurrah, and many thanks. This ones been a real pleasure.
Vladimir Serbia
THANKS A LOT!!!!
I was despered when my key fell off the keyboard, but your instructions helped me to fix it. Thanx again, and keep up the good work
Daniel
Thanks for great help! Your picture DYI guide is really helpful.
Cheers!!
Jordan
I used to work on dell support calls. They try and get you off the phone in under 6 and a half minutes.
Denise
My 18 month old son popped off 4 keys, including the enter and shift keys. Thank you so much for the info on this page. I was able to get it fixed before my husband got home and blew a gasket.
Alexander Miranda
Hey, thanks a lot for this i was dying for how to properly snap those keys back in. Yo rock grade A++++ On guide.
thanks
Thanks for help, i fix key in a minute.
Phil
Dude, thats amazing. Thanks!
Eric Geer
Hey I need help and it looks like you may be able to do so…SO…I have a Ibm T40 Thinkpad and the “b” key does not work at all…it doesn’t stick, it doesn’t slide, its not stuck…it just does not work…is there any way to try to clean off connections in order to maybe possibly have it work…I really don’t want to buy a new keyboard and copying and pasting b’s sucks to have to do it all the time…please let me know how you can help me..if you can help me…thank you so much
eric
Lu
Great visuals. I wish I would have checked your site out when my son tore off several keys. You would have saved me a head ache for sure. Thanks.
Jen
I have used his tuorial several times now, and it has been a lifesaver every time. Thank you so much for publishing this!
Haley Brown
Thank you.. That really helped!!!
Maxwell
Please Please Please, where can I obtain the plastic retaining clips as mine has broken and need replacing.
Any help would be greatly appreciated
Maxwell
Dan
Thanks a lot mate for the tips.
Thank you
This tutorial really helped me .. super easy .I wasted so much time trying this on my own .. all I needed were the visuals . Thanks soo much !
Ivars Bezdechi
THANK YOU THANK YOU THANK YOU for the excellent tutorial on putting the spacebar back on my computer!
cj2600
Eric Geer,
I afraid you’ll have to replace the keyboard. I don’t know any other way to fix the problem.
Dylan
Okay, thank you SOOO much. I had been trying to fix my laptop key for over 2 hours, then i found this page and i FINALLY fixed it. Thank you thank you THANK YOU!
chris
my esc and delete keys came off and i cant get them to go back on
Antony
My esc key fell off and i lost 1 key retrainer, can i buy such a part??? i got a hp laptop.
Mischelle
Thank you so much…with your photos I was able to get my key top back on!
jodi
i have a toshiba laptop with a keyboard like the one show in silver. the h key popped off and i cannot get it to seat properly. should i take the retainer off and set it first and then push the key on or does it stay on the key and just get pushed down?
thank you
cj2600
jodi,
That’s the right order.
1. Remove the retainer from the key.
2. Attach the retainer to the keyboard.
3. Push the key on the retainer.
You can break the retainer this way.
jodi
thanks but it still is seating properly and the retainer does not look altered or broken in any way.the top of the “h” key is loose. if you don’t hit the key right on center but rather towards the top it pops up.
cj2600
jodi,
Apparently, the retainer IS broken. Otherwise the key would stay attached to the retainer.
If you wish, you can remove the cap from another key and take a closer look at the good retainer and compare it with a bad one.
jodi
yeppers…i just realized that the tiny ittle notch on the top left is gone. i’ll have to check my other tosihba laptop and see if the clip is the same. tanks. lol
Will
Great tip. Easily replaced the key. Fala!!
Viqui
I’ve tried the steps of situation 1 but when I snap the key back it stays ‘up’ somehow. It’s like if two of the points that connect the retainer to the keyboard doesn’t hold the retainer… Any ideas? Am I doing something wrong?
arunvel
thankssssssssssssssssssssssssss
marie
thanx! this really helped alot
u saved my life lol
THANKS! 🙂
Lydia
Thank you soooooo much!!!!! 🙂
Jennifer
thanks! super simple and smart!
alexia
Thank you so much for the help. I was able to replace the key on my laptop using the great pictures and instructions.
Confused
Every time i put the key on it sticks up ? As if there are two joints can you help me with that
cj2600
Confused,
Sorry, I do not understand the problem you are experiencing.
FRED
On my Compaq Presario laptop the broken key came off altogether with the retainer still attached to the key itself. The problem seems to be that two of the points where the retainer attaches to the keyboard itself have broken off. Any ideas?
FRED…
D.A.
THANK YOU SO MUCHHHHHHHH!!!!
honestly wikkihow disnt help at all, ur amazing!!!
:DDDDDDDddddddddddddd
cj2600
FRED,
That happens a lot. You’ll have to replace the retainer. Search for a new key on eBay, it’s possible you can find a new one with the retainer attached.
James
Thanks! ‘V’ key fell off today, and this definitely aided in my fixing it!
Hilal
My Q key felt today from Toshiba keyboard laptop just like the 2nd keyboard here but i am not able to fix it !!!! every time i put it , i cant get it to get stable ! specially from above !
cj2600
Hilal,
One of the retainers is broken and the key will not stay connected to it. You’ll have to replace the broken retainer.
Bobb999
Thankyou!
Your excellent post gave me sufficient hints that I was able to restore my HP/Compaq’s “Z” key back to it’s rightful place! My meddlesome cat pulled the key off this AM, with one deft hook from one sharp claw.
After the cat’s misdeed, one part of the 2-part plastic retainer (the round-ish part)was still attached to the key itself. The other half of the retainer (the more rectangular part)had come loose from both key and keyboard.
I never would have figured it out without taking your advice to carefully remove another key,and use it as a template or model to refer to in restoring the key assembly that flew apart. I soon realized I would need to remove the retainer piece that was attached to the key, and reassemble both parts onto the keyboard, not the key.
One must find out which side is the correct “up” side for each retainer part (I found one side is flatter than the other in each case). And also ascertain which is the top and bottom end in each case. Neither of these parts is symmetrical. Each has a correct top and bottom end, and an up and down side.
With the aid of a magnifying glass,an ultra-mini screwdriver tool to help move pieces into place (rather than to screw screws), plus fingers, I went to work.
I attached the round-ish piece first. It attaches to the keyboard at two points at the top of the part.
Next, I attached the rectangular piece. It attaches to the board at two points at the bottom of the piece. The undisturbed template retainer I used as my model showed me how the two parts fit into each other. It took a little fiddling and squeezing to get the two parts to fit into each other properly, while remaining attached to the keyboard properly. But persistence won out, and now my two retainers (the model one,and newly repaired one) both looked and behaved identically when inspected.
I prayed that I had it right, but feared I might end up with not just one, but two keys that would no longer attach to the keyboard!
Fortunately,snapping the two keys back into place was the simplest and quickest part of the process! They easily snapped back in immediately. No coaxing required. The two keys seem
solid, good as new!
I noticed online other people’s useless advice on how to repair detached keys. e.g. “just push down and the key will snap back into place”. Yeah right. This of course won’t work in the case of plastic retainer parts becoming detached from the board, and from each other.
I appreciate your helpful tips!
Bobb999
I’d like to add for the person who says they have a Compaq Presario laptop and had a key come off with a piece of the retainer still attached to the key. That’s exactly the model laptop I have, and my key also came loose with a piece of retainer attached.
But you may be mistaken in thinking that the key won’t snap back in because the retainer has bits broken off it (unlikely, imo).
First you’ll need to remove the retainer piece from the key. The two parts of the plastic retainer need to be reassembled onto the keyboard itself, not the key. So long as you still have the two parts, you should be able to reassemble them.
Please read my prior post to see in detail how I was able to successfully reassemble the two parts of my retainer and fix my detached HP/Compaq Presario’s key. Good luck!
tyler
Hey,I have a labtop that recently lost a key (number seven key). My computer is an Acer labtop (Windows) and it has two notches on the bottum and one notch on the top,so it’s different from the one you did on the exampe to fix a broken key. I need help to fix this so it would be very nice if you could help me. Thanks.
Jennifer
I have the same laptop as tyler april 2o,2009 3:15pm and I cannot get the bottom of the key to snap back on! This isnt my laptop and I have to fix it ASAP!!! Please help
Acer aspire 5315-2326 intel celeron processor 550
Kev
I have an Acer too.
You must first connect the two retaining pieces together, by inserting the small one into the little swivel holes in the big one.
Like advised here, carefully lift off another key to see how to connect everything. Then you connect the little on to the little clips on the keyboard, and after that you will be able to connect the big one onto its clips, and then snap the key right back on.
deathactually
I also have an Acer -Aspire 5610z mae sure you position the key correctly – it has go to frther down the keyboard (towards ) than you thinkand try to get all four to click in at once. Also EVERYBODY note that the key retainer’s middle part at the bottom has a thick and a thin side – the thin side ofthe holes has to be on top in order for the hooks to fit over the clip
front on thin part at bottom of hole thin side up
_ _
||_ _||
|| ||
|| ||
||—||
cross section thin part at bottom
||
into computer <–||
-||\ |</ <– it goes up and then bends towards space
Apart from this wow!! eally good wouldn’t have known what to do
Cheers!
deathactually
Apologies for what turned out to be sheer graffiti!
the point is the hook coes up out of the computer base and bends towards space, and the thin part must be so that it is on the bottome with the empty space on top so that he hook which is a bit ‘fat’ can hook over it.
Do the bottom of the retainer first while bending it and then flatten it and snap the top two on
Maggi
My kid popped out 2 of the keys…Thanks for u guys! I replaced within couple of mins!
jordan
i have the tosihba satalite L300 and on the letter a part of the clip has broken of and they say you need to buy a full keyboard not just the letter a and it donsent come under warnntry so it is £30 at pc world and at toshiba it is 35 pounds just to deliver it there what can i do i still have the letter a
helpful hint
also. the little tabs on the side of the inner piece. they need to be inside the little groove for them. if not the key will not snap on correctly
cj2600
jordan,
You can disassemble another key you don’t use, for example the right ALT key and install it instead of A key.
Teresa
I have an acer notebook and the home key came off. The little brace piece isnt a full square, one wall isnt there (supposed to be that way) I dont see any way on here to get it back on. Help please
Paul Kern
Your instructions worked Great, and fixed in 5 minutes! Thanks!
I had this problem with my IBM laptop from work a year ago. The Desktop Support guy at work said to call IBM support, who sent me a new keyboard and we replaced the whole thing. If I had found your site then I could have saved a whole lot of time (and expense to IBM 🙂
Much Appreciated!
justin
thank you so much! i thought i was a goner
Anna
i have acer aspire 5020 and my space key is broke the lil keyretainers where do i get new 1s
Nadia
Thank you so much!!! You are a saver. My toddler took out the caps lock and shift key from DH 1 month new laptop. And thanks to you it’s now fixed!!!
toby constable
thank you so so much! the key retainer parts were not properly attaching after i took them out because i spilt a bit of water on my arrow keys and they needed wiping. absolute life saver :):)
Jesse
thanks a ton! Saved me time, and SOOOOO much stress!
tina
help i did everything it said and i still cant get some of the keys to stay on what do i do now???
Simone G.
Thanks so very much for sharing what you know.You have helped me many,many times.God bless you.
Keri
Thanks you so much for this my daughter (3) took like 4 keys off of my new laptop I was able to get all except for the G back on properly and your tutorial helped so much the g is back on and working FABULOUSLY!!! Thank you soo much!
kirsty
thanks so much my toddler pulled off the key and bent the part that the key fitted to, without your help i would ofhad to tell my OH, and I fixed it all myself with your instructions.
Manjit
Thanks so much my little boy wrecked 3 keys…and you helped me fix them!
Lynne
Thanks so much for this information!!! My laptop keyboard is slightly different from the one shown in the diagram, (Dell Inspiron 7500), so the retainer isn’t quite the same as the one shown above, but similar enough. I thought I’d have to take my computer to a repair shop and wait for a few days, but I was able to fix a key that’s been broken for a week!
Thanks again!
Rach
Where do i find individual keys to purchase for my laptop? My number 8 key is not fixable because the latches on the key itself broke off. I don’t really want to have to trade it with another key, i would just like it replaced. Know any good websites where I can find that or places I can purchase just the number 8 key?
cj2600
Rach,
Did you read through the entire post? Under the picture 5 I posted a link to the eBay store where you can buy individual keys.
Heather
Thank you – your pictures and instructions really helped me when my daughters book slipped and landed on my keyboard last night popping off 2 keys. I stayed cool, but inside I was totally bummed. It was not the easiest task, but with patience and your site I was able to snap the keys back on. I really appreciate this.
nitin
Whenever I use thefollowing keys the impressin is as under
key marked as the impression is
” @
# £
~ ¬
Please let me know how to set this right
Thanking you
blackEd
Thank you!!! your manual saved my night jajajaja It’s feel so good to have space button again jajaja
greetings from Mexico!!
Djay
Thank you. Your pictures helped me put my my X back on after my toddler stepped on my keyboard. I have to admit that I did not feel comfortable pulling off anothr key. I was able to to fix it by using the illustrations. Thanks a bunch!
melissa Allen
thanxz this helped me fix my keys that my 4 year old daughter had broken while I was at work.
chaosgone
Thanks! That was just what I was looking for. My backspace key came off on my laptop, and I could not figure out how to put it back on. Thanks again!
Kaley
Is this just me, or my keboard? I’ve tried so hard, over and over to get my L key back into place. I’ve followed all the instructions, but it doesn’t seem to snap.
Shelly
Thanks! This really helped.
katherine
thank you very much being able to see how the keys are fitted on has helpt me to solve my problem, I lifted the H key just a slight touch to ease the presure and it seems to have cured the problem of the H key constantly repeating itself whenever i tried to type somthing as i was constantly having to use the backspace key to put things right.
thhank you
katherine.
cj2600
Kaley,
Take a closer look at the retainer and key itself. Apparently one of them is broken.
Sean Godwin
I had the exact same problem. The exact same one with the U button. The U button gets used alot!
x_Goddess_x
I’ve done all the steps & its not as easy as “click it into place” My “A” key wont fix, the key retainer wont clip or click into wit the key :(( WTH!? HELPPPP!!!
cj2600
x_Goddess_x,
Take a closer look at the retainer and back side of the key, maybe one of them is broken.
Stephen
I had the same problem with my num lock key. I couldn’t get it to snap into place until I noticed that the little metal hooks on the keyboard were slightly bent (squashed by my 2 year old). Because of this the keyboard not accept the key retainer. I just bent the hook back into place with a small screwdriver and everything snapped into place.
Imelda
Nice one thanks 😉
Mandie
THANK YOU SOOOOO MUCH!!! MY MOM WAS GOING TO KILL ME!!!
kelly
I have an hp dv 7 pavillion and my son threw something and knocked off the ‘enter’ key of the main keyboard. I can see that there is a bar or two little pins that fit into two small holes but I’m not getting the key to snap into place.
Looking around on the net, every keyboard tutorial I see.. the key does not have this swiveling little bar?
cece
oh thank u, thank u, thank u!!!!!
Nancy
Thank you!! I tried many other websites before coming across this. This was exactly what I needed. Thank you for including pictures!
Sophie
it wont click into place .. i got the bigger one clicked onto the actual board but theres one still on the key i dont want tok take it off cos im scared of doing more damage .. what should i do?
carissa
O THANK U SO MUCH MY DAD WUZ GONNA KILL ME
bill turner
You guys are brilliant, love the pictures and helpful information. It’s well appreciated.
thanks,
Satisfied user
zacksci
Thanks God you create this man……
so… he mad this web…
and I can fix my notebook….
it’s terrible when CTRL always push it self
Fergal
This guide is super – ended my frustration with my ‘R’ key.
Thanks.
Alan
Awesome! Your spacebar instructions worked! Thanks!!
angie
thank u so much… i feel like a dumb ass but at least my husband wont blame me for breaking the keyboard… lol thank u thank u thank u whoever u are u genius
cc
i did everything you said but it still wont click an stay..help !!
jessica
Are key retainers the same for all models of laptops/computers? Of course one of the little “pins” broke off of mine and now won’t go back on. Also, where can I buy just the key retainers, I have the actual keys.. Thanks for help…
Anubhav
Thanks for, great help . it worked .. 🙂
Thanks Again
Anubhav
monty
thanks, this helped me form a whole heap of frustration!
Dan
Thanks buddy, I panicked for a moment haha. Was nearly without a ‘G’ and a ‘F’ for a moment 🙂
Sleep State
i was working with the enter key. i found as i have when keys came off before, that you have to keep gently jiggling it but that it would eventually snap in right. this article helped me remain calm and not make the problem worse. such little pieces of plastic!
thanks for the articles. the pics are excellent
David G
Brilliant, thanks very much. I removed my space bar to clean beneath it and I couldn’t get it to work properly until eventually finding your advice that the metal rod in the spacebar needs to hook under the plastic restraints in the keyboard. Many thanks. David, UK.
Heather Dudley
Now, is there some kind of trickto resnapping the key cap? My baby popped the “z” key off (at least she chose the single letter I use the least) and now I can’t get it back on.I see how it works (it’s identical to the one in your pictures, but I just can’t figure out how to make it snap back into place. I’ve positioned it every way I can think of, and I even hear it “click” – but a couple of vigorous taps, and it’s crooked and unattached again. nothing appears to be broken… I think I just suck at this. By the way… thanks for your incredibly timely post!
cj2600
Heather Dudley,
Take a closer look at the retainer assembly. Maybe it’s broken?
Tony W.
Lost my ‘M’. The instructions and ,especially, the photos were clear and succint. The reattachment operation was successful.
It requires several unsuccessful and clutsy attempts. Don’t give up. Thank you, thank you.
Linda Maine
I left the door to my office open and the dogs had a field day trying to get to the birds outside. Unfortunately my laptop was in the way – I panicked, found your site, got all but two keys on since I need those white little HP connectors. I’ll order those, THANK YOU SO MUCH FOR YOUR HELP!!!!!
Amanda
I saw somebody posted a reply about the black little rubber/silicone things under the keys… but I hadn’t found a reply to it.
My space bar fell off and there is only one black rubber thing under it, and I can’t find the other. Can I order more somewhere? I haven’t been able to find them, and my space bar will not work on my laptop now.
Any information would be greatly appreciated. It’s an HP Pavillion. Thanks!
John
Please help, I can get my A key back on however it requires a lot of pressure to get the key to register, and if I push too hard it just comes off.
Is there any solution to this problem? I followed all of the instructions and got the retainer and stuff on..
Jill
Fantastic!!! I can’t believe it was so easy.
THANKS
THANKS. REALLY WORKED. MY EMAIL AND WEBSITE IS REAL. THANKS AGAIN.
JC
Help! I have an hp sd ms pro mmc sm xd with a faulty N key, but the problem is not the key or the mounting clip assembly but one of the little metal slots it all snaps into has sheared off so the key bobs up and down at its head. How do I go about fixing it?
karen
thankyou so much for this site, i hated having a key missing, & u guys helped me fix it…..yay….
satisfied
This worked PERFECTLY! Thank you so much, and great pics!
cj2600
JC,
I don’t think you can fix it. You’ll have to replace the whole keyboard.
Xavier
This worked great! Too much WASD gaming causes my keys to fall off! Lol…
brian
i did everything it told me but my button wont stay in ?
Brian Car*son
No L in my last name, what a surprise cause it fell off…The retainer didn’t fall off…I stuck alott of other key back on, by just placing it there…But the L won’t stick on…I think part of the retainer is broke because the top part off it is missing…I can’t find the missing part…He*p p*ease!
BC
Can you glue a key back on? =-].
john
Can you buy keys anywere? i burned my G-key. but it’s connected horizontally while all other keys are connected vertically (except for H). But switching the H to G doesn’t make very much sence of course.
Ruan
You truly are a legend!!! Thank you!
Ruan
sherry
Thank you! you saved me from having to buy a new laptop. Great information.
Robert Hanlon
I was able to apply the instructions for reattaching the spacebar to reattach the backspace key on my Dell M1710. Thanks so much!
jess
i used this and it worked, the first set of instructions.
except i pressed my key in abit hard and now its stuck in the pressed position.
it still works
but is quite annoying, any ideas ?
EvaMarie
lol. ive been trying to fix a key for an hour then i went to this website and fixed it in a minute. thanks 🙂
Dania
ok, so my key fell out with the white pieces are still attached to it!
how do i take the white pieces of in the first place!!!?
and how do i take of another key without breaking something??
Dania
yaaay! i figured it out! i DIDN’T have to take out the other key! the white plastic snapped right out!
awesome!
i could kiss you!! mwah!! thank you sooo much!
jakub
What can I do when the silicon membrane got lost and the button fell of? I have the button but can I buy the membrane or how can I replace it and what would be the best thing to replace it with?
symphony
one of the key retainer broke when the key cap fell off, do you know whether these retainers can be replaced? do they usually sell them at computer stores, etc.?
shailaja
Thank you very much for your advice.
3 of my laptop keys came off . I thought that was the end of it. I googled for help and found your solutin. It worked brilliantly.
Thanks again,
Shailaja
John S.
Thank you so much. Popped a G key on my acer. I will add that using a dental pick will greatly help get the key retainer clips back into place.
Darin
Thanks, nice diagrams too.
Jeffry
Hello,
Im facing a problem with Toshiba Laptop Keyboard:i have 2 keys attached only the Q and the W only attached to one key retainer from the 2 top sides but not from the bottom sides..so what should i do to fix it ??
thx a lot in advance
Regards.
Ron Baxter
Thanks so much. My Vaio enter/return key came off, and I spent ages trying to get the little wires in the holes in the keyboard base. I didn’t realise till you explained that I could just remove them from the key, fit them in lace and snap the key back. Brilliant solution.
Ron
Anthony Muchina
I never knew how much I need and use the U key until it broke and popped out. I was so frustrated trying to think of how I could fix my damaged “U” key (why is it always U) and Thank you, thank you, thank you because you just saved me over $90 I was about to spend on a new keyboard. I used your technique and had a new “U” key replaced in less than 5 minutes. Now I’m just glad I can type without looking at the keyboard otherwise that funny useless key would be very confusing.
Thank you.
Erika
I did what you said and now my spacebar is too tight. I dont know how to fix it. What do you suggest?
Luis
My shift key came off of my laptop (Thinkpad T23) and I cannot get it back in. Is there a website with pictures that can guide me? or can you help me? your advice above was not applicable to me.
Many thanks
Tanya
Hi,thanks for your very helpful instructions and images. My dog managed to flip the Caps Lock key off of my Dell laptop when my daughter was doing her homework on the floor. Don’t ask, I have no idea!
I was scared of taking another key off incase the same thing happened so I spent many frustrating days trying to figure out the way the retainer sat. Now I have a functioning Caps Lock again.
Nabin
Superb – Thanks for providing this information. Very useful.
My little naughty daughter took three key caps out. I tried to fit them back but couldn’t. Did a google search, got this page and I could fit those caps back. Its all because of the nice explanation by you. Thanks again.
Regards,
Nabin
India
matt
What if it doesn’t just “click” in? The top half of the key is in place, but the bottom clip won’t click into place?
cj2600
matt,
Take a closer look at the bottom part of the key and clip. Maybe one of them is broken.
magicyte
Thank you very much for your help! I did something that I shouldn’t have (ate near my laptop), and spilled syrup under the space key. I need to clean it out and I found this page by Googling. Your help was simple and easy to understand. Thanks again!
Sincerely,
Magicyte
Ryan
what if the retainer is inside the key cap
EkkuZakku
Thanks a bunch! This was exactly what I was looking for, I took off a key to get a crumb out (eating, like one of the guys below me) and realized that it was gonna be a bit harder to get the key back on than a normal desktop keyboard!
Kevin Rampling
That key you put in the place of the U is a right click key…
Craig
Thanx so so very much could not have done it without your instruction. As you pointed out there is no universal guide. On my Acer D250 Netbook the outer part of the retainer (right hand piece on your first pic) is a “U” shape. Therefore assembly appears to be able to be assembled in reverse. It was not until I assembled the retainer and keypad together the off the laptop that I realised I was trying the do it back to front.
An off computer assemble of the parts could be a good tip to add. But seriously would not have got that far without your help. Thanx again…….
cj2600
Ryan,
1. Separate the retainer from the key cap.
2. Connect the retainer to the keyboard.
3. Snap the key cap on the retainer.
Joseph
My A botton Fell off and my rubber thing did as well what can i do
Darrian
how do i repair a key on a compaq presario CQ50-103NR Notebook PC
pamela
My 2yr old picked the keys off the laptop, i was at witts end till a friend forwarded this site! Thank you so much!!!
I’m almost done putting them back!
julyansyah
thanks a lot. this really help me with my broken spacebar.
Monica
Thank You! My ‘4/$’ key fell off and I fixed it without having to buy anything. You guys rock.
Arijit
Thanks for this fantastic post. I could fix one of my broken keys. This saved a lot of time and money. really appreciate your help.
Dan Brinkley
So I have a Thinkpad (Lenovo, so new-ish. Post-move to flimsy form factor) and the spacebar has come off. I simply cannot get the bottom of it to clip and stay on. Any help would be greatly appreciated.
KURT
The key retainer pins broke on my dell laptop,
anyone know where i can buy the replacements??
the key was loose and i was wondering why, now i know.
🙁
Courtney Fandre
This is great! I borrowed my friend’s lap top and the key fell off. She would’ve been pissed if I had given it back to her with the key off but you saved me! Thanks!!!!
Dan Brinkley
You’re a life-saver. I took another crack at the aforementioned issue with my spacebar, and the re-installation went smoothly.
Thanks again,
Dan
Janine
I can’t get my enter key on, do you have any advice for that? (its a dell computer).
Melissa
Thanks so much for this. Lost my shift key for about 2 weeks and your instructions helped me fix it in less than a minute. X
Katy
Thanks! This saved my sanity, and the appearance of my keyboard!
Georgina
Thank you very much! Finally fixed my key with your help!!!
Pato
Hey THANK YOU!
My cat sometimes rips a key off my laptop keyboard and, a couple of times i managed to do it by myself (mostly by luck). But this last time I was having difficulties.
You really helped me out!
Thanks again!
Borellus
Good post, I wish I had read this a few moths ago when my key fell off. I tried for ages to egt it back on. I managed in the ned but would have been a lot easier with this help.
Thank you.
Rotondra
Pictures helped me repair the shift key on my dell
Thanks
jhr
Thank You, Thank you….
dj aj
thanks man, that was a great tutorial got my key back in place in less than 15 minutes.
toshiba satellite l355-s7902
sheri
awesome! i did it!!—–
Winston
Thank you so much for the tutorial. I had my left arrow key chipped off from my Lenovo. I tried getting support for it to be fixed, but when I was told it’s gonna take weeks, I had second thoughts. It was only after I got to your site that I tried snapping back the key, and it worked.
Great job guys.
Nisarg Gandhi
Thank youuuuuuuuuuuuuuuuu soooooooooooooooo much!
sexy
thanks.
Prakash
Thank You for the deatiled demonstration of the procedure.
I fixed the decimal point key from my Dell Inspiron 1420 laptop myself using your tutorial.
It helped me saving considering money and time!
Me
omg Thankyou thankyou thankyou!!! my spacebar works again!!! yay!!
Vostro 1710
Thanks man! That helped me get my > key back on after it jumped off when I was typing on my new Vostro 1710. You da man!
SL
I just popped a key out by accident and your instructions helped me put it back in. Thanks for the great info! Incredibly helpful!
Valerie
Thank you so much! You made is so easy and gave me the confidence to do it.
Ella
In the process of trying to fix this i snapped the key retainer! It’s a very fiddly job!
Steph R
Thankyou so much! Took my spacebar key off to clean under it then realised I couldn’t get it back on *embarrassed*.
Thanks!
Sarah
Thank you so much! I exchanged a broken membrane just like you suggested, and now I have my “M” back. You guys rock!
chandra
This article is really helpful. I fixed my laptop keys seeing these suggestions. The screenshots helped a lot
zie
thx so much!!! wouldn’t have been able to fix my ~ without the pictures :)))
Alex Perez
You rock! Thanks so, so, SO much! I replaced my broken E-cap using that weird little key cap next to ALT, and I can finally type properly again! Seems so simple now, after reading your suggestion to swap out the caps like that, but I was completely at my wit’s end and not thinking properly. You really saved my day!
And as somebody said above, the screenshots are excellent and a huge help. Thanks again!!!
Mary
Why is genius so simple? Thanks so much. I won’t have to shop for a key now!
Norman
Thank you so much.The pictures were a great help. Now I can appear to be a genius when my friends need help.
God bless you
Meghan
Thank you for the response you gave explaining how to reattach the cap of a letter. I was desperate to fix my dell inspiron lapton enter key before my husband saw that it had popped off. he might have murdered me for letting it get busted 🙂 i didn’t realize that i would have to push as hard as i did to get it to snap back on. i kept thinking that it would need glue to reattach, but there was no leftover glue from the original assembly so i knew not to do that. it snapped back on easily…i just had to push down on it harder then i thought i would have to!!!
leah
thank you so much, this made everything so simple. 🙂 reattached my “j” key with ease.
Abhi
Thanks for putting this info. I have a HP compaq 8510w. The suggestion worked perfectly for me.
Gopinath
Thanks
Clear and lucid instructions.
Was able to fix the key within 3 minutes of finding your site.
Will join the crowd, and say, Thanks Again !!
Yovi
This website is amazing!! Thank you soooo much for helping me!
This website is much better than any other website “trying” to help you. So thanks again!
Heather
Thank you thank you thank you!!!!!!! I fixed it with your tutorial’s help!! You are amazing!!
Joy
You are brilliant – my husband had tried without success, and it worked first time for me!
mark silverstein
My problem with a missing key seems to be that the silicone membrane itself oes not work. The key u say to use is also off, but when I push that membrane it works. The other missing key oes (will) not work when the memrane in pushet. Also, it seems the membane is not gluet but sticks up thru the keyboart. I on’t know if you’ll reply, but it woult be much appreciatet if you woul . It is a Sony laptop VGN-FE77OG. Thank you.
cj2600
mark silverstein,
I guess it’s time to replace the keyboard. I don’t think that you can fix it.
Frank
This was soooo useful. I fixed my Sony Vaio Laptop using method 1. The most important tip is to take another key apart and see how that one is assembled so you can assemble the broken one.
I now have this website bookmarked and will recommend this to everyone. ^^
Emily
Excellent instructions! Does anyone know where I can get a MEMBRANE? The membrane under my left mouse key on my laptop seems to be broken. The top is off of it and the part the top rests on seems to be irreparably smooshed!
Morten Brodersen
You’re amazing. It’s actually easy. Just take another one off, and see how you need to put it together 🙂 ty very much
Hayley
Heeey
this is AMAZING! only the key cap fell off on the shift key in my Advent netbook!
thank you (:
Chuck Edwards
I’m looking for a replacement keypad button
Specifically the “Enter” button (gray plastic cover that goes on top of the button)
For a Gateway M-6332 laptop
If I can’t get the button cover, where can I get a replacement keypad? $$ ?
hyperdelirium
What if a key fell off, as well as the key retainer, and the points that would hold it on seem to be… ineffective? And/or one of them broke off? And snapping it back on does nothing and it continues to come back off every time?
cj2600
hyperdelirium,
You’ll have to replace the keyboard. If one of the metal hooks is broken, you will not be able to attach the key.
cj2600
chick Edwards,
You can search for this button on eBay and if there is no luck, replace the whole keyboard.
Jack Deegan
Voilá! Took white plastic key retainer off of keycap and installed retainer per pic and snapped on cap. Too easy when you know how!
wolfie
omgosh thnk you sooooo much
this saved my keyboard 😀
gedderdun
Thank you very much for taking the time to make such visual instructions for this. I had a key come off of my Thinkpad in three pieces. Your instructions led me to remove a nearby key so that I was able to see how to reconnect the three pieces. Great job!
the person
my retainer and cap has come off but wen i try to put retainer back to half fits, bottom doesnt D: help
Misty
Can I just say that when you pass, someone needs to nominate you for Sainthood? I’ve been living without a down arrow button for almost two years. Thanks to you, I now have a down button again (the membrane was gone as well, and that had me stymied). THANK YOU.
Huw
this was very helpful, i thought my key was broken but i fixed it thanks to this website
many thanks
robyn
thank you thank you thank you….
believe it or not i caught my arrow key on my fingernail (while i was typing) and pulled it right off — came here hoping for answers — and seeing the pictures for the “spacebar” helped me put the “puzzle of a retainer” back together and back on the board!!! now it works perfectly again!!
pjvisitor
Heyy … thanks soooooooo much for this tip. fixed it all muself using your instructions when my “\” key abbove the Enter fell off half hour ago.
You r a star!
elizabeth
I fixed it all by myself 🙂 great instructions!!
Danny
By popping the key next to the troubled one, I found the missing clip under the other keys–bonus! Thanks.
L
thanks so much! my broken space bar was really frustrating. thanks for the help
Gary
Thank you so much for posting this! My 1/! key fell off this morning with the retainer piece intact, situation 1 (<—typed perfectly!) helped me fix it inside 10 minutes, no doubt saving me an expensive trip to Best Buy!
Elle
OMG THANK YOUUUUUUUU !
Imma save this in my favorites just incase it happens again ! (:
Stephanie
Thanks! My son broke off the U key and retainer clip this morning….while I am waiting for my order from ebay for new retainer clips I found this and decided to borrow a reatiner clip from another unused key.
BUT my U is still tight instead of springy- any tips? I have an HP Pavilion ze4500
Brittany C
Oh thank you so much! I spent the last hour trying to repair my spacebar, and finally resorted to looking up tips on google. Within a few minutes of reading this my spacebar was working again! I about died. Thank you!
Inspiron1525
Thank you!! You saved me from having to buy a new keyboard. Now to figure out what to do with the inspiron 1525 annoying touch pad!!!!
Jordan
So is fixing the enter key the same as fixing the space bar? i can’t figure out how to get it, my husband and I worked on it forever, and we can’t seem to fix it ourselves
chris
for some reason, even though I have all the parts, this just doesn’t work for me…nor the people at geek squad… I have an HP dv2000 and the retainer is stuck to the keyboard??? so I thought I could just press the key back on… apparently no. I was able to kind of get one half of it to stick, but its only part on and wabbly?!
any ideas?… because geek squad want to charge me a whopping $35 to send it back to HP to get a new keyboard!!! ps, all the parts are there.
Johnny
I need helpp my backspace button fell off my laptop but the retainer is still on the keyboard. What Should I Do?
Susan
I have an HP2700. If the person who posted before me has the same keyboard that I do…. the reason it didn’t work is because the key retainers work differently.
The key retainers cross over in the middle and where they cross, there are two pegs on one and two holes on the other. Before you put them back onto the keyboard, you have to make sure that the pegs end up back in the holes before you put it on the keyboard.
To complicate matters, the retainers don’t have the same “four points” as in the picture. The one with the holes has two notches that catch at the top. The one with the pegs has ONE notch that catches at the bottom.
The way I got it to work is this:
Get the pegs back into the holes by gently stretching the key retainer with the holes. The two retainers will then form an “X”. The retainer with the pegs will connect to the keyboard on bottom and closest to the space bar. The retainer with the holes will connect to the keyboard on the top and the closest to the monitor.
Once you get them connected to each other, then slide the retainer with the notches into place. Note that I say “slide” NOT “press”. Once it’s in place, use your finger nail or some tweezers to gently pull the other end into place.
It took several tries to get it done correctly…and it was slow go and took patience. But, it’s possible!
KELLIE
Thank you!! It worked so well! Exactly what I needed!!
jo
thanksforteachingmehowtofixmyspacebar.
Greg
I searched the responses on the sight but could not see the response for fixing the shift key on a Lenovo laptop. My 9 month old son ripped the Shift key off on the left side of the keyboard. Thankfully the pieces did not break, but I am not able to “snap” the key back into place…
What would be the trick to making this happen? Do I need to press harder? I am afraid of breaking the key.
Christina
My backspace key was shifting and hard to use. I fiddled around with it, and it fell off! There is a little metal bar on the back, and on the actual area it goes there are two black thingies to put it through–but it seems that there’s nothing to hold that in place. I have a Compaq laptop. Any help?
Nicole Burroughs
Thanks! This worked perfectly!
jamene
thank you, very easy to follow and this really helpeed me!
fads
Thanks a lot………….worked perfectly……
jinx
Thanks! Worked like a charm!
Stu
Lifesaver!!!
Len
Thanks SO much !
vivek
thanks a lot.. this was really helpful,,,
nina
Thanks SO much ! Worked like a charm!
farrah
but the problem i have is that..my space key fell of a few weeks ago..i didn’t know how to fix it…and now the membrane has come off..how do i fix it now??? i don’t have it no more because it ripped in two..how do i fix it??
Nabbb
Easy to say but hard to do
My Backspace key came off but it is different to your screenshots
Kat
OMg. tym. I was working on my laptop and i thot below the yeswere dirty So i popped the cap off, then couldnt get the thing back on. u saved my but, and kept me from being grounded..
Jill
Thanks. It fixed the problem and we didn’t need to get a new keyboard!!! Thanks a million!
cmod
OMG i spend 3 hrs trying to fix it and it keeps falling off my hand …after i read the laptop repair took me 2 secs its fix …thank you very much!!!!!!!!!!!!!!!!!
Theo
Thanks so much!, I was trying to read this on my laptop, while fixing it – kept pressing keys accidently! Thanks a bunch.
Dave
Great advice, fixed it in a minute, thanks
Hellicus
Excellent article guys !
I got my key back in place in minutes, you guys rock !!!
Luke
Thankyou so much!! I broke one of the keys the other day n balmmed it on my baby brother:P but fixed it!! Feel so triumphant!! thought i would neer get it fixed!!:)
thnks so much
michael
Fantastic…was about to throw my DiNovio keyboard out due to fallen off keys…get straight forward useful advice…there should be more info like this around…
Moira
Sooo helpful! Couldn’t have finished paper without you!!! yay! <3
Nick
This was so helpful thanks for the article good find. 🙂
Vince
Thank you so much! This was a huge help!
josef
thank u very much!!! your site is very helpful!!! 😀
alex
my j key loves you now. but… too bad i cant get the h in now. lol. ill get it later
eve
thank you a lot:)helped in my desperation
greets from key f11
euggeeeene
wot fit back togther, It wotclick ad we it does it falles of we i clcik it (cat write theletter ext to m ad b)
madeafoolofmyself
ha ha..
i had downloaded the instructions and saved them, coz i wasn’t getting the time to read it..
only my key had come off….
when i read… it said snap the key back 🙂 🙂
and i jus did that snapped it back…
it took me 5 days and 5 seconds…. 5 days to read it and 5 seconds to repair..
thanks a lot 🙂
Shelly
My kid broke 5 keys off my keyboard…we were able to salvage all the peices but I had no idea how to put them back. This website did the trick. The pictures helped tremendously!! I got all the keys fixed and now know how to do it in the future. I recommend this site to anyone!!!
min
thanks~
i worked!!
i was so worried bout it at first
david
thank you very much! My 15 m.o. daughter pulled my z key off and it only took me about 10 minutes to fix it after seeing this site! awesome!
Sherry
Thank you for posting this information. Somehow my cat loosen 2 keys on my laptop. I was about to take it to a repair shop, when I decided to check the internet for instructions. Normally my brain freezes when I read instructions, but this time it was a “snap” (pun intented)to put the keys back on. I think it was the pictures that did the trick, as weel as the clear to understand instructions. I recommened this website!!!
Dawn
Thanks! My space bar is back in place!
Steve Cunningham
Hi, I just dropped a stapler on my toshiba keyboard. From your pictures above, it broke the tips off the key retainer. It is the “H” looking or square one you show in the picture.
Do you have one I can purchase?
Thanks,
Karen Mitchell
Thank you a million times over! I am all thumbs and your photos and instructions showed me how to snap the space bar back on to the laptop. I still can not believe this actually worked! I thank you again and my cat thanks you too since she was in BIG trouble for having pulled the space bar off inthe first place! Thank you thank you thank you!!!!! Karen
Michal
Thank you soooo much!!
Grateful user
Thank you so much dude!! You save me of a scolding 😉 Excelent contribution
lesley
The spacebar on my lenovo3000 N100 failed. I took the bar offand put a piece of doublesided sticky foam on top of the blue grommet. That helped.
Jacinta
It worked on my Sony! Thank you. My boyfriend said it would cost a lot to get fixed.
taylor
oh my god
thanks soooooooo much you saved my life
my parents would kill me if they say my space key broken off
Greg
thanks it worked on my new HP laptop..
Dalz
thank you thank you thank you thank you thank you thank you…..as u might realise by now this is a ‘laptop novice’ thanking you from the bottom of her heart. I almost died when the key from my ‘brand new laptop bought from hard earned money’ fell off. you are a lifesaver for many, god bless. – Dalz
Dalz
btw…adding you to stumbleupon so that many more helpless souls can be saved :p
J. E. Lopez
MAN!!! my cat just ripped off my “page” button, and CTRL button…… {right next to eachother}… I freaked out for awhile, then did a search.. Found this site… and all i can say is THANK YOU VERY MUCH!!!!!!!!!!! everything is all back to NORMAL.. THANK’s AGAIN!!
Georgia
Thank you!!! Really easy to follow, my dad will still kill me though because I still can’t fix it on??!!!
Georgia
THANK YOU!!! Turns out I reassembled the key wrong!!! Thank you so much! Managed to fix it without my dad finding out!
Neven
Thank you! My niece ripped out my space bar and ‘C’ Key and with this guide i put back my laptop keys where they are meant to be 🙂
John
Well,
THANKS a million for taking the effort of making this pictures. It didn’t take a minute putting the button back. You saved me a nerve here 🙂
saifuz
oh my god thank you!##!##!#!#!#
I thought i needed to glue it or take it to the shop for months!#!#
you saved me a bunch!@#%$^
Grateful
Hi,
Thanks a ton for your website. Priceless in fixing my laptop keys. 🙂
grateful visitor.
Stmguth
HP said it couldn’t be fixed. You showed me how.
Thank You!
Iona
Thank you SO SO SO SO SO much! I had reassembled my enter key AND my space key wrong, and with this, it only took a couple of seconds!!!
Pravin
This is very helpful for me. You can fix the key by yourself.
Thanks a lot.
natalie
thankyou i broke my ke n now its fixed xx
Luther
You are a huge blessing. Thank you so much!
tbell76
Thanks! I got my enter key back on. 🙂
Aren
I need the actualy keys for the laptop and its not a MAC. I dont have any of the keys. I cant find them HELP
Zahra
One of my keys of my laptop fell off and I had to get it fixed immediately. I came across this website and ordered my exact key from them. They had video tutorial on how to fix your keys. It was great. If any of you in need for a laptop key or how to repair it yourself check out this website: laptopkey.com
mheller
Great help! Your procedure worked like a charm! Thanks!
Luciana
Wonderful! Key is back on. Thank you so much for the help.
cj2600
Aren,
I don’t get it. You don’t have any keys on the keyboard? Why wouldn’t you replace the entire keyboard?
Rajendra Atreya
Thanks I Just fixed it as per your guidance and saved my laptop
jim mullin
I just want to say thank you for taking the time to help other people. It took a few hours for you to publish this but in doing so you so many others save time and money. I sincerely appreciate you posting this and if I can ever figure out how to fix something easily that others cannot, I will post (I have no idea how to post something like this)something similar. Thanks again.
Neil
Thanks for the article. I was trying to relace the whole key without success. I’d never thought about whipping the cap off first! Doh!! It still drops off but I think I strained it before I found your article.
E.R
this was alot of help
i thought i had broken my ‘B’ key
when i removed it to clean a crumb under it,
but you helped me fix it!
thanks alot!!
TaintedAffliction
hurr hurr hurr. brokeded ma space barz trying to clean it. had to replace the plastic parts. used my ctrl key. its okay though. never use it. SPACEBAR STILL BROKEN THOUGH D:<
Sarah
Amazing. Thank you for the repair tip(key cap came off attached key retainer. I carefully removed the key retainer from the key cap & etc…instructions. Relieved that this was an easy fix, done carefully.
bee
Yeah so um one of the key broke in half cause of my manHands;D can i juss put tape on it
Alan, Cymru.
Excellent tutorial, I thought I was in for a repairshop job until I saw this, Thank you so much. Diolch yn fawr. A.J.
Warren
I am so happy I was to fix the key that fell off, I dropped a book on it and the #5 key popped off. This article was able to assist a bit in the way it works to put it on… Thank you!
Warren
Michael Wale
This is so great, spilled juice on my keyboard and it got skicky…I took out the space bar to clean it but couldnt fix it back. Now I fixed it and am gonna be fixing some more of my friends, maybe for money too! LOL…Thanks!
1
Thank you!
Jacob
Thankyou so much. My laptop is fixed now and I can use my delete key.
Umer Farooq
My laptop key is open the keyboard how can i do it?
Dave C
Thanks for all the help! Was able to fix spacebar easily!
cj2600
Michael Wale,
You are lucky. It’s not always possible to make the keyboard work after liquid spill. In most cases you have to replace the keyboard.
Ls
Is it safe to use super glue on the silicone membrane since you’re placing chemicals on a pc board or is this not considered like a pc board?
cj2600
Ls,
It’s not a PC board. I did that and it worked for me. I guess you can use epoxy instead of superglue.
Pras
My one of the key retainers is broken, and also the silicone membrane is lost. Your article is great. I have kept the broken ‘K’ button, but can’t fix it. Where to buy a new silicone membrane and the containers??
Ann
Hi
That key to the right of they Alt key is the shortcut menu key. (Like right-clicking something.)
Aimee
thank you so uch. My youngest son removed several of keys from my laptop. I have been making due for a while. Thank you so much. No w I have a functional 7, 8, r, h and shift. Thank you, T=thank you, thank you
B
Thank you so much for this tutorial. I would be either over-paying someone for labor or remain “D” less, you rock!
ariella
Thank you so much! I don’t use the w key alot but it would still suck to not have one!
Katherine
thankyou very much you saved my keyboard!
Kerry
Thank you so much, i fixed my arrow key thanks to your digaram. will tell everyone where to come when there key come off
Crissy
wow! this was very helpful. thank you. i was able to fix my broken key.
josh b
SWEET BRO THANKS!
Kjell
Superglue is dangerous stuff here. Better use another type. Superglue stings in the eye because non-cured glue sends vapors out. These vapors settle in the surroundings, combines with water molecules and thus cure. This will leave a thin isolation layer on the conductive pcb traces so that the key may not work any more. This is valid only if it is a conductive membrane that shall register the keypress. If there is a sheet below the membrane that makes the contact, it may work. But in general, never use superglue close to any keyboard.
Rory Hughes
The suggestions on this site really helped me to fix the keys on my laptop that had come off. Very helpful
Earl
THANKS. I saved a lot of time and frustration.
Lysiane
Hi,
I wanted to know, if superglue is dangerous for keybord, what should we use instead?
Thank you!
Sebastien
Sooo easy… once you know how keys are assembled !
I thought keys were stuck, and I was wondering what kind of glu I should use. But I just had to snap it back.
Thank you so much !
Yogendra
Thanks for the demo. You saved my time and money 🙂
cj2600
Lysiane,
Maybe epoxy?
Theresa
THANK YOU SO MUCH!!!
noufal
Thats fine thank you
sokratesTM
omfg, thanks! took me 3 hours to find out, when i found this page i opened another key, then just took half an hour for the rest! TY
kathryn
See this?: ,
That’s a comma. I’ve been without that key for so long I believe the way I write has changed. When the key I ordered arrived I was at a total loss… thank you so much for this incredibly helpful page! It’s on!
marie
what can you do if the keys are bent? buy new keys or a new laptop??
clow
Many thanks!
Sinan
thaaaank you so much 🙂
Damian (dkhd)
the quick brown fox jumps over the lazy dog!
Thank you, that was the little bit of guidance I needed.
angel
i followed the instructions on how to fix the key & the problem was the key retainer is broken, it can’t hold.. so my problem now is i wanna buy a new retainer but i dont know what’s the size, my notebook is an HP tx2-1025dx..
cj2600
angel,
If you cannot find the retainer, just buy the whole new keyboard. It’s only $29.50 on eBay with free shipping. A single key with retainer might cost you about $5-6.
Metzgermeister
Hi!
I have a Toshiba Satellite 5205-S703. 5 keys of the keyboard is dead! So they’re makaing nothing. Can I use to fix it on of theese methods?
cj2600
Metzgermeister,
Do you mean these keys are not working at all?
Most likely the keyboard is bad. There is a chance of bad keyboard controller on the motherboard.
1. Try reconnecting the keyboard cable to the motherboard. Maybe it’s just bad connection.
2. Try replacing the keyboard.
3. If you still experience the same problem after replacing the keyboard, most likely this is motherboard related problem. You’ll have to replace the motherboard.
srikath
nice posts mate
Alex
Thanks for this, my mom wiped my keyboard with a cloth and F6 and F7 fell off this really worked cant thank you enough
Jesse
Thanks for the tip, this was awesome! My son pulled my space bar off of my dell xps, you saved the day!
Kalpak
THank you very much. My start key fell off and I followed the steps. It’s perfectly working now!!!!!!!!!1
sara
thanks! my son pulled off the enter key. You are a lifesaver!
George
my d fell off, and i dont wanna remove any keys, help?
cj2600
George,
Fix the D key without removing other keys. 🙂
All keyboards are different. There are some key installation guides on YouTube but I cannot tell which one is good for you because you didn’t mention the laptop model number.
True Anderson
This was very helpfull! accidentally broke off my control key when i got frustrated and looked this up, first one i clicked and it worked perfectly. also good idea the pictures were there ! xxx
Linday
I spilled orange soda into my key board and managed to get my space bar sticky and clicky. This helped me in removing and fixing the key, and now FANTASTIC! I can have spaces between my words!
Paul Sheraton
Hi Thanks for the tip on how to repair the space bar! great website!
Nick
Took my space bar off, typelike thisalot until I say these instructions. Worked like a charm.
Thanks,
Nick
(also an engineer, just shows what you learn in school isn’t everything)
Amanda
I literally typed “How to put a key back on a laptop keyboard” and this site was the 1st or if not one of the 1st ones I saw and helped me fix my keyboard 🙂 I thought I was going to have to go get it fixed by somebody. But after 20 minutes or so of frustration, I finally got it. Thanks 🙂
Marcella
Thanks a lot for the instructions, without it, I wouldn’t have made it:) I can finally use the spacebar correctly.
Michael
Popped off my f3 and esc key while upgrading ram on my nc6230.
THANK YOU!!
Saved me a lot of time and questions from my company tech.
This is a great service to others.
And to those who diss you because their laptop isn’t exactly like the one pictured –
Folks, get some grace and empathy – someone goes out of their way to provide help and you’re going to get all snarky ’cause it doesn’t help you right away? Puh-lease.
Torsten
OH man, this is GREAT I was just getting worried, but this guide helped me.. Thank you 🙂
Krissy
THANK YOU!!!I was just messing around and accidentally popped the key out… thank goodness for google and your website.
fnp
thank you so much…. i was having a hard time fixing back my space bar key… now it works just fine.. thanks a lot…
Nina
GOD BLESS YOU!!! I have had keys floating around for a couple of months that I couldn’t figure out how to reassemble, and today my spacebar popped off . . . I went looking for a site to help me . . . as you can see my spacebar is back on perfectly intact! I plan to try my six-key next and see if I can get it.
THANK YOU!!!!!!
Apoorv Umang
TY VVVVVVVVVVVVVM !!!!!!!!!!!!!!!!!!!!!
🙂 🙂
Was finally able to get my spacebar working,all because of your help!!
ty once again!
Ray
Thank you so much! I never would have thought to pull off ANOTHER key and seeing how the retainer was connected. The pictures really helped too! 🙂
Valerie
Thank you sooooo much!!! I thought I broke the whole thing but the pictures helped show me how to fix it!!! THANKS!
jaroc
Hi,
Thanks for this efficient webpage.
Personnaly, the kb of my acer portable was also blocked due to some suggar drink.
I have remove it from the unit, remove the aluminium folder in the back. (It is used for shieldering purpose).
Then I have placed the Keyboard in a WARM basket with water and a tiny quantity of soap. (I have washed it)
I have also pass in under the running water of a sink faucet.(some water under pressure remove garbit)
Then I have leave it on a heater for several days (one week) to make sure that it dry completely.
To replace the aluminium folder, I have use some double face tape and a piece of alumium used by my wife for cooking.
Now I have a nicely working kb.
Shari
Thank you very much for your help. I was in the middle of my school work (I go to school online) and the key popped off. Of course, I panicked, then I thought about looking it up online. Again, thanks for your help!
emre ramazanoglu
You rule! Thank so much!
Sarah
Thankyou so much, left laptop running on table, came back and key was missing, think the cat had somethign to do with it, found the key and fiddled trying to get it back on, thanks to your pics and instructions I realised a piece of the retainer clip was missing and searched and found it, laptop keypad fixed and working great…
joe
cheers neva thort id fix it!!!sweeeeeeeeeet
Annie
Oh my gosshhh!!! I love you!!! Thanks SO much!!! I was so freaked i would never get my keyboard working!!!
thank you again!!!
Coffey (ALASKA)
Good Stuff!!! My son pulled about half of our keys off the keyboard this morning. Googled you for a repair and you guys are awesome!!!
YOU HANDSOME BRUTE DONT YOU EVER DIE!!!!!
Hippoman
🙁 i have a different retainer… Toshiba laptop… Pulled off left arrow key cause it wouldnt go down anymore cause of hairs… what to do! they dont fit into each other like the ones on the pictures….
Amare
Thanks a bunch.. my son removed several keys and with your help I was able to install all back.
freeman
Thanks, you help me from panic
Ali
Thank you so much! My 8 month old pulled off my space bar right before my finals week!! I was going to have to just buy a new lap top for the week because I can’t live without the space bar. YOU ROCK!!!!
RT
Thank you so much! This site and advice saved my life, literally! My sister would have freaked at me if she realised i nearly broke the laptop again! Haha. Again thank you so much, i feel like a computer genius now. (Cheesey i know, but oh well!)
(Look my “H” button works perfectly thanks to you! YAY!)
R.T. x
Fiona
Excellent – thank you – fixed my spacebar problem, mind you I dont have pgDn or the weird page key with the little arrow – but who cares 🙂
Cara
Got my space bar back on leaving the metal retainer on the space bar but pivoting it so I could slide the ends back into the base, then pressing down to click the whole space bar into place. Thanks for the pictures.
Karli
Thank you so much! I was so relieved to find this. :]
Frederick
Wow! Thanks! That helped a bunch! I was about to throw my laptop out the window! Great pictures and awesome technical writing skills!
Mila
Thanks a bunch!!! i popped the key off and if my dad found out he would’ve killed me!!! Luckily i found this and repaired it in time
Nilda Hurley
Hi,
My problem is not with any of my new laptop keyboard keys, but with the mouse left key. For some reason it does not have the ‘bounce’ that all of the the other keys have. It works when I press it but the fact it stays flat drives me crazy. Is the membrane the issue? Can the cap be lifted just like the keyboard keys, does it have a retainer also? What do you think is the problem and is there a solution to it? Thanks!
Tim
Thanks!
Ash
Absolute saviour! Thanks heaps. Great guide!
Chase
My damn cat pulled one out, but this helped me put it back in. Thanks man!
Stacy W Barbour
This help article is well written and the illustrations are invaluable…”a picture is worth a thousand words.”
Thank you very much!!!
saffron
Thank you so much! This was a great help and stopped me from getting in serious trouble haha!
Arnab Jyoti Gupta
This article helped me a lot. Otherwise i was going to purchase another keyboard for laptop. Hats off to you.
Thanks,
Arnab
Dorothy
WOW! I thought I was a goner! My laptop is old but I love it and didn’t want to even think about replacing the keyboard. My husband told me to just buy a new laptop instead of a keyboard that I would have to struggle to install. Guess what? I found your website, followed the directions and now I have my “e” back and my trusty 5+ year old laptop! And I (okay, we) did it! Love the website, love the photos accompanying the instructions. Appreciate the pictures of the broken rings too. I thought maybe one of my rings was broken, it wasn’t 🙂
Thanks so much!
Jaseena
Amazing. You made it really simple.. 🙂
Thanks
Melissa
Thanks so much for the detailed pictures and helpful tutorial! I was able to fix my keyboard key that came off without purchasing a new one!
Udara
Thanks for your help
Ali
The first solution completely ruined the key retainer for me. It snapped the top part in half, making it usless.
I ended up using that useless key’s retainers for the B key. Luckily I still had the cap, so it works as normal, but my keyboard still looks odd.
Tam
For those with the shift key issue, I managed to get mine back on by leaving the bar attached to the key then slipping the ends of the bar into the loops on the keyboard. Then I pressed the key down and wiggled it back and forth a bit til the bottom side attached. To get the top to attach I had to stick a toothpick under the edge on the bottom, then press down on the top (was the only way I could get he top part lined up to snap in). Not sure if this will help anyone or not.
annom
Thnks, But My End Key Came Off Because Of My Bro! But Your Website Didnt Help THAT Much 🙂 But It Made Me Use My Common Sence Lol! Thanks Ever Soo Much , Now My Laptop Dont Look Crap With Just A White Gap That Shows Out!
maryam
thanx .. u helped me alot ;)))
god bless u
Cris
Tam, Thank you for your suggestion. I was having soooo much difficulty getting the shift key back in place.
Since you offered what worked for you, I tried it & now my keyboard is as good as new again!!!!! ( I was scared to press down & break it worse before I read your post.)
sophie
ive done everthing it says but they not click back on, what does this mean ? 🙂
Elizabeth Dunsone Agnovich
Just wanted to say thanks for helping me fix my spacebar!
Galluer
Got it fixed. HP laptop.
Chris
I just dropped a CD on my Gateway laptop keyboard and the the #7 key popped off! Thanks to you, I got it fixed!
Audry
How do I fix the backspace button. i still have it but cant seem to get it back on. Help please
Mark
My cat pulled a key off of our keyboard over night. Thanks to your info here I was able to fix it. Thanks!! You rock!
Stacie R
Thank you, Thank you, Thank you…everything including the little black rubber ball came off my “s” key and thanks to you, it is back together…you saved me a trip to Best Buy…people like you make the world seem a bit more optimistic. Happy New Year.
Gagan
dat’s good. I fixed my toshiba laptop key
Jess
Thanks so much! I broke my keyboard ad thanks to you I fixed it before she found out! I’m really greatful thanks.
Mosawer
Hey
Great information, but its my esc-key that fell off, and its a little bit different then a normal key. Can you please help me.
Mosawer
Hey its me again and i just wanna say that i found out how to put the esc-key on. Thanks this was a great help
fasdf
THANK you!!!
bruce
thankyou so much !
you saved me a bunch of headaches !
thomgrub
thank you, yours was the calming voice that i needed to hear. the backspace key came off [i took it off to clean under it, ahem…] and it was the little rubber cone that was missing, so the key would not spring back up.
two minutes sweeping the carpet with my fingers provided the answer and then i popped the cone on, and the key back on top.
easy peasy… and if i can do it…….
Brock
I have a habit of pulling the keyboard keys and they fall out. For the first time, my backspace key came out. I saw it had a plastic rim thing underneath, unlike the shift key (one i usually pull out). I started freaking but read this guide helped and got my backspace back in. I now need to remember not to pull the keys, or i’m going to have to come up with some money.
Thanks for the guide. Favourited and 5/5.
Regards,
Brock.
QWERTY
Thanks Dude, I figured out the regular key on my own, but was stuck on the enter key. I just followed the instructions for the space bar. Fixing keys is so cathartic and fun, I don’t think I’ll hesitate to pound on my laptop next time I have a meltdown.
newb
Such a great resource! And luckily I have and IBM just like your example! This saved me about 4 hours of my time! Cheers!
Scott
mona
Oh wow, thank you so much for that step by step with photos! I couldn’t get my space bar back on correctly until I saw this. You rock!
asdsd
Coool thanks!
Rachael
Thank you soooo Much!!!! my key fell of my laptop and i was freaking!!! and i read this and did what u said and it snapped right back on. 🙂 Thank youuu! 🙂
X12
OMG!!! Thank you sooooo much.. i broke my dad’s laptop and had to fix it.. andi coudlnt work out how! this helped sooo much
eagleswings
Thanks, my 0/) key was sticking so I pulled it off not realizing it was different than my desktop keyboard keys and I am sure with these instructions I can get it either fixed or use another key like you suggested!
Magdy
i have toshiba satellite L300 , the problem is when i operates the laptop , every thing shows that it is working but the screen is black at the end (starting is ok but after that screen is black)
Chris
Thank you, it was just a simple case of snapping it back into place on the laptop. You have made a guys day!
🙂
eniwhizzy
when i put on my system, the lght comes on but the hard disk doesnt respond.the hard disk is not the challenge neither is it the ram but the system will not just come on it wont even display the laptop make,pls reply…
Bro
Ha, thanks, i wouldve been so grounded without this :)!
Eddy Dijkman
This was great. My D key was busted and now I was able to fix it.
😀
Thanks!
Deniz
thanks a lot 🙂 (thumbs up)
Lisa
thanks! I messed up and left my laptop w/in my 15 month old’s reach. He’d had a lot of fun and 2 keys popped off. I fiddled around on my own at first but with your help I got them back on in no time!
Jay Reed
Thanks! Folder jammed into laptop in my book bag and separated several of the keys– I thought I was surely off to the computer repair shop until I found your article. Very informative!
Jennifer
This looks to be very helpful but what about Laptop Mouse buttons? I have a Thinkpad T-61 and the left mouse button has come off. I believe I have all the pieces, can I fix this or do I need to order a replacement
christinamartinez
This website helped me so much, thank you !!!!!!
Jon
I took apart a few keys and couldn’t put them back together.
You will find that the aluminium clips may be out of place, so I used pliers to put them into position.
Christian
If you allow yourself some patience and utilize some sort of small, non-sharp tool, this will work flawlessly. I kept trying and the easiest way to accomplish a key that separated from the retainer is to orient the retainer properly, place the key back on the retainer squarely and press down evenly. My FINALLY snapped in place with no broken tabs and I’m trying this now without any problems. Incidentally, my “N” key was the problem on an HP Pavilion laptop and I couldn’t type without the repair. Good Luck
Danny Hairy
Thanks for you the website. The letter ‘I’ had popped off from my keyboard and thanks to your website, I was able to fix it and not pay to get it fixed.
p.s too bad it was the letter ‘I’ and not ‘Q’ lol!
thanks again,
Danny Hairy
Gareth
Brilliant guys,
Just saved me £70 from PC World
Johnathan M.
it works but when i put my broken c cap on, it stays pushed. what do i do now?
Dr.Roxxo
This was great. Could you post a walkthrough on how to remove the key caps though?
Sydney
this isnt working….. i dont have any hooks to pop my retainer into. GRRR HELP PLZ
moomoo
OMG you just kept me from having a major meltdown. Thank You so much. One of my birds popped my 0 key of and I have been working on ledger sheets all day and there was no way i could compleat with out my 0 key. Yes it took me nearly 2 hours to get it back together, but I did and it works!!!!! Thank you Thank you Thank you!!! you are my super hero!!!
Christina
vvvvv I can type the letter v again! Thank you so much! My son dropped a cream cheese frosted roll face down on my laptop and after I cleaned it all up, I thought I had broken the V key when it wouldn’t go back on right. Fixed now!
yb
very helpful site….thank you!
Jo
Your instructions saved my butt from a serious kicking from my mum
Paul
Thanks guys! Brilliant article! Thanks a lot!
zoheb
one of the key on my brand new laptop came out some home
i fixed it easily..
Thanks
Michele
Extremely Helpful better than the Dell website.
Major
Thank you sooooo much!!!
sam
dude, thank you soooo much! i was goin to be dead by the morning if i didnt find this site. seriously, thanks
Yiannis
Many thanks. Following your instructions I just managed to repair my Toshiba Tecra right arrow key.
Thanks again!
justin
Ok… now what do you do if one of the four points are broke? My key and retainer are fine the medal point is broke:( I’m sure I will have to take every key off to replace it. What is it called, and where do you buy one?
justin
By the way I have an HP dv7-1245dx laptop.I have the broken piece, but it is too small to try to solder it back on.
Thanks for any feedback!
cj2600
justin,
You’ll have to replace the entire keyboard.
SinBoy
Hi please help me i have a hp laptop and the , < key fell and the retainer is still there but i cant seem to place it back it just doesnt go it keeps on coming off PLEASE!!! HELP
cj2600
SinBoy,
Take a closer look at the retainer and back side of the key. It’s possible that plastic is damaged and that’s why the key will not snap on the retainer.
jose
thanks for the info, i bought my keys at individualkeys.com, no one else had my Gateway NV56 laptop keys.
Melissa
Very helpful, probably saved me a lot of $$$$! Thank you!
mario
thanks alot, just fixed my 2 keys. my lil kid managed to get em off 😛
Michael
how much do they cost
cj2600
Michael,
What are you asking about? The laptop key? About $5.
emi
So, I have a trusty Toshiba satellite — the spacebar has come off. What do I do?
Reveleye
BRILLIANT! I followed your instructions, pulled off the alt key on the right side of the keyboard, using it as a model, and was able to put the replacement tilde/accent grave key that I purchased at Individualkeys.com back on in less than five minutes. Thank you. (I made a small donation at paypal–I hope you get it.)
cj2600
Reveleye,
I’m glad to help. Thank you for your donation!
Mikey
What do you do when the metal clamp on the keyboard breaks off? Nothing from the key itself, but the metal clamp that is on the computer that hooks onto the inside of the key?
JEH
hey thanks for the info. very helpful. that stupid key has been off forever!
Katrina Corbett
Hi
I have broken a couple of key hinges on my Acer Aspire 5735 – do you know where I can buy replacements?
I look forward to hearing from you.
Katrina
Thanks A Bunch
Hey thanks for this i got my key back in and didn’t have to pay =].
beba
thatnks a lot i fixed my key in 3 minutes im only 12 and im using my sis computer and if she fouund out she well kill me thank a lot!!!!!!
Aleks
Thank you soo much! i took of two buttons on my Parents pc, got them on in 10 sec!
themess
hey, thank you very much! you saved me! i couldnt afford to pay someone to get it fixed.
have a nice day!
zack
omfg thank you so much iwas playing around with the spacebar and my mom was going to flip then i googled it i fixed it tyvm!!
Deb
You’re a lifesaver, thanks! It worked!
kacey
this helped me out so much i thought i was gonna have to go buy something but step by step it helped me and i got it thank you
Kiril
Ok, where can one buy when a key is broken? Any advise is welcomed!!!
I live in Germany, but would rather buy on ebay than in a store if possible.
Thank you in advance!
cj2600
Kiril,
Don’t you have eBay in Germany? eBay.de
Elizabeth Harrington
I followed your advice about replacing a never-used key with the one that broke, and it worked perfectly! Thank you for saving me money and helping me realize that I can fix these kinds of minor things on my own!
sam
the key next to the alt. key is like the right click button 🙂
Maggie
YAY! Thank you so much!
Nitesh
For me, my son plucked out the retainer and the cap – and I could not fit it back with the instructions (my first time and the Thinkpad X60s does not have 4 points to fit the retainer on that got me to think that something is broken).. as a last resort, I took out cap of another key and looking at that I could fix the other one.
I would not have ventured on this path but for your article. Many thanks!
Caitlyn
A key came off my laptop and won’t go back on. The bottom of the retainer goes on but just not the top and i don’t know why. Do i need a new key?
cj2600
Caitlyn,
I cannot tell if you need a new key or not without looking at the key and retainer.
Please take a closer look at both parts, it’s possible that one of the is broken.
Brandon
Thank you so much! I was stupid and pulled off my space bar because i thought it would be easy to pull off, but then it turned out it wasn’t. You saved me a lot of embarrassment
ragman
Key retainer broke when the “i” key was popped off by my dog. I couldn’t find a replacement key retainer for Samsung NC10 netbook. Took off the less used “\” key to get at the key retainers. Used these to put the “i” key back on. Worked great. Thanks!
A word of caution, I broke the key retainer for the “\” key when taking it off. They’re not easy to get off. Fortunately, it broke in a different spot so between the two sets of key retainers I could assembly a complete set.
Anyone know where I can get new key retainers?
ragman
PS. I did try the links to find a new key retainer but netbooks and the Samsung NC10 didn’t seem to have anything available.
StarrHummel
Thanks! I fixed it myself! (Thanks to your step by step instructions.) I really appreciate you taking the time to make this available to people like me. I am a mom and a teacher…and not a computer expert. This saved me a repair bill.
Thanks again!
Starr
cj2600
ragman,
If you cannot find the retainer, you can buy the whole keyboard. I found a brand new keyboard for Samsung NC10 listed for less than $20 on ebay.
You can use key/retainer from the new keyboard, or just replace the keyboard.
vicky morgan
well, my button came off and i i could not remember hot to put the white bits back together. I look on here and you made it so simple to put them back together. thanks !
Julie
thank you very much, my B is back in business!!!
Matt
I pulled off my C key because I thought something was stuck underneath it, but when I tried to put it back in my key would only snap back halfway in place. Turns out the clips were damaged; they too wide to allow the lower part of the key to snap back in place. I was able to squeeze the clips closer together with my thumb and forefingernails as the plastic is a bit pliable. Now my key snapped back into place and has worked just fine for now!
Millie
Thank you so much! I took off one of my keys to clean something under it and when I popped it off the key retainer came with it! It’s all back together now and snapped back into place but I wouldn’t have had a clue what to do if I hadn’t found this page and I would have been in a lot of trouble with the parents! Thanks again!
Sara
Brilliant ! my wonderful two yr old son plucked half a dozen keys off in a few unguarded moments !! Arghh!!! managed to fix all but two which need the rubber/silicone bits. I may be able to salvage these off an old keyboard. Thanks very much !!!
madnessa
tnx a lot for the help. i was just about to get a panic attack after removing two of the keys on my keyboard when i opened this page. now they’re working just fine! once gain thank you!
tez arnold
Hi, great guide….however my problem is I have removed the key ( in my case the U ( on my inspiron 1300 laptop) because the u was not printing to the screen. The key cap is ok as is the retainer, I also took of the i key to compare. when pressing the silcone cap on the i key directly it prints fine but on the u key when pressing the silcone ap directly there is still no response, I have even slighty removed the bottom half of the silcone cap to try pressing underneath on the contact and still no response. Is there anything further I ccan do or do I need to replace the keyboard?
Sue
This is very helpful, thanks. Just one question: I just got a ex-display Toshiba U400, had it for about 3 days but not really used it for typing on a great deal, just running over apps and checking stuff works really. Anyway, I noticed as I was about to give the keyboard a gently wipe that the left CTRL key was ‘wobbly’ and appears to be connected only at the bottom half. I can’t see any broken tips or anything when I gently ease it up to look.
I am terrified of just ripping it off – how much pull do you need? Will I break anything?
Jennifer
thank you so much! I have a hp laptop that the spacebar came apart. It actually has 2 metal hooks, not quite like your picture. But your guidance was very helpful. I’m always worried about breaking those little plastic parts and then having to replace much more than you would have otherwise. Always good to know you can do it yourself.
Jennifer
Daniel
This sooooooo helped! we couldnt work it out until we looked here!
Daniel
Sue,
You won’t break anything
travis
thanks so much 🙂
michelle
thank you so much, it worked!! nervewracking for a novice laptop owner though!!
Cheryl
My down arrow key on my acer 5738z has come off and i cannot get it back on. the hinges (dont know what they are called) one of them has come off and now i cannot get it back on and dont know how it went on. As i only bought it in October 09 it should still be under warranty and guarantee and i want acer to send me a replacement key. Any help ta
Elcino
The letter “N” on my Toshiba Satellite m55 is not working no matter what …can someone help
Thank you!
Charlie
thank you so much, i broke my ‘d’ key off my family laptop and fixed it, it was a toshiba l35 and the retainers were different from this but it was very similar, and now my ‘d’ key is 😀 lol…
broke it off by playing the keyboard mash on facebook, i did 580 keys in 20 seconds
Charlie
ome more thing, I also have a laptop with the exact same keyboard lol.. its a toshiba m35x -s114
caitlyn
My retainer and membrane fell off my laptop while I was trying to clean it, as i was glueing my membrane back on i lost the key cap and the retainer won’t go back on. I don’t know what to do as i am only young and also if i tell my parents they will teell me off and shout at me . Is there anything i can do ? PLEASE HELP AS I HAVE ONLY HAD MY LAPTOP SINCE CHRISTMAS! AND IT WAS EXPENSIVE 🙁
Prashant
yeah man!!…
this keyboard smash on fb SUCKSS… like big time..
even misalligned my ‘y’ key..
somehow fixed..now its totally fine!!
Ed Nicholson
Caitlyn, good for you for trying to fix your keyboard but accidents happen and they do come off. I was upset at both my children for breaking their keyboards on their new laptops but here I am trying to work out how to fix them just like you. Your laptop should still be under warranty and you can probably get the keys fixed free of charge. Take care.
lisa
Hi the backspace keycap came off my keyboard attached to the retainer. Is it supposed to have a wire like the spacebar ? Also am I supposed to remove the retainer and then snap the keycap back on?
supal
hi.
thanks a lot…
my nephew broke one of the key of my compaq laptop.
your article helped me find out the solution….
Grub
Thanks so much! I can finally type a document without the bothersome flurry of ‘ccccccc’s rushing in.
Osagie Ighodaro
I am the most happiest dude right now cos of you…….. thanks a million billion trillion times…you made my day….I wish you were close I would buy you a beer….Keep it rolling bro. You are the best
marcus
the metal clip where my the tip attaches to the key board snapped off, is there anything i can do to fix that?b
Carolyn Engledow
I have a toshiba satellite A135-S2346 model laptop, I hit a key that disabled the spacebar and the symbols on the number keys. How do I enable them. This has happened twice before and I repaired the problem but I forgot how I did it. Do you have the solution for this problem?
Maria
Thank you so much for providing this website.. my cat has a tendency to pull off my guys when i leave my laptop unattended and open (totally my fault though). I’ve had my keyboard replaced before because i was told by the company that it was impossible to fix the keys individually. My cat pulled off two keys afterwards and i was unsure what to do. This was SO helpful. Thank you so much!
Daniel
Thank you so much! i wanted to clean my laptop, and the space button fellof, and i didn’t know what do! but u guys saved my day 🙂
Cynthia
2 weeks after I got my laptop, I spilt gingerale on it. The I key came off, (this was a year or so ago), and I’ve been trying to put it back, it was half on, and driving me nuts.
thank you for the excellent “tutorial”. the last 2 images are exactly like my keys, and I played with it, and I now have a working i key, now, to key 5lbs of cat/dog hair OUT of my keyboard – at least, now I know how to put the keys back! thanks SO much!
André
yay!! success!!
after 3 days trying to put my “shift” button i found this site
and i favorited it (for future reference)
Marco
hello, ive got a problem with my laptop keyboard which you probley cant fix.. hope you can help me.. the key is the number 3..as you can see i can press it and the number will show.. problem is.. the silicon membrane was ripped off.. dont ask how all i know is that i dont have it.. i still have the key cap tho.. just need some help..
Anthony
Wow… Thanks a lot… very well done, the pictures are clear and the explanations were easy to follow! Thank you very much!
yybyyjgg
i broke my hhhhhhhhhhhhhhhhhhhhhhhhhhhhhhhhhhhhhhhhhhhhhhhhhhhhhh key and it wont go back on
Jaqs
Thanks a lot! This really helped 🙂
Thank You
thank you!! 😀
Greg Rhodes
Last week, my “g” key popped off my Dell and the little plastic pieces went flying. After recovering them, I though I could put it back together but to my dismay I found that a little plastic tab was broken off. I came across laptop-keys.com, ordered, and 2 days later got my brand new key. They even had full on videos to help me install my new key and plastic parts. Very helpful.
ToxicWaste
Dude thank you so much, while gaming with my laptop I accidently popped the w key off while I was raging. I got it re-attached thanks to your guide.
Al
on 4/11/10, i was being acting foolish, and i threw a notebook, and it had landed on my laptop. and the 2 button, got knocked off and i have no clue how to get the key to back to its original state. when i put it back on, it it crooked. i cannot think of any other way of fixing it. can anyone help me?
Roger J
I have a gateway LT 1005u series and the button next to the mouse came out of place I switched the mouse settings but I wanted to know how to fix it can you help.
ken
MY SPACE BAR WONT GO IN AND I LOST 2 OF THE 1 THING AND I GOT 1 LEFT SO HELP ME
ShaneLothian
Thank you so much!it helped me alot! much appreciated.
Sumaiya
FRIGGIN’ AWESOME!!! thanks. in 10 mins i went from WTF
sasha
I need a key retainer.
Jazzy
OMG!!! Thank you so much I finally got my space bar back!!!! This was amazing and I am a writer so not having a space bar was driving me crazy!!!!! You know what you’re talking about!!!
abhishek
very gud article keep up the gud wrk
Brooklyn
Man your a life saver I was working on homework and decided id give the ole’ fix-a-key search one more go. Thanks for giving me back my O-power, you can see by my name it was a constant problem. Internet info what a great resource, saves money too.
Hannah
Thankyou so much! I have a dell laptop so like others have been saying it didn’t work at first but after a little pushing the spacebar fixed into place! Hurrah!This was very helpful
james
thanks so much.thanks to my daughter the keys were being dismantle 1 at a time.now i have them all back on.thanks so much.
MajorLee Conffused
That’s Great info- Thanks!
oh… if you haven’t been told 1 million times already by others… that “useless” key you replaced the “U” with… that is the keyboards own little “Right Clicker”
for those of us who have a vendetta against using a mouse, I use it somewhat often. but it’s still probably the least used key on the keyboard, other than Scroll Lock.
daniella
thanks so much! I broke the “x” button on my mums laptop would have been in so much trouble! thank god for your site xxxxxx looool
cj2600
Roger J,
Most likely this button is a part of the top cover assembly. In order to fix the button you’ll have to replace the entire top cover (palm rest assembly).
jane
thanks . i’ve a fix a key(my sis laptop). u saved my life
Holly
Thank you so much! Do you know how hard it is to type without an “O” key? I am greatful!
Travis
OMG!Thank you so much dude! you fixed it but i would like to know what to clean the keys with if they are sticky? i unhooked my space bar and use a Q-tip and water to get rid of the soda stickiness, it worked, but every random time it will just not function do you know what to properly clean the keys with?
Thank you, very much!
md
OMG Thanks so much! I thought I busted my work laptop!
Bill
Thank you so very much! My ENTER key came off my Toshiba laptop and with you help it is back in place and functions well. I cheated a little because there was a metal retainer. When I looked at it placing under the metal hooks it only fit one way which placed it “upside down” relative to the retaining clips on the key. The key is in place and working but the retainer is not in the clip. It is a mystery to me. Do you have any suggestions?
Again, Thanks 🙂
karol
My kid broke 3 keys Q,ENTER and h thanks for the site where i can buy them 🙂
Kimberly
What happens when the metal clip on the computer that you connect the key to is broken? There is no possible way to connect anything to it because it will not stay down on the top where the metal clip is broken.
cj2600
Komberly,
I guess you’ll have to replace the entire keyboard.
nabeel
how/i/can/chang/the/function/of/space/bar/to/another/button?plz/help/me
Rajnesh
Thank you very much. my keyboard key fell off and your site was helpful alot for fixing it myself.
Thanks gain. 🙂
CJ
Thanks. My 4 year old had a tantrum and broke 3 keys off and the retainers were separated too. with your helpful guide I managed to put it back together.
eienkuro
What happens when my ‘K’ key came out half-way? What can do about it?
dana
Thank you sooooo much!
stork
Thanks very much, you’re a hero.
nina
awesum thankss heapss 🙂
Max Frisch
Very helpful, thanks!
Christy
THANK YOU
Chris
My cat mog jumped onto the laptop and knocked off the del key, followed your instructions,laptop as good as new,thanks very much.
Nakita
Thank You so much you are such a help.
If i couldn’t fix it i swear i will feel so bad.
So once again THANK YOU SO MUCH I LOVE YOU!!
<3 <3 <3 <3 <3 <3 <3 <3 <3 <3 <3 <3 <3 <3 <3 <3 <3
KEMLYN
Thank you so much for this detailed info!
fiona
my key fell off with the retainer still attached to it … how do i get it back on ?
Jatinder
Big thanks to you! The ‘A’ key fell off my laptop while wiping to clean the keyboard…it was painful as the laptop was is new…
Thanks to your step by step illustrations I’ve put the key back on!
Cheers
Jatinder
adi
Thanks a million 🙂
Cassie
My 0 key came off when my 14 months got into my laptop. I could not figure out how to fix it? any suggestion please.
Anna
Thank you, very clear and simple to fallow!
George
This guide really saved my ass today. Thank you so much for taking the time to put it together.
One tip that might help others:
If you’re having trouble getting the key retainer to snap onto the board try flipping it over.
Martynas
Awesome, saved my day! 🙂
Lisa
This was a lifesaver — thank you!
Bill
After several attempts on my own, and no help from HP, I found your repair instruction. I also found information at laptopkey.com helpful on how to separate the hinge (retainer) from the cap. After looking at both that the repair was easy. Thanks so much for putting this information out there. HP wanted to sell me in-home service upgrade, or have me send the laptop back to them. (I’ve only had the laptop for one month). They would provide NO information over the phone! A technical bulletin with this information is what they should have offered.
claudia
Muchas gracias, pude solucionar mi problema!!
Paige
Thank you so much! when my enter key fell off of the brand new laptop my dad bought me for university I was terrified!
This saved my life.
The enter key did take a while to fix though, for me it was easiest to make sure all of the retainers were in place and then push it in all four corners.
Thank you thank you thank you!
Sari
Thank you, the clear close-up photos are much appreciated!!!
Andrea
Thank you, Thank you, Thank you!!!! This is all I can say, I thought I would eventually need to replace my laptop. You’re the BEST!!! I can’t believe I did it on my on thanks to you!!!
Justin
Well, it is a very good tutorial, but my z key is snapped off and i cant seem to get it back on. it doesent have those 4 things on the corners plz help D:
Sen
Very many thanks to you. I appreciate your effort of taking closer pictures. It was too easy for me to fix it as I had the retainer intact. Thanks a lot. I am happy that I could fix it before my husband come back home to see it. Thanks once again.
FLORES
THANKS A BUNCH ! HOW HELPFUL OF YOU TO SHARE THIS WITH EVERYONE. I’VE BEEN USING MY LAPTOP FOR ABOUT A MONTH WITHOUT MY RIGHT SIDE SHIFT LOL IT WAS TERRIBLE MADE MY TOSHIBA LOOK CHEAP AND OLD I READ THIS AND IN SECONDS SNAPPED IT BACK INTO PLACE. THANK YOU AGAIN (: NOW I HAVE TO GET A HOLD OF SOME SUPER GLUE AND GLUE THE SILICON MEMBRANE BACK ONTO MY CAPS LOCK AND DO THAT WHOLE PROCESS LOL BUT THANKS TO YOU I HAVE CLOSURE AND I WILL GET THIS DONE MYSELF WHICH MAKES ME FEEL GOOD (:
juliana
Thanks so much…. great set of instructions! the pictures defintely helped too 🙂
Ed Hoofnagle
Thanks, these things seem cumbersome because of all the small plastic pieces, but you have clearly illustrated how to fix it – works like new!
Joe
OMG THANK YOU SO MUCH! You saved me a lot of heat from my mom, who just found out about our laptop key falling off.
Dorothy
THANK YOU SO MUCH! Great instructions with pictures! It really helped!! Thanks a lot! So nice of you to share! 🙂
Nichole
you just saved my spacebar. eternally grateful!
doggitydogs
Thank you! A little tip: If you can’t get the key to go on (or one or both halves of the retainer), try flipping the different parts of the retainer over. On my laptop, both halves looked exactly the same if you flipped them over. However, the first half (the half that connects directly to the keyboard) will not connect to the keyboard if it’s upside down, and the key will not connect to the retainer if the second half is upside down.
Jaclyn
i cant get the retainer out to put them back together, , the retainer wont stay together but it still has the two tips
Jaclyn
NEVERMIND I GOT IT, thanks allot your information really helped !!! my baby got a hold of my lap top when i answerd the phone and pulled 3 keys out ,
MR Hunter
I cannot thank you enough!!!!!!!!!! My “F” key on my Toshiba Laptop just popped off in the middle of writing an article under a tight deadline and needed it fixed ASAP! Luckily, none of the plastic hinges were broken or I would’ve come unglued myself. Much appreciation for this page and helpful pics!
Best!
ms Carley
OMG thanks so much i`m a teen and i piece of food got in the key so i removed the key and i couldn’t get it back on and then i didn’t tell my parents and so i looked it up and i found this sight and now i don`t need 2 tell them i might tho i.d.k and THANK YOU
Petro
Thank you!!
RenRad
Thank you! My 3 1/2 year old broke off my ‘i’ key. Two of the tips were broken on the retainer but now I just switched it with the right clicker key as you suggested. Now my 3 1/2 year old is blaming his 1 year old sister for breaking the right clicker key!
Monika Earner
Thank you it worked. You deserve an award
Have a great day
suresh
thanks a lot buddy
emma angeloni
thanks for advice my cat jumped on laptop and my D key came off slightly bent a metal hinge but i managed to bend it back and took a few other keys off to see how it went back together thanks again
Stone
Thanks so much! My cat also jumped on my keyboard and my spacebar came off it’s a little different, but it works! You rule!
Daniela
Thank you
Happy Camper
WOW THANKS! LIFE SAVER!
Vivek
Hi all I am using DV4-1318TU. One of the keys (Key B) got damaged and came off from the keypad. The problem is only with the key and not with the retainers.
I am not getting the key alone from market (tried in net). Please help me.
Vivek
Chennai
Shadeezy
Thank you so much. that was very very helpful!!
Allison
Thank you so much! My “U” key broke and with your help I was able to disassemble it and fix it. You saved me a lot of stress and money.
CyberSharky
Thanks a lot for your article.
I successfully fixed back my laptop keyboard key. (n_n)
Kevin
my membrain popped off my ‘a’ key… its still in good condition so i suppsose super glue works? will try, thank you 🙂
dushyant
sir my laptop key is broken sir tell where i can found new spare key in delhi?
Terri
Thank you soooo much! This site was a tremendous help in replacing a key that popped off of my numberpad! Thankfully none of the retainer tips or key clips were broken and it snapped right back into place … but admittedly, I never would have figured out how those little retainers fit without your helpful diagrams!
Thanks again!
Kathleen
Thanks! Easy steps on how to fix my detached key!
KB
Wow. I had the hardest time getting my spacebar back on. Thanks for the guide.
Eric R.
This site rocks, thanks for the info on how to replace a key, just enough info to get the problem fixed. Thanks!!
AH
Please can u post how to fix the GOD awefull sapce bar of DV6000 Series.My daughter removes the key onregular basis…. ARGGGGG
Louise Allan
Oh my word, ty ty. Despite being pc capable with almost any problem, laptops are a whole new world and when my kitten pulled the key off the keyboard a few minutes ago, I freaked out. Thanks to you, I finally realised the retainer was still attached and all I had to do was clip the key back on (no broken attachments thankfully). So, am very grateful for this simple to follow guide. The pictures helped more than a thousand words ever would. If the worst happens in future, I’ll know what to do!
sk8r dan man
Well, this looks very helpful, but my key has not fully come off. It’s still attatched to the center part of the retainer, and the other part of the retainer is still attatched to the keyboard. I don’t know how hard I can pull on it to get it off, before I have to worry about breaking it. It doesn’t want to come off very easily. Which parts of it are supposed to snap in and out of place?
sk8r dan man
Nevermind, I figured it out.
shahabuddin
my left shift key of ASUS X51H SERIES is not working. your suggesstion required.
shahabuddin
Oliver Tribe
Thank you very much, my number 8 key came right off and this worked, I was very worried for a second!
AH
Any Help? 🙁
Luke
my keys retainer wont clip it keeps falling off no matter wat i do its my key after g
Adam
This worked wonders on gettin my space bar on the metal clip was driving me mad 😀
Rumneet
Thank u sooooooooo much i would never had thought to just clip it back in place, saved me a trip to pc world! Again thanks ALOT 🙂 xxx
ronald
Keys O, L and 9 are not functional. Please help me on my problem. Thanks in advance.
Katie
you literally saved my life! i just got a new laptop and my parents would have killed me if they saw it broken!!
pagid
bbbbbbbbbbbbbbbbbbbbbbbbbbbbbbbbbbbbbbbbbbbbbbbbbbbvhhhhhhhhhhhhhhhhhhhhhhhhhhhhhhhhaslkfdlsa
oh it’s back in – thaaank you 😉
Delene
My daughter pulled 4 keys off my laptop. I managed to clip the 5 back in. The letter keys are clipping in, but not sitting right. The tops are leaning forward. When I type, they pop right out again, yet they’re clicking into place.
Any ideas of what to do? It’s an acer aspire keyboard.
Dibo
thanks so much-you saved me from pulling my hair out!
Melissa
The info posted was super helpful & clear! The pics help a whole lot! You’re a genius! If I were typing this before I stumbled upon your site, my comment would have no a’s in it. Thank you, thank you, thank you!
Isabelle
Jeeeeej!! Thank you very much! A keyword without a W is horror to work with!
cj2600
Delene,
Apparently, the key retainer is broken and because of that the key not sitting right.
You can search for a replacement key (usually sold with retainer) and replace the whole thing. The spare key and retainer cost around $5.
Kit
Thank you for this! The work laptop i’ve been lent lost a key and I have to take it back soon 🙂
THANKS
THANKS SO MUCH!!
asdfdsafsa
hey thanks DAWG
rABS
THANK fOR YOUR hELP mAN… mY dAUGTHER TOOK OF ONE FOR THE KEY FROM A LAPTOP I borRowed FROM mY cOUSIN. i WAS FREAKING OUT …
THANKS FOR yOUR INFORMATION …
Tasha
Thank you so much for this 😀
A key on my keyboard wasn’t pressing down correctly so i pulled the cap off and thought i broke it when i couldn’t put it back on but this helped so much lol
Jocelyn
i can fix it but it keeps poping back off what should i do???
Kori
Hi this was very helpful sadly tho the retainer still won’t go on and its not damaged or anything it just wont go on, my cat poped the keys out i need to get the backspace, the del, the scroll, and the ins back on but I can’t im also missing some retainers. If you could be so kind to show me how but instuctiion and pictures that would be great.
cj2600
Jocelyn,
Probably one of the retainers is damaged. Buy a new key WITH retainers and replace them.
Charlie
Hi! My altgr key came off and i’m really not sure how to put it back on. I’ve looked everywhere for a tutorial but I can’t find one. Can you help?
valerie
YAY ! im so happy now =], i should have looked this up first before trying to fix it myself =]
-Thanks =D
Jonathan
Thanks!!!
Great photos and step by step examples…I fixed it myself!!
kittikat
Thank you so much for this help! I was devestated when my ‘Enter’ key fell off my new PC (less than a month old!), and your very comprehensive guide saved me a troublesome trip out to PC World, plus a lot of unneccessary stress.
rob
My L click has broken (one side won’t click)…any ideas?
cj2600
rob,
Are you talking about left click on the touch pad?
It depends on the laptop model. Sometimes it’s enough to replace just the touch pad board. Sometimes touch pad buttons located on the motherboard, so the repair process is more complected. Again, it depends what laptop you have. It’s necessary to remove the top cover assemble and take a look underneath.
If you prefer not to fix the problem, you can use an external USB mouse.
micheal
my keyboard stops working. how will i repair it?
eke
my up key button is broken and when i put it back on it just gets stuck
eke
and it makes noise too when i press it
lol1234
my enter key just fell off and i dont know how to fix it back and i think that the retainer is broken how do i fix that ????????????
Ken O'Meara
Thank you! You are a lifesaver, I’ll be more careful when I clean the keyboard in future.
Karen
OMG I fixed the key on my lap top. ”'””””
Thank you very much. 🙂
gaytanstar
i removed my END & PG DN keys & when i put them back, only the top part of them hold on, so when i press on them, they lift up like a flap. did i break something? i looked for videos on how to put them on right but nothing seems to work. PLEASE HELP ME! i have an HP PAVILLION DV4-1275MX.
cj2600
gaytanstar,
You’ll have to remove the key and take a closer look on the back side of the key and examine retainers. Take a look with a magnifying glass.
It’s likely that ether one of the retainers or clips on the key are broken.
If that’s the case, purchase a new key with retainers and replace the whole thing.
Terrence
Whoever you are- thank you so much! I have a “u” key now!!!
jeff
Thanks soooo much, my 2 year old removed our shift and function key which are now safely back in place!!!!!!!!!!!!
You are great!!!
Mitchell Allen
Salutations!
This a fantastic tutorial.
Can you fathom which cap is always falling off, causing my typing
to continually abort? So far, it has not shown up in my thank-you.
A hard task to accomplish, but I did it.
Thanks, again!
Mitch
P.S. “E” is our culprit!!!!
Ashrita
Hey, that is a very nice tutorial. My “i” key has fallen off, but in a different way, you see those 2 small parts are already attached to the button and all I can see is the flat thing on the keyboard. any way to fix it?
ismailqutub
thanks a lot, very nice tutorial.
sinan
You never use the “right clicker” key! I can’t live without it, it is so much faster to use keyboard than mouse. Thanks for the info here. It is a very thorough one. I have no doubt it will enable me to fix the non-working Right-Alt key on the keyboard. Keep up the great work. Cheers!
Rod
Thanks so much for the tutorial! Excellent job!
musa
thank you very much
i’ve don it
KIRAN KUMAR
Thanks a lot , it was saved my time n money
Karen
Thanks for that, I’d just been pressing the wee white nubben underneath for ages now! Was a bit nervous removing another key cover incase the little bracket came away as well, but it didn’t!
Thanks – you’re a star! :o)
Jo Ann
Thank you so much for the great pictures and explanation! Success!
Robert Velasquez
Wow, wonderful tutorial here.
Took me a few minutes, because it was my SPACE key.. 😐 but with your help I conquered the challenge quite quickly..
Matt
Great guide, fixed my space bar:D thumbs up
Toby Jones
Thanks to your excellent guide, I now have a fully assembled keyboard! THANKS A BUNCH!
Marcos
Thank you so much for the great pictures and explanation!
Great
Adam Robinson
Cheers,
Fixed a broken “R” button in under ten minutes !!
mjvoss
this site is a godsend. I had some mystery liquid spilled due to a 3 yr old and I popped off the keys and the first one was the space bar. It cracked in half. I have to hit it dead center or it won’t work. Then some of the retainers cracked and the O won’t work unless I push it super hard. I am glad to see I can fix the membrane and get replacement retainers. I was looking at a huge relacement just for a keyboard. This just made my day!! thank you times 100!!!
Locksley
An arrow key popped off my 7 month old laptop in the middle a dungeon. Thanks to your site I was able to fix it and go back to the game.
Thank you
thankyou
Thank you so much. I now have an “I” key instead of a |\ key, which I think I’ve never used. – untill I get a new retaining clip. Thank you so much!
Social Media Jobs
Oh…. mate! The clasp on my “M” key is broken and it has been driving e crazy for a onth as I keep issing the M key…
Your solution to replace it with another unused key is BRILLIANT mate!!!!
Wonderful!
I also had a dog use my laptop to jump off and get his ball. The down arrow key popped off my 1 mth old laptop. These instructions really helped a non-techie person fix the issue.
Jacob
Thank you sssoooooo much my dad recently bought me my first laptop and my sisters cat seems to love laying upon the keyboard, it got up so i tried to pull it off and i heard a snap. (don’t worry he’s grounded from my room : P)
amritpal singh
thanks bro /
Lisa Sands
Thank-you!
Alexia M.
THANKYOU SOOOOO MUCH!!! I am 11 and the “h” broke off my laptop(thanks to my dog). I thought I was gonna be in soo much trouble and I was so frustrated. But thanks to laptoprepair101.com i can type again! (and without getting grounded.) 😉
Shannon
Thank You!!! My 4 year old thought it would be fun to take all the keys off the laptop.
Mel
THANK YOU! THANK YOU!!!
You saved my day, my FULL-STOP!
e
Thanks so much: This was very helpful!
Similar to one I read above, my Dog Jumped on to the keyboard, by mistake while jumping on the couch to lay-down. She was so innocent, and didn’t mean to. I got very frusterated, not being able to re-insert the “2” key, a.k.a. the “@” key . .which was quite annoying, seeing as how I seem to use this key quite frequently. . . Isn’t it true that you “don’t know what you got ’til it’s gone”? . . I truly realized how much it is that I “needed” this key, and how often I used it, when I actually didn’t have it there!
Thanks again. Great info@
sree
tank you soo much
Tony
Awesome! Came out to my computer to use it in the morning, and there were a couple of keys ‘mysteriously’ sitting a-top the keyboard! Thnks for the easy step by step instructions.
Tony
Jack ODonnell
Perfect….Saved me frustration and $$
Sarah
Thank you for your detailed directions and pictures! I got my “Enter” and “Shift” keys back in place within minutes of reading this!
Kelly
This page saved my laptop MANY times! (I have a 2 year old) Thank you!!
sophie
thank you so much!!! my question mark key fell off now look????//// thanks you so so so much 🙂
Jack
Thank you !!! I successfully got my W key back on my laptop in a matter of moments. If only I had found this website a couple of months ago when my M key was pulled off (I resorted to bashing it into place and consequently snapped one of the clips)
David
Thanks – worked a treat.
Lalita
Thank you soooo much! It seems like every time I turned my back, a new key was mysteriously laying on the floor. Two year olds are quick!!!
Kate
Thanks a million, Helped me so much!
Enter Key is back on 😀
Gayle
Thanks!! Now I can get some ZZZZZZZZZZ’s!!
Steve
Wow, thank you so much, I needed my “n” key but I didn’t even know what the useless clicker did until you told me. Now I can type nnnnnnn again!
xXACCEXx
dropped my laptop on my TV, the SWAD keys all fell out. THE MOST IMPORTENT KEYS!!! thanks so much for this. was a pain in the but to find it without them but they all work wonderfully now! THANKS!!!!
wackychick
wow – I can find anything on the internet! thanks for teaching me how to do this! Now I think I will fix ALL my laptops that are missing keys! Wahoo! thanks… (see those periods? the fixed key!) 😉
Han
Hey,thanks. Its working…
Ahmed
hi, i have prob some 4keys of my advent laptop, 3,E,D,C AND space Bar all of these stop working, i have tried diff options,like restore,format, and bala bala, can any body tell me the solution?
Thanks
Sir
i have a dv7 pavilion from hp, and the ARROW DOWN key fell off, but i DONT SEE the retainers :/ I only found the one to the LEFT on the picture above.
Anyone can help?
Marge24
Thanks a lot! Was easier than I thought it would be.. Great job 🙂
Ricky
I’ve got a slightly different problem. On the laptop keypad itself, the key and connector have nothing to hold onto on the keyad as these have snapped. Any solution please???? It’s the letter L on a lenovo T61.
Cheers
tantan
hi, i have problem with my loptop keyboard,,some of my keyboard keys like when,im presing shift+2 it becomes double quotes instead of ‘AT’,,how can i fix this.. i think it may become shuffle key.,pleaas help me,, thanks,,,
Mark Justus
Hi, thanks very much for the instruction. It helped me repair the letter D on my Easynote laptop!
Gladstone Campos
Tks for the class how to repair a keyboard.
Thanks for teaching me how to do this!
Harmeet Singh Sokhi
Brilliant explanation….thanks a ton.
Mom
Thanks! I’ve been working with two broken keys thanks to my toddler. Now I can enjoy typing, knowing which key is b and which is n. Yippee!
roonham
i still can’t fix it i have a compaq laptop and a num key fell off. please help i can’t fix it. please please please!!!
Ella
Hi my key has come off but i have lost the square bit what should i do????
Lowell Fitzgerald
Thanks a bunch–successfully reattached my space bar!
Alicia
saved my life!!!!!
jobin
thank you so much for the brilliant explanation…………
that help me to change space bar button of the 3 year old fujitsu laptop…………..
thanks a lot…………..
Kevin
Awesome guide, thanks! Used the keyboard replacement guide as well. Much appreciated.
Question: my Inspiron 1525 touch pad left side key is wearing out. (stands sort of half-depressed at all times now, hard to double click) Do you have a guide on how to replace that, by any chance?
Kevin
Jennifer
Thank you! Your diagram for what the guts under the spacebar key were supposed to look like was just what I needed.
Cynthia c Head
This was very helpful but I put the key back on but it did not work could you please tell me if I need a new keyboard I have a Acer Aspire 5515 PLEASE HELP ME need my laptop for college and My number seven key will not work
Katgurl 13
This has been very helpful. Thanks!
`````````````Sandra P
This site is great! My dog was laying next to me on the sofa and had a dream as I was on the laptop. Out whipped his long Greyhound leg and off came the 1! key. Gheesh, I couldn’t snap the thing back on and here is this awesome site that shows me exactly how to do it. It’s fixed now and I have pillows between the dog and my laptop now. Thanks!!!!!!!
rafael ocana
Your website is REALLY HELPFUL. Thank you very much for your great work and useful links.
Whitney
Wow thank you so much for this information!! Dell’s website was so unhelpful!
1983
Thanks…. This has been a great help!!!!
Pao
WONDERFUUUL! U ARE SO COOL, AND SO HELPFUL! GOD BLESS U! La informacion esta super bien!
laila
my spacebar fall off, but it does not look like the spacebar you putted online. help :(?
please mail me
Bill New
My “0”(number key)popped off, when I tried to put it back on, it wouldn’t snap back in the bottom hooks. The problem is that the hooks were bent almost straight up. When I tried to bend them back down they broke. Any way to fix this? My laptop is a HP Pavilion dv5000. Also the silicon membrane is ruined from super gluing once to many times. Thanks.
Lauren
My cat was trying to crawl into my lap and stepped on the right arrow key of my laptop, his nail went under it and when he stepped off it popped off! I was so panicked until I found this website, and now all my keys are just as they were before (:
Thanks for this tutorial and the helpful pictures!
Jyothi
Thank you for such wonderful pictorial explanation. Helped me a lot!
cj2600
Bill New,
Nope, sounds like you have to replace the whole keyboard now.
You can pick up a brand new keyboard for HP Pavilion dv5000 on ebay for about $15-20.
And keyboard replacement instructions here, starting on the page 5-20.
milind
I am having compaq laptop and my down arrow key runs up and down continues. so how can i solve my problem
Aminurasyid
Hi Im from South East Asia.My arrow key fell off and i can’t fix it and my lap top key does’nt same with yours
Annel
Hello,
well two of my buttons fell off my compaq laptop because my lil daughter pulled them off. While i was trying to fix them the lil rubbery thing came off. How do those go back on. Is it a special glue?
Annel
If i cannot put them back. Do you know of a website were i can buy a new keypad.
its a compaq presario v4000.
thankz.
ima try to put the buttons back after i figure out how to put the rubbery thing back on
cj2600
Annel,
You can buy entire keyboard for Compaq Presario v4000 on ebay.
You’ll find instructions for keyboard replacement in the service manual on pages 5-27 through 5-32.
Here’s the manual for Comapq Presario v4000 notebook.
Rebecca
Strangely enough my cat the exact same thing and the ‘n’ key came off right under his claw, I found this website straight away and clipped it back on! Thanks for the help!!
Kayla
thanks so much ! this really helped walk me through how to fix it . the instructions were simple and easy to follow . it’s because of you that i have my D button back ! <3 <3 (:
bailey main
my b key fell off ive tried and tried but if i put it on its crooked please tell me wat 2 do
Debbie
My cat snapped off the space bar, i thought id have to buy a new one, then i seen this web site, thank you very much!!! i now have a working space bar again 🙂
Bilal
THANK YOUU!!!!!
amir bakhtiary
Thank you for sharing.
great read.
rachel
THANK YOU SO MUCH!! i dropped something on my laptop and 2 keys came off, they just needed clipping back on. Thanks again!
Shadowsteps
Thanks a lot, this helped me repair my W key without having to buy a new keyboard.. the key popped out while playing ._. but now it’s in it’s place :D. Thank you.
Nicole
What happens if someone accidentally ripped the membrane piece off of the keyboard? Also what happens if the key r lost and so r the little white lives that go with it?
leila
Sweet! super easy once you know how 😉 thanks!!!
PLEASE HELP ME ASAP
HELP!!!MY “W” key fell off and all the pieces are fine and in place and not broken i have checked them all but when i put the “W” key in i hear it snap back and place but as soon as i take my finger off it pops right back off!! help me!!!
cj2600
Take a closer look at the bottom side of the key and retainers. Something must be broken. I cannot tell what is wrong without looking at the key.
cj2600
Nicole,
You can remove the membrane from a key you don’t use. I explained it in the guide. Or replace the whole keyboard.
Cecilia D'Elia
THANK YOU!!! Your explanation helped me replace the “;” key on a borrowed laptop! what a life saver!
Faith
I am so glad that I found your instructions. I had spilled eggnog on my Inspiron 6000 laptop, and after cleaning everything off carefully, I noted that some keys were loose. I snapped most of them back on, but the ‘N” key was not cooperating.
Underneath the “N” key were the tiny white bracket, which I was trying to hook the bracket back onto the hooks on empty pad where the N should go, by holding the “N” key with a pair of pliers. It was clumsy! The membrane had to be glued back on of course. I realized I was scratching up the “N” key with the pliers, and that I had to find out how it could be properly done.
I found your instructions, thank God, and your pictures are so clear in how to put the bracket back. I carefully detach the white bracket from under the N key, which was a serious job because I did not want the tiny bracket to crack, and carefully hooked it back to the pad. I then snapped the N key on top the secured bracket, and it snapped in like a charm! Thank you!
Cailyn
I got a brand new $500 laptop for Chritsmas and the down arrow button was making a weird noise and ended up coming off. I don’t wqanna tell my becuase he will freak out on me. But I need major help!!! One piece of the retainer is broke in half but I feel like it could still work. Help please!
cj2600
Cailyn,
I guess you’ll have to buy a new key which is usually sold with retainers. It cost about $5 for a new key.
After you receive the key, install retainers first and after that clip the key back in place.
nagam
THANK YOU SO MUCH!!!! MY BABY SISTER BROKE ONE OF KEYS TO MY FAV LAPTOP AND THIS HELPED ME FIX IT! like thankkk youuu alott!
Andreea
my three felled of and my mom got so mad …..and it won’t work as the first example and i dont wanna take of another button ….what should i do and it is a labtop
hezzy
Nice one, my space bar is back on!
DiVenti
Great job! Thank you for sharing!
Tyra
Help me please. My u key feel off. But the problem is the key is lost. Also the little white rubber on top is ripping off when I press it, It do sent work. Do i need a new key board and how much are they ?
Kay
Can’t get key to stay on. Took off neighboring keys to copy, put everything back like it should be, but now I have 3 keys that won’t stay on. I can get the retainer to clip to the keyboard, & I can get it to clip to the key while it’s off the keyboard. But I can’t get the key to clip to the retainer once i’ve clipped the retainer to the keyboard.
Peter
Hey thanks so much for this explanation; my “N” key is sturdy and in place. This is a really awesome and helpful site. Thanks again!
Im2Charming
My “FN” button popped off, I could figure out how to put it back on till I read this it helped a lot but the part with broken tip the key will still fit back on but it will be slightly raised at the point where its broken
cj2600
Im2Charming,
I guess you’ll have to buy a new “FN” key with retainers.
Nimalnana
The keys E,R,T,G do not work on my fairly new Notebook. Pl tell me how I can repair it.
cj2600
Nimalnana,
Most likely this is keyboard related failure.
The keyboard cannot be repaired, it has to be replaced.
Keyboards are not extensive. Probably you can find a new replacement keyboard on eBay for about $20-30.
cj2600
Tyra,
You can find a single keyboard key online. There many sites selling single keyboard keys.
You can glue the rubber nipple back to the keyboard with superglue.
How much is a new keyboard? It depends on the laptop model. Probably around $20-30. You can find cheap replacement keyboards on eBay.
Sassy
Thankyou for posting this!
JJ
I tried what you said to do with my spacebar key, and it worked except the top half ofthe key isn’t latched on. This site was really helpful otherwise, but anyother suggestions?
SAM
Thanks alot.it was very helpfull.
Nyksism
This really worked thanks a lot for the help
yolanda
you rock!!!
Jasminebed
Well,my key did not fall off, I pried it off! The culprit dog hair under my period was removed, but I couldn’t figure out how to get the key back on my period on my netbook.
As you can see, my sentences now include periods! Although I dislodged the silicon membrane, it was not necessary to glue it since there’s a lip that fits under the retainer.
I’ve made a very small donation, I really appreciate your help.
Cristiano
Omg thanks ! I thought that my brother would found out and kill me for wrecking the letter ‘N’ Realy thank you!
chicka crazy
this suckss cant fix my key and my dad will be gome any minuet
Cuqs
Thanks!!!! The repair shop insisted I got a new keyboard but I saw this site first and insisted it wasn’t necessary…saved me some moola.
Bashar
oh my god thanks very match guys
dt
invaluable. thank you
JW
my a key came off my Compaq Presario laptom……the retainer (which is black) is still attached to the key. However, I have tried and tried, and cannot get the key with retainer attached to snap back in place.
HELP, Please
123456789
My up arrow key broke off, so I took the down arrow key off to see how I should put it back in, at first I thought the retainer was broken, but when I tried conecting the down arrow key to the up arrow retainer it worked fine as an up arrow, so does this mean my up arrow key is broken? (I also tried up arrow key on down arrow retainer and it wouldn’t conect right) So do I have to get a new up arrow key?
cj2600
JW,
You have to separate the retainer from the key.
After that you install the retainer on the keyboard.
Finally, you snap the key back on the retainer.
nidhi
thanks a lot…
Ftroit
In my case (with a compaq presario), one of the four metal points that the retainers latch onto is broken. What to do? 🙁
cj2600
Ftroit,
Replace the keyboard.
fee
Excellent helping tips, mate!
Trice
How much is it for a new spacebar?
jp
Thank You 🙂
cj2600
Trice,
Cannot tell. I guess it’s depends on the laptop model.
shiyam
my keys are not working in the laptop keyboard what is the solution for it
John
just what I needed to know. Thanks!!
Heidi
I about panicked when I popped off the space key. Thanks for the easy instructions!
D. Gilbert
The Hing came off still attached to the Button.
1.You will have to take the hing off the button,
a. hold the button by the side the Hing will unfold and hang down just enough to get a finger nail in the gap- pry it off CAREFULLY
2. Now, install the hing first back onto the keyboard of your Laptop. Bottom two ears get wiggled into the stand-up loops first. (let the hing unfold naturally hold it by the section your installing, letting the top side move.
3. after the bottom is in, let the hing lay down naturally,the top tabs are now ready to be carefully pushed down. on each upper tab, one at a time, push down, the tab will stretch, then recoil into its slot.
3a. Look at it it should be square to the board – if so your ready to apply the button.
4. lay the actual button(key) on top of hinge – the spring-loaded actuator will hold the key (floating) above the hing – with thumb squarely in the middle press steadily down until you hear them “Click” into place.
Awesome! This web site just saved my butt! I’m at my university reading and typing in the Library when my book slipped and hit my keyboard three keys went flying. Typed into the net Toshiba keyboard repair a presto! here are the picks simple step instructions. Done, took about 4 minutes of fussing.Hope my instructions have enough detail to make the job easier.
Shanibelle
I was panicking trying to figure out how to take off the keys I had pried off trying to get some nasty pet hair out from under them… but thanks to you guys, my spacebar is back on and pet hair-free!
Jen
Does this method work with the right or left click buttons on a laptop mouse? The kind that is situated below the keyboard…
My left click button is not popping back up. 🙁
thanks.
Anthony
Thank you so much! This was very helpful!
jessica
i love u guys thank u very much for posting this repair online.
su
Thank you very much, you’ve just taken my 11 year old son out of serious bad books and saved us a fortune as HP wanted us to replace the whole keypad for one broken key. You’re a legend.
Nancy
Thank you! Very helpful. I was worried that I would have to pay for a repair. Was able to put the keys back myself!
mike
Thank you!
Our son removed some letters in his zest to pretend type but I was able to snap them back on thanks to you!
Anonomous
77777777777777777777777777777777777777777
thats me snapping the key back into place. Thanks dude! it helped a ton!
travb
thank you, this is the best instructions on the web by far!
Carole
Thanks,
I found I had to lift the retianer up and the cap just snapped back on.
Wonderful…
dan
thanks a ton!!!!! this website’s a lifesaver
El
Awesome, thank you!
D Gaddis
Thank you Thank you Thank you…Dumb Cat tore 2 keys off my laptop…Thought oh great now what…found your suggestions and with a little time and effort my “g” and “h” keys are back on…Thank you Thank you Thank you!
Alex
Wow..holy shit this actually worked! Mine was a spacebar but it has two retainers…it was a pain but I’d never thought to snap the metal off and push the key on top of it. My hat is off to you.
MMDAVISON6
Thank You so much….worked out easy n wonderful.
GH
thanx
alex
thank you. it worked out well for me! now i dont have to worry about fixing it again 🙂
coco666
Thanks a million for your help !
Toota
Extremely useful–thanks for creating such a great tutorial and for sharing!!!
Jim Downing
Well my 1 year old son grabbed a key while I was typing and popped it right off. I googled the symptom and was directed to this website and BAM, key is in and I am up and running, Thank you for this information!
Abhishek
Thanks a lot…..
I fixed my compaq laptop key with the above tutorials…..
Algirdas
Thanks man a lot, I was thinking about such a way of repairing but was afraid that I can broke something. Didn’t find way to replace that silicon so after tutorial everything went good. My PC is very old so replacement I can’t find anywhere of whole keyboard. Thanks again!! And sorry for my english 🙂
udi
thaks for info
tykke
i can not put the 3 on my laptop
cj2600
tykke,
Take a closer look at the retainers and bottom part of the key cap. It’s possible one of them is damaged.
If that’s the case, you’ll have to buy a new key with retainers.
Claire
i have a HP special edition computer and the clips on the keyboard are different to the ones shown plz help
Ben
Amazing tutorial with clear instructions and even more amazing macro photos! Thanks for curing my sticky buttons from 6 years of abuse.
Thinkpad… can’t live without its red track point 🙂
Anders
Thanks a lot – saved my day!
BraveryEdo
Would like to submit another thing that might need repairing.
If a key is forced off and the white retainer comes off with it, the metal braces that hold the retainers in might have been bent upwards. symptoms of this are: one side of the key going up when the other side is pushed down, although the key is not dislodged.
quick fix: push down the brackets with your thumb nail until they make about an 75-90 degree angle (could do this gradually, checking bug status in between attempts).
FAJJ
I am about to cry. i just broke the *o* key on the keyboard to the laptop. HELP!!!!! THIS DID NOT WORK!!!!!
Abby
THANK YOU!!!!!!!!!!!!!!!!!!!! I am so relieved because it was the backspace that popped off.
destiny
help me my ‘w’ key fell off and i cant get it back on what do i do???
Cody
What do I do if the little metal clips on the computer break off?
cj2600
Coby,
Replace the whole keyboard.
cj2600
destiny,
You’ll have to take a closer look on the key cap and retainers and figure out if something is broken. I cannot help you without seeing the keyboard and key.
Sherry
THANK YOU SOOOO MUCH!!! You saved me!
Alexa
YOU SAVED MY LIFE! I almost cried! My ‘E’ key fell out and I didn’t know what to do! THANK YOU! 😀
holly
my button below the touch pad has come off. the left clicking button. its moved to the side and gone under the laptop a bit and i cant get it off. :/ HELP ME:(
cj2600
holly,
The touchpad button is different from the keyboard key.
Most likely in your laptop the touchpad button is a part of the top cover assembly. If the touchpad button is broken, the entire top cover assembly has to be replaced.
What is your laptop model? Maybe I can link you to the disassembly gude (if I can find it of course).
Manuel
Hey, thanks for the very useful article!
I’ve got a problem with my dell studio xps 16, its “enter”-key is loose, so I’ve tried to fix it, but it’s still loose! Damn thing! 😉
So after reading your instructions I’ve checked the retainer, the key itself, but they seem to be O.K..
Here’s a photo of the key, but there’s nothing broken… may you can help me, giving a tip what else I could try to do.
May the parts are not in the right order, because it seems that the retainer does not beholden with the key, so the whole construction is unstable.
http://img4.fotos-hochladen.net/uploads/imag0141lf06w9tpvu.jpg
Regards from Germany,
Manuel
Anders
Tanks!! So easy with just a litle help on the way!!
Dr. Jumba Jookiba
Thanks!
Thomas
Thank you. My niece is rather destructive and decided to have a stomping temper tantrum on my laptop, absolutely destroying Insert, Home, Page Up, Delete, End, and Page Down keys. At least I now know that I need to buy a new keyboard…
Steffen
WOOOOW man, this is 4 real one of the coolest pieces of advice I have ever gotten off other people’s experiences!! I had been struggling with my space-key for years! literally for years and now just after fiddling with it a bit like you showed — kabooom!!! and its SO fixed!!!
Thanks a million!
one
thanks it helpd alot
Alex
I have A Toshiba laptop and my f1 key came loose. I tried to fix it and i took the f2 key out also. But then They wont snap back into place? Please help me Dude. My parents are gonna kick my ass if i broke this computer.
cj2600
@ Alex,
If key caps and retainers are not broken, they should snap back into place.
Do not hurry, works slowly.
First, attach retainers back to the keyboard.
Second, position the key cap correctly. Right above the place where it should be.
Third, apply some pressure on the key and snap it back in place.
jielg97
Thank you! Very detailed analysis.
Prateek
thanks a lot
your tutorial helped me a lot
my keys got fixed
love you brother .. here my donation for you guys 🙂
mercedes
I have an hp intel g71-449wm Pc notebook
And my backspace key came off
i can click it back on but after a few times of pressing it, it comes right back off. I think the i have the clear white part and the cap but its just not staying and I cant figure out why
do i need glue for the actual button part to glue the cap back on to the center where it was? or what?
g
Thanks a bunch, just what I needed!
Kelly
You helped me so much with the space bar button….Thank you!!
Kelly
michael
woops i boke the key …. my key between e and t is gone
Simon
Thank you very much! Finally my keyboard is fixed. ^^
Laura O.
Thank you so much!!!! I don’t know why I hadn’t thought of searching eBay for a new key before now! I’m so glad I ran across your site :). You’ve saved me from so much frustration.
rachel
i have an acer aspire 5736z. i accidentally broke the spacebar while trying to clean under it. it has 2 sets of plastic retainers, and 2 metal hooks. i currently am pressing the rubber button under where the bar should be… i cannot figure out how to reassemble it back on (=[) i am absolutely frustrated. help? i have no idea how to put parts backtogether by order. also, where do i buy new pieces if needed?
Shankar
Hi,
I am from India . I have a samsung laptop . Someone poured acid on my keyboard and all my key retainers melted . But, by God’s grace all keys are working fine . I need retainers for all keys . Where do I get retainers .
kandar4
Thanks! My spacebar’s been making a really annoying click noise since it fell off a few months ago, and now it’s fixed!
Charlene
Thank you so much!!! I popped one of my keys off while I was cleaning my keyboard. I popped another on off to try to figure out how to get it back on, but couldn’t figure it out. I finally went on chat with a Gateway representative. They told me that since it happened while I was cleaning the keyboard that it wouldn’t be covered under my warranty. The computer is 4 months old. They told me that it would cost me $199.00 pluse shipping to have the keys put back on. I found your website and was able to fix it myself. You are awesome!!! Gateway custmer service stinks. My husband wanted to get a computer like mine, but I think maybe we’ll try Dell or someone else. I think I’ll do some reasearch to find out who has decent customer service first.
Kiera
Hello!
I have an interesting issue… My ‘a’ key has just popped off. I have had keys pop off before and replaced them. I know what to look for, and I’ve tripple checked. None of my hinges or pieces are broken. When I push the key into place, it snaps on. But after a few times pressing the button, it pops back off. It appears to happen if I press anywhere on the lower half of the button. The hinge seems to be working properly when I press around it and it pops up. I just don’t know what to do. Any ideas?
-K.
Crystal
This.was.really.helpful.only…my.spacebar.doesn’t.have.any.hooks.I.have.the.metal.bar.but.its.completely.straight.on.both.sides.
it’s.currently.off.and.I.can’t.get.it.back.on.hence.why.i’m.spacing.with.a.period.
any.ideas.on.how.to.fix.this.kind.or.where.I.could.find.out.how.(preferably.without.having.to.pay)
Aaron
Thank you for the help, brilliant advice!
Heather
My M key popped off. I fixed ittt. THANKS!
Kim
Thank you so much! I fixed my A key in a pinch. Really helpful! 🙂
Mohsen
helpful, thanks.
Richard
Thank you so much!
One tip, you might want to add it to your guide: when attaching the key onto the retainer on the keyboard, apply pressure with two fingers to the parts of the key where the clips are, and it will snap back into place easily.
Josh
I’d just like to say, putting super glue onto my laptop was the worst idea ever. I followed the instructions completely and it resulted in not only my x key no longer working but the adjacent keys to go out as well. If you have an emachines laptop, DON’T do this.
Luis Rojas
How do you fix an ENTER key? I did exactly what it said for a regular key, but didnt work!
P.S. I have an Acer Aspire One D255E
Brenda
I can not believe this! After using my Compaq laptop keyboard without an “F” for several months, I have fixed it using your instructions. Thanks so much!
johnroberts
How do i do it for a down arrow key
NAEEM AHMED
My M key popped off. I fixed it. THANKS!
Courtney
my R and T keys and i cant fix them i took them off to try to get dog hair out but the top retainer is lifted up and i cannot get them to stay dowm
Ellenda
Thanks sooo much for your web site!! My counter surfing puppy clawed off a few keys on my laptop. With your instructions I was able to fix them all!! Now my laptop looks new again. I am sure you saved me a huge repair bill.
Greatfully yours,
Ellenda
jodie say's
My son has pulled 42 keys off my lap top the other day.your instuctions look easy but its not. Im so glad i got insurance with my lap top.A tip for anyone with young kids (get insurance!)
breanna
thanks 4 posting this! my cat was on my laptop right in front of me and i didnt notice until he fell and scratched my leg up really bad and clawed off my 0 key on my # pad. 🙂
Dave
Very helpful – thanks
Josh
I had my v key snap off on accident the problem was that the two small metal hooks on the bottom broke off, I don’t feel like replacing a keyboard for one key is there anything to do to fix this one key take the keyboard out install new metal hook or something like that?
suiko
Thanks a lot!!! It was a very helpful article!!! ^^
alfonso
my membrane thing is lost so this didnt help but thank you though
cj2600
@ alfonso,
Remove the membrane from under the key you don’t use and glue it under the key you need.
richard
Great pics thanks !!!!
servet guden
thank you a lot. it was vary helpfull.
Jerces
Thanks for a lot of the details that you been posted here..it was very helpful for those people don’t have enough money to go to computer technician..Thank you…
omg
OMG! Thank you for this!
Kaleigh
Thank you soo much! This was a life savor. However, the key I fixed doesn’t work correctly. But i am going to have someone look at it or something. But you did an amazing job showing me how to fix it!! Thanks again
-Kallleigh!
demetria brown
This was VERY helpful as we decided to fix daughters laptop as oppose to gettin new one. Thank you.
ghie
thanks a lot! ‘A’ key on my laptop works like new now 😀
great info…
Rosen G
Thank you so much. Nice and very helpful!
Ann Christine
Thank you – really helped me 🙂
emma
fantastic! really really useful, thanks a lot 🙂
logan
Awesome thanks. The secret for me was to take the white strip thing off the key and get it locked in on the keyboard first and then laying down the key. Anyone can do this
ed ocampo
how can i fix a broken key? every time i click the letter “n” it doesn’t function. i using a lenovo laptop pls help
Dimitar Dimitrov
Thanks for the repair guide you are giving here. I was facing lots of troubles after my cat sharpened her claws on my laptop keyboard. I managed to fix all the detached keys.
This is really very very useful info.
Thank you.
Kenz
Currently, my “l” key lsnt worklng. uslng “L” key to replace. thls ls so compllcated…
Vexus
THANK YOU! Using that replacement method, I managed to get my ‘N’ key to work and stay still! (For the most part, but still!)
aidan ohanlon
Gateway NV50A Laptop – 4 months old and keys are sticking, unpredictable, a couple have popped off. Nothing available in their help menus. Gateway “live chat” expects that I should take computer back to factory settings for a remote fix. This is clearly a mechanical problem. I have proof. THANK YOU. Escape key popped off, and would not re-attach to retainer. Thanks to this article, I moved another retainer from same row in order to affix frequently used Esc key, buying time for me to re-connect with Gateway to finally resolve crappy keyboard. I honestly think the whole thing needs replaced: Space bar works sometimes, “S” either doesn’t work at all or repeats tens of times, another dozen keys are so unpredictable that I cannot rely on a thing I enter. Under normal circumstances, I have exceptional keyboard skills. Twenty-five years ago my Dad made me go to secretarial school before college in order to have a marketable skill to carry throughout life. He had no idea, nor I how vital a role keystroke mastery would become. Too bad Gateway/Acer builds a worthless keyboard. Sorry to be so long: This is both gratitude and warning.
AVISEK SINHA
i need a keypad for acer e machine laptop suggest me where should i get it
S. K. Gupta
Backward delete key of my laptop HP Compaq Presario V 5310 US is stuck which does not allow me to enter website address, password etc as it rubs out the character immediately after entering. Please guide me to repair it. Thanks
pocco12
i have done all that is shown above but it will not clip in at the top. any tips?
Florio
Really hope you can help me; someone else may have the same problem.
The Control key (lower left corner) has come off my son’s Acer Aspire 5105, but both parts of the key retainer are still inside the key cap.
I’ve tried pressing the entire key back onto the keyboard, but it won’t stay on.
What can I do?
Florio
I should just add that this particular Control key has a metal retainer similar to the one you show us on the space bar key.
Chikako Mays
Can somone tell me how to fix my ‘Y’ key i can put it on but it hangs loose plz help 🙂
dude
can someone tell me how 2 put my space back on D:
David Teasley
The key is still in place and still does not work. I have changed out and replcaed many keys over the years, but that’s not the problem here. A known-good keyboard from a different D620 was tried and worked OK. In the past, a prolem like this has always turned out to be in the cable. There may be other keys on that cable coductor which do not work, but that was not checked. Give me an RMA and I will return it for exchange
Priya
How to fix ‘E’ key?
Lynn
Is it possible to put super glue in the middle of they key and not ruin the computer?
cj2600
@ Lynn,
I used super glue for attaching the rubber nipple back to the keyboard. It worked fine for me. Just use a very small amount of the glue.
Eli
Thanks for the help! My landlord’s cat decided to climb on my keyboard and start scratching my keys off…You saved me hours of frustration!
Sally
my cat clipped one of the keys and it took me such a long time to figure out why i can’t put it back.
thanks a lot. from the pictures i knew there must be a missing plastic thing from it. i followed instructions and placed it back.
Natalie
fixed my laptop thank you very much 🙂
Jean
Wow my “E” key has been off of my keyboard for about 4 weeks now after trying and failing to put it back on. I read this and had it back on in about 5 mins. Thanks a bunch for the help!
Nicholas
THANK YOU!
PG
Brilliant!
Many thanks!!
Autumn
WOW THANKS ALOT!!!!!! MY ALT KEY FELL OFF AND NOW U HELPED!!! THANKS SO MUCH!!!
Luciana
OMG!Thank you so much! My 1 year old has the habit of removing my keys all the time, now I can at least fix it!
caitlin
ok so my my laptop is a hp and the backspace came off and the retainer thing is stuck to the cap thing idk how to remove it from the cap without breaking it can you please respond asap
TK
Great job…Thanks!!!!
Zeeshan Arshad
Excellent work. I had my 2 loose keys, very nice explanation and tips which helped me to understand the background.
I fixed them. Thank you!
Super girl
Nice instructions it worked thank you who ever yah!!!!!
vrrajesh
Very informative !!!
Gaurab H
Excellent instructions. Fixed my space key in seconds.
Jesper
That was an extremely helpful guide! Thanks a lot!
Barb
WOW! FANTASTIC SITE! The pictures were perfect … fixed my key within a minute! I am SO grateful!
gedson natalli
thanks a lot
harsh kumar
Thanks a lot ………………It was really helpful.
Mrmph
Thanks a bunch, saved me time and money. My d key is missing 1 key retainer but this was easily fixed with scotch tape!
Jen
Thought I’d ruined my laptop, but this guide proved me wrong. Bit fiddly to do but very clear instructions. Thanks, you’re a lifesaver!
Gorazd
Thanks man! This is a well written guide!
Phew...
My ctrl key just fell off but I managed to put it back on…phew.
Pete
Nice write up. Helped a lot. Thanks
JH
You saved my keyboard. Thank you very much.
Adz
I was using my laptop for a week without the space bar! With your help it’s back in place! THANKS a lot!
Mary Ann Jocoy
Purchased new key, but still can’t clip it onto retainer. Retainer looks ok. New key looks little different, but back side appears the same. May have to wait until a “computer geek” comes around!!
Mary Ann Jocoy
Just took another look at back of key, and they’re not exactly the same–apparently co. sent wrong key, so will have to deal with it or use it without the cap! Thanks for help, tho.
cj2600
@ Mary Ann Jocoy,
If you cannot find the correct key, maybe it makes sense to replace the entire keyboard.
These days laptop keyboards are cheap. Probably you can find on on eBay for $15-25.
Cathy
Simple and straightforward. My shift key is firmly back in place and all the complicated replacement scenarios I was imagining evaporated in seconds. Thank you so much!
Martin
Nice guide!
But it does not work for sony vaio keyboard!
Are there any working fix?! 🙁
cj2600
@ Martin,
I guess you are talking about some latest model. Probably you’ll have to replace the entire keyboard.
josiah
Thank you for your help! got my lenovo thinkpad “b” key back on!
wasim
HI,
how can i replace keyboard keys laptop hp compaq 8510p thanks?
cj2600
wasim,
Same way as you replace keys on any other laptop keyboard. I don’t understand your question.
nick
I’m missing 7 keys for a panasonic CF-29 Toughbook, and I have 0.00 money.. The keys are shift, 3 arrow keys, page-up ky, and HOME key. D=
cj2600
@ nick,
There is not much you can do with 0.00 money.
With 7 missing keys it’s a good idea to replace the whole keyboard which is about $45 on eBay.
andrea
Thanks so much! Got my space bar back in place after my cat somehow took it off of my Dell laptop.
Joanne Berbes
Please help.
Only space bar and number 2 are not working on may laptop keyboard.
What im going to do to fix it?
THANKS
cj2600
@ Joanne Berbes,
If two keys stopped working, you’ll have to replace the keyboard. You cannot fix it.
Give me the laptop model number and maybe I can point you to the right direction with laptop disassembly instructions.
kristy stauffer
i have a dell laptop and the k button broke it is flopping all over the place how can i fix it and where do they sell new keys
please let me know and is it easy to fix..
sairam
i’ve lost locks for A key. what should i do now?
rozina
hi i have a toshiba labtop and on the keyboard letter R is not working at all. can you help me please
cj2600
@ rozina,
If one of the keyboard keys stopped working completely, you’ll have to replace the whole keyboard or use it as is.
jenn mangis
Hi,
My backspace key fell out today and I took it to a man who was not able to fix it (when I came home the key fell out again). There doesn’t seem to be anything wrong with either the key cap or the retainer. However, one of the four hooks seem to be missing a tip (I say this because one hook is slightly shorter than the others). Does this mean that I will need to have my entire laptop keyboard replaced?
My second question is about the techniques of the man who tried to fix my keyboard–he wasn’t able to fix the key and when I came home I noticed there was some ink under the key retainer–it looks like he was working with a pen to fasten the key back onto my keyboard–is this common practice?
Thanks!
cj2600
@ jenn mangis,
Most likely the key doesn’t stay in places BECAUSE this missing tip.
Is it a metal part on the keyboard? If yes, you’ll have to replace the entire keyboard.
Don’t worry, keyboards are cheap these days.
If you give the the laptop model number, there is chance I can point you to the keyboard replacement instructions or service manual.
No, it’s not common practice. 🙂
dee
i have toshiba portege r700 esc just popped off but dont know how to get it back on
Kimberly Farris
Followed your directions to fix my ‘n’ key that kept coming off. Thanks.
Your biggest fan
This is great 😀
Thanks so much,
You guys are the best… gooo laptoprepair101.com
<3
D Weatherspoon
Thank you very much! These very detailed, illustrated instructions were just what I needed.
ChristopherVon
Hey okay, My problem is the Broken Clip Illustration. But I cant find where to order a new “E” Key for my Laptop. Dell Precision M6500
There is a website very popular for selling a key replacement kit but it seems mine is the only laptop for Dell that they don’t have. Where can I get a new “E” key for my Dell Precision M6500 ?
cj2600
@ ChrisopherVon,
You can buy a brand new keyboard for your Dell Precision M6500 laptop for about $20 on ebay.
ChristopherVon
Dang I was looking for a key to buy instead of going all out… I watched how to put a new key on but… Yeah.. The site has every dell execpt mine… Maybe one of the other dells has the same key design… Cuzz a key only cost 4$ and that key board is over 20$ and doesnt make sense if the only thing wrong is the key in the first place. Some one is selling the key and I will continue to look. Thank you anyway.
I was really hopen you knew where to get one sense putting the key in isnt complicated at all.
LoN3ly b@by
Hi everyone i from malaysia . and i looking for a down arrow key for dell inspiron mini 10 .. i looking for 1 key only ….
Anand
Thank you! My “R” key had fallen off and your article helped me fix it in less than 2 minutes 🙂
Thanks again!
tommy
My “s” key is coming off,but it is just the back; I have followed the steps and the back just keeps coming off. please help.
Steve
My spacebar/membrane came off before christmas last year, found this site and wrestled with it for 10 minutes or so and got my spacebar working again, definitly recommending this site to anybody needing to fix their laptop 🙂
cj2600
@ tommy,
It sounds like the retainer or key cap itself is damaged. Take a closer look at both pieces. If they are damaged you’ll have to buy a new key cap or retainer. Usually they sold as an assembly.
Fernando
Hello, I am having trouble to insert again the left key of my Lenovo X200 notebook. I cant seem to get it on and I dont want to break it. Any pictures or video that could help specifically for this left key?
Thanks a lot for your help!
Hunter
This info is great. But it looks like I may be beyond this. I have a key that is part of my password that does not seem to be functioning. When logging on and asked for my password, when I press what was the key in question, nothing happens. Do you know of alternative keystrokes that might mimic the key I need to press? Or am I just hoping too much?
Thanks.
cj2600
@ Hunter,
Find an external USB keyboard. Start your laptop with the external keyboard and login. Change the password so you can use only working keyboard keys.
drburn
The article is very helpful,
thanks a lot and keep up the good work……….
Catherine
These is a great help but what can you do if the little metal things at the four corners on the base of the keyboard are missing?
We have an “f” key that we can’t get to stick in place. Any help
would be greatly appreciated.
Thanks.
Megahn
THANK U! SOO MUCH!
Kenya Starflight
Thank you so much 🙂 My E and I keys had popped off, and your site saved me an unnecessary trip to my tech support guy…
liz
thank you!!! my A and K keys fell off, and your explanation made it easy and fast to repair!
cj2600
@ Catherine,
You’ll have to replace the keyboard.
What is your laptop model? Maybe I can point you to the disassembly instructions.
wilson
I repair computers, and its just easier to order a new keyboard typically than try to fix them.. thats just my 2 cents.. 15$ will typically pay for a new keyboard.. ive only seen once i order once.. an emachine cost like 40 bucks!
cj2600
@ wilson,
As a laptop tech I agree with you. It takes less time to replace the keyboard than fix a broken key but… some people have no idea how to replace the keyboard or they just afraid to try it.
Norton
Thanks for the great images and info, but the detail I am looking for is missing. 1. Removing a key: “Carefully remove the cap from any other working key so the key retainer stays connected to the keyboard” – obviously this has to be done carefully but is there any particular technique which is less likely to break the key retainer? e.g. use fingernail to lever up the key from the top or right? 2. Putting a key back on: “Put the key cap on the retainer and snap the cap back in place” – again details on the technique are missing.
Adding these details would greatly improve this article. Thanks.
cj2600
Norton,
There is no special technique. I found it’s easier to remove the key if you start lifting up just one side of the key, not the entire key. You can start with wither side.
The key cap has four small plastic locks. When you position the key cap above the retainer and push it down, it should lock on the retainer. I’m not sure how more details you need.
Kevin D
Sweet! Thanks a lot, gave me tips on how to fix my tab button that was kind of on a hinge
nick
Awesome! Im not a tech guy at all, and I was able to fix my laptop key! Thanks to who ever posted thid fix!
M.Ali
great…
Lindsay
Thank you so much!!!
Hummus
Thank you so much, you saved me
ma4ohioboys
Oh Thank You, this worked perfectly! Just needed to be careful. The dog walked across the computer and her nails pulled up several keys. This fix worked !
TearxNan
Thank you! My cat knocked over a cup on the ground, and jumped up in a fright and ran over my keyboard. He managed to take out the A and the Z key. I’m only 15 so if my dad found out I would have been killed. Thank you so much <33
EarthRounderPilot
Thanks, where looking for the name of Key Retainer
was very useful
Keep doing well.
tnx again
Eva
Tank you soo muc. now you know wic key i ave a problem wit! lol. te one in between g & j lol
Bryan
Any advice on how to replace an entire keyboard this way? I got some garlic powder stuck in my key board and removed all the keys to vaccum it out, but nw only half the keys will go back on. What would be more cost effective, to buy the inividual retainers or buy a new keyboard? I have a toshiba Satelite A215.
jessica
Hey, my backspace key fell off on my Hp laptop, and it’s not broken….I just can’t clip it back on. (Don’t judge) i need help!1!1
Deema
Thanks so much! I was able to reattach my key in just a few minutes with your clear instructions and images.
Emily
great! Thanks so much!
Joachim
Where can i buy new retainers or new keys for my acer aspire 5951g? The clips on to of my buttons is broken
Jasmine
Thank you soso much,, i accidently broke my alt key of my new macbook last night and if my parents found out the would have killed me so, i just googled it and this site came up and it was so easy, i only had to follow like the first 2-3 stpes. Thank you 🙂
Stu
Thank you what a greatly helpful site have just sorted my gf’s key that fell off. Many thanks for such a concise instruction!!
Lana
Thank you so much! the number 1 key broke off my school laptop……. i would have been in so much trouble! 🙂
luckily i found this 🙂
Anil Chaudhari
thank you very much………
Anil
Tnx a lot..
Marcel
Hi, I need one key for acer aspire one D255e. This key is F2. Please, tell me if your find. Thank you.
foas
hello,
a few days ago my “r” key loosened of my laptop and now it is still hanging on my laptop but when I push it, it only responds when I push several times really hard. Do you have any idea what I should do? I have a acer aspire 5733Z if that might help. (sorry for the bad english)
Hakeem
Thanks So Much!! I FRICKING LOVEE YOU FOR THIS !!!!
Glenda
Thanks a million, but sorry, I only donated $10. I can’t believe that was so easy to fix. I’ve been struggling over this key for months. Thanks again.
cj2600
@ Glenda,
Thank you very much for your donation.
rusty
Thanks!
My dodgy S key has been annoying me for ages and I fixed it in 5 minutes after reading the first quarter of the page.
+1 for restoring my sanity!
reece
thanks mate youve fixed my space bar i was trying to fix it back on for ages and when i serched it and found this it was done in 2 mins
Rose
Thanks for this! As a side note, Dell Inspiron space bar keys are connected with retainers, which makes them much simpler to reinstall (and for my 8-month-old to pull off in the first place,I think).
Tatiana
Your help didn’t work! I needed help on my backspace key! Can you make a step for that? If my mom finds out she’ll be pissed and never let me use the laptop again!
Jennifer
Thanks! The step-by-step really helped and my keyboard is back to normal. I appreciate the assistance!
karl
why no just buy a new keyboard their cheap enough and that way you get a brand new keyboard with no gunk in it. i repair computers every day and trust me the new keyboard is easier than a single key
Michael
I have a laptop gateway and every time I Press the G bottom on the keyboard the H bottom is being display or every time I hit the U bottom the Y appear on my documents. How can I replace the keyboard on my laptop or reset the keyboard. Help plz
Nice Nice
Nice
jon2775
Man, you are good, thank you very much for this page, it is the only reason that I was able to put 2 keys back on my laptop. If I had any money at all in my paypal or my pre-paid visa I would gladly give you a donation. I am on a small disability and it is barely enough for end of month expenses, if there is any to spare I will put some to you. I am saving this page link to my desktop so that I can find it again, thank you so very much.
jon1775
ps, i shared on facebook, twitter and google +1
Karen Lea
Wow you people are the real deal! Thanks for knowing what you know and breaking it down so ANYONE can figure it out! You are officially my “Go to Site” for all my computer questions and fix its! Keep up the great work!
Ethan
My keys only come off with the cap and retainer clipped together how do I reattach the key when it is like this?
WILDAN
MY KEY BOARD DOESN’T WORK NORMAL HOW CAN I FIX IT
Karin
Hey, thanks for your nice instruction. Anyway, my ‘P’-keyboard key already fell somehow when I saw my laptop weeks ago. Until now on, I couldn’t fix it, even after I read your instruction *sigh* No, it’s not your instruction which is not working, but the key retainer parts won’t stay in place. I’ve examined the retainer part, no part is missing, all seems just okay. But somehow the clips just couldn’t stay connected. Maybe I’ll have to find the solution by myself. Anyway, sorry for the bad English. 🙂
ROBB
Thank you, it worked.
Lilia
thnx but i don’t think i can fix it with out the membrane, which I can’t find
Jennifer Wilson
I have a disconnected letter key on an Acer Aspire (2010 vintage). the ‘V’ key came off but the retainer is still in place. However, I cannot press the key back onto the retainer so that it sticks. Any advice? Thanks.
Chelsea
Well two of my keys need to be replaced… I have broken Tips on both of them, wonder how much it is to replace them…
tripurari
sir ,
the function 11 and function 12 keys have dropped from my Compaq 620 laptop , is there any help from your side
andrew
thanks so much!!
Ron
My Deepest Thanks for this keyboard repair guide.
I just got my new Sager laptop a week ago and had problems with a number of the keys. Sending the laptop back would have cost me weeks without a computer.
Thanks!
– Ron
Sami
Excellent demonstration….fixed the key in 5 minutes….Thank you very much
Basil
Thanks very much,,, really helped.
Ash
Thanks so much, you’ve saved my sanity
JJ
Great ifo thanks
Laura
Thank you. Great information.
Soren
Thank you so much! My “Caps Lock” button randomly fell off. I got it working in 1 minute
Bill
Excellent fix info. Just have to find retainer now.
Thanks for that!
Ismail ihsan
I lost the button plz explain further by steps,hope it will work.. (Ismail)
cj2600
@ Ismail ihsan,
You can buy individual laptop keys on the internet. Search ebay or just google it.
Jared
I have the retainer on the back of the C key!!!!!!! but I can get a new C key!!!! it was all like PRONG!! Me:WTF WAS THAT!!!!!! SHIT THE C KEY!!!!!! AHHHHHHHH!!!!!! AH!!!!!!!!!!!! I have to hide from my uncle or i will get beaten 🙂
Kim
The retainer is on the key that is off. What now? I just received this for my daughter after I dropped her last one off the dock (horrible Christmas accident) and don’t want to send this one back.
TiaMarie
There is surprisingly little available to help with broken key connectors online so thank you for this.
Pulkit Mathur
Thanks man!!!! you rock…..this website is awesome….
Saji
Thanks a lot!!!!
Without the pictures I would have never fixed my laptop.
Becca
Hi!
Great site! I just have a question and i would be more than thankfull if you could answear it!.
So i have a chiclet keyboard just like the pictures,on my packardbell laptop and my N key keep gettinng stuck!Every 30 sec i have to push it hard otherwise it keep spelling out 500 N´s annd freez the laptop up. I liftet the key today just like the picure and cleaned it and i could see nothing wrong with the littel silicon thing eventhough without the plastic key it gets stuck.
I gave a grand for my laptop and use it several houers everyday since im a Chem studennt and cant afford a new one just becouse the damn sticking key!!!
So thankfull for answears!
/Becca
Ryan
I cannot thank you more! For years, my laptop has had the T key come off everytime I push it (I use this key often, as per standard). The retainer was broken, but using your genius tip, I stole the retainer from the right-click button, breaking it in the process. Oh well, I never even noticed it before. Thank you so much, I will be sure to come back here if I ever need my laptop repairs in anyway again.
If I had a suggestion, I would say include where I could buy retainers and such, as I only know Ebay as a semi-reliable source.
iza
great, it helped me to fix my space key, that i removed to clean my keyboard!;)as space key didn’t work properly
thank you for good advices, with good pictures! it makes your advices easy to follow
Dale
Thank you so much! You helped me fix the whole bottom row… I tried to chase down a crumb with a pen. The crumb was stuck under the keys, and I kept popping up the keys, not meaning too. 😀
Teodoro
The control key of my Acer Aspire 5551-2452 works at random (you press it and sometimes it wirks but sometimes not. The key and the retainer system are fine. Wjat shall I do to fix the problem? (besides changing the entire keyboard…)
Thanks for an answer!
Ron
My D key fell of, but the retainer is stuck on the key cap. What should I do?
akanksha
last ROW keys of My DELL vOSTRO 1014 LAPTOP SUDDENLY STOPPED WORKING INcLUDING ENTER KEY I M IN BIG TRBL PLS HELP ME OUT
cj2600
@ akanksha,
You can try reconnecting the keyboard cable on the motherboard. If this doesn’t help most likely you’ll have to replace the keyboard.
What is your laptop model? Maybe I can point you to the disassembly guide or service manual.
Thor
Thanks a lot!!!!
Mark Flint
Good Day to you sir. My name is Mark and Last night, my son and I were talking about how many keyboards he has went through in the last 5 years because of neglect. I pointed out to him that I have had the same laptop, Sony Vaio, for the last 6 years and aside from once forgetting my password to enter my unit, I have never even had a key fall off. As it would happen, one fell off at the perfect time for my son to exact revenge on me without actually doing anything. Moment later I was getting the keys for a lock to get some tools I thought I may need to fixthe missing key and as it would come to pass, the key on my keychain had fallen off as well and it was lost. Your instructions helped me and my laptopis now, once again, working great. thank you for the detailed intructions that helped me carry out the step that make it a success the first time.
T Lain
What if i followed these steps and things work fine but then one by one over the next month the keys plus some others come off again? This will be the 3rd time I’ve fixed them and they only last a few weeks.
Herb F
Thank you, one of our keys came off with the retainer still on the key cap. Following your pictures, I removed the retainer clip and the rest was easy per your instructions.
Thanks again.
sam hector(mr)
hi there
i use windows vista operating system laptop, some of the letter on the laptop keyboard is not working, when you pressed them the shows numbers instead of letter, do you think i have corrupt laptop key bard or i need to format the hard drive to get rid of this problem or do you think there is virus inside my system. could you please help me with matter. really grateful to you. thanks
cj2600
@ sam hector (mr),
What letters not working properly and what numbers they are typing?
If it’s numbers 1,2,3,4,5… instead of letters J, K, L, U, I… you have keyboard NUB LOCK enabled. Disable NUM LOCK and it will be fixed.
To disable NUM LOCK you can try pressing NUM key on the keyboard. Sometimes you have to press FN key and NUM key together.
blah
i lost a retainer. how much will a new one cost?
cj2600
balh,
You can buy a new key with retainer (hinge) on the Internet for about $5.
tip
this did not work for me it really didn’t work for me.
Moncerra cano
I need helppp please
My backspace button is out of control
Every time I type something on my laptop it keeps erasing by itself I don’t know why but all I know is that if I don’t fix it in time I’m going to get a bad grade on my school assessment.
Please help me!
cj2600
@ Mancerra cano,
It sounds like your laptop keyboard failed. It’s necessary to replace the keyboard in order to fix the problem. What is your laptop model? Maybe I can find a disassembly guide for you.
Mary
all I did to keep the key on was chew some gum and used it to keep it there..don’t use too much or you’ll have to remove some of it
cj2600
@ Mary,
Well, it’s a very uncommon solution. 🙂
ahung
This is really a helpful page.
Besides what’re hinted, maybe a final(or temporary) way: Use on screen keyboard? LOL~~
Especially wondering if exists any software of “on screen keyboard” so better/flexible enough for portable devices(the screen’s so small:)?
For example: The “CTRL” key can put atop_row for easier fetch. Or, even some keys can be user friendly:
Relocatable & let users define their functions~ Then *net_surf_new_tab or #copy/paste surely very very easy!:)
Usually, CTRL-key..
*needed to be pressed while clicking an URL.
#together with C/V key pressed.
Steve
I think I have two of the best questions on this website, whatever prompted the idiot engineers at Logitech to design a stupid system like this? And why do we continue to purchase crap like this?
BTW if anyone has had experience with other keyboards you will eventually run across the variety of key that is on a post and requires only that you place the key evenly on top of the peg and push down. Wow what a concept! Sheesh! some times I think we deserve this stuff just because we put up with it. Thank you for this good site, and Good luck to all! Steve
Sachin gupta
Nice tips
augusta
thanks a lot. i used your technique and fixed my space bar key of my old laptop of compaq brand.
feafea
thanks for telling me to take another key off now i cant get two keys back on 🙂
Shekinah
Hi. plss help me. The letter “e” key of mine is not working. i’m having a hard time using this onscreen keyboard. plss help. thnx
cj2600
@ Shekinah,
If one of the keys failed you will have to replace the keyboard. You cannot fix individual keys.
shilpee
Thanks a lot for the tips.My key got fixed finally after reading this…. 🙂
Jerri M
Thanks! Worked great…after I figured out that the keys really would snap back on.
fred
i.have.Acer.laptop.its.space-bar.key.is.unresponsive.i.removed.it.by.hand.from.keyboard.and.removed.the.dust.and.reattachedkey.on.keyboard.again.But.its.spacebr.key.is.not.working.Provide.more.picture.of.spacebar.key.
nayeli
hi can you pleaseeeee put a tutorial on how to put back a torn off left clicker pleaseee mine fell of that’s why pleaseeee thank you!
Michele
I have a problem with the contact of 2 keys. When I press these bottons they doesn’t work. Somebody can Help me to fix the contact rear the keyboard?
Now the only solution I have found is to remappin the keyboard with ukelele program but I’like to fix definitely the problem…maybe soldering the damaged contact….
Thanks
Gwen
Big thank you for assisting me with the letter “a!”
yogesh bacchi
Thank you sir fir your useful guide
Thanxxxz alot sir
Sir what is the cost of a single button (sony vaio )?
Guy who plays video games
This guide saved my “W” key, and now I can keep playing computer games.
Thank you for your guide.
shabbe kami
how to fix right enter key its felloff, toshiba satellite
John Ford
Thanks. Key snapped off, wasn’t broken, but I had a heck of a time getting it back together. The secret was in making sure it is seating properly onto the keyboard on both sides. Once I finally got it to do that, the key just snapped on easy-peasy. Your “situtation 1” inspired me to persevere.
Logitech Illuminated Keyboard K740
indra karki
my laptop fallen, got it repaired but it runs too slow, pictures are flatten, pages overlapped….plese suggest….waiting for your reply….
Guy that has a messed up w key
My w key is broken on my HP laptop and now it doesn’t respond fast and acts like a sticky key but it isn’t stuck so if I hold down the key for long enough or just press it once it spams w.
Jocelyn
Thank, I followed your explanation and I replaced 2 damaged plastic hinge. It was easy. It cost me $17.00 CA. Replacement of the keyboard was $60.00 plus labour.
Tzviya
Hi, very useful post, took me only a few seconds to put back the key one of my curious cats took out. It saved me going to the technician (I donated something for you). Thank you!