These instructions will help you to remove and replace keyboards on various laptops. I will not be able to cover all models but you’ll get the idea. Steps for removing and replacing the keyboard are similar for most laptops.
If your keyboard is missing a key, it’s not necessary to replace the whole keyboard. You can fix it using this guide: how to fix keys on a laptop keyboard.
Warning!
– if your laptop is still covered by the manufacturer’s warranty, do not open the case or you can loose the warranty.
– always remove the battery and unplug the AC adapter before you open the laptop case.
– if you damage the keyboard connector on the motherboard you’ll have to replace the whole motherboard.
– proceed on your own risk.
Sony laptop
I took these pictures from a Sony Vaio PCG-K33 (model PCG-9S1L) notebook. Should be similar for some other Sony notebooks too.
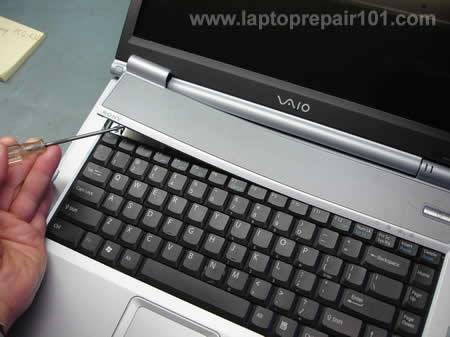
Insert a small flathead screwdriver under the keyboard bezel and carefully lift it up. Continue releasing plastic latches and removing the keyboard bezel with your fingers.
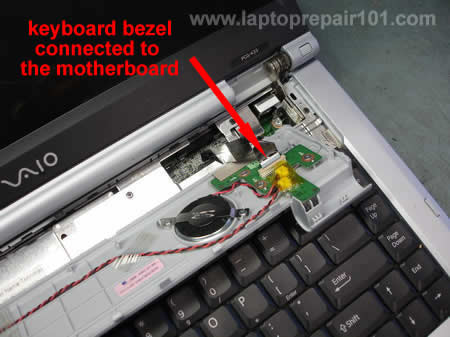
Be careful, on some models the bezel might be connected to the motherboard as it shown on the picture above. If you accidentally pulled the cable, connect it back. It is not necessary to disconnect the keyboard bezel from the motherboard in order to remove and replace the keyboard, just put it aside so you can access the keyboard screws.
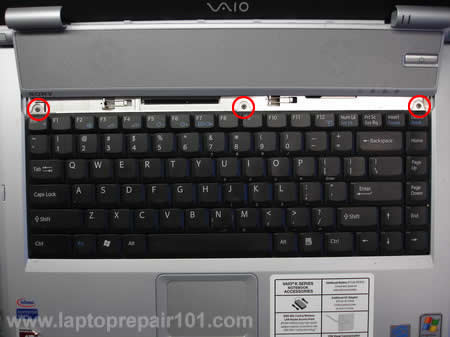
Remove three (or more) screws from the top of the keyboard. Carefully lift up the keyboard from the laptop case.
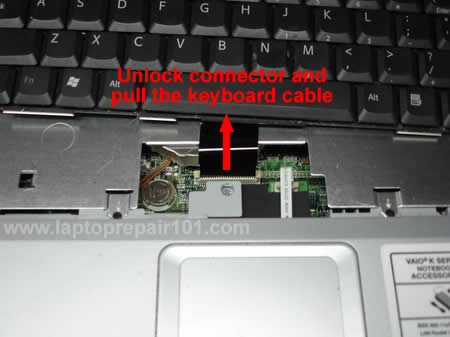
The keyboard connects to the motherboard via a flat ribbon cable. Before you pull the cable from the connector, you’ll have to unlock the connector.
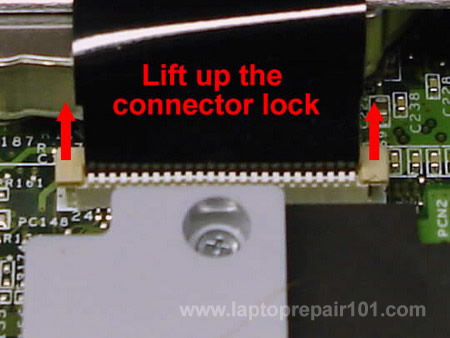
The image above illustrates how to unlock the keyboard connector. Carefully move the connector lock 2-3 millimeters up and after that pull the keyboard cable. To install the keyboard, follow the above mentioned steps in the reverse order.
Toshiba laptop
The following pictures were taken from a Toshiba Satellite A135 laptop. The keyboard removal instructions will be almost the same for most modern Toshiba laptops.
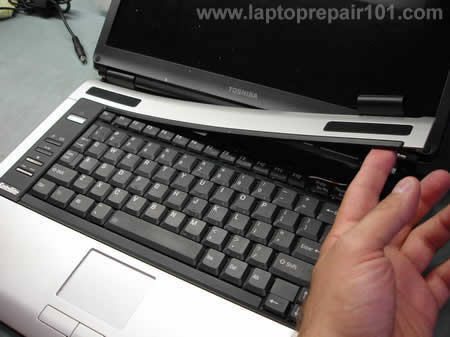
The keyboard bezel removal procedure is similar to the above mentioned Sony Vaio laptop. Lift it up with a small screwdriver and remove using fingers. On most Toshiba laptops the keyboard bezel doesn’t have any circuit board underneath, it’s just a piece of plastic and you don’t have to worry about cables.
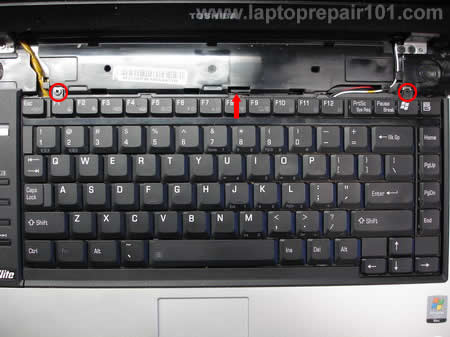
After the bezel is removed you get an access to the keyboard screws. Remove two (or more) screws. Release the plastic latch pointed with the red arrow and lift up the keyboard. Carefully put the keyboard aside so you can access the connector underneath the keyboard. Do not forget that the keyboard is still connected to the motherboard.
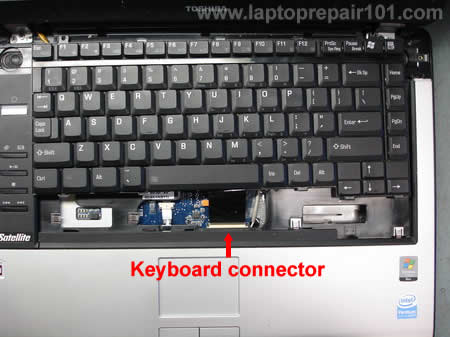
Before you remove the keyboard, you’ll have to open the connector and release the flat ribbon cable.

Here’s a closeup picture of the keyboard connector on the motherboard. Be careful, this type of connector is fragile. On the left image the connector is closed. On the right image the connector is opened. Unlock the connector by moving the lock up as it shown on the right image and after that release the ribbon cable. Remove and replace the keyboard. For assembly instructions follow all the steps in the reverse order.
UPDATE. What can you do if the keyboard connector was damaged?
If you are looking for laptop disassembly instructions, check out laptop service manuals.
98 Responses
R. Thompson
Hey I just wanted to leave a note to say thanks for your instructions on this site. Had a problem with a laptop after cleaning and you solved it. thanks again
bp11280
my toshiba L25s121 can not charge the battery. i gotta new battery and a new charger. when i connect to ac power the charging light lits but the icon at the bottom right corner shows battery is charging but is not actually. when i plug off the computer it shuts off due to lack of charge. i upgraded the BIOS but still no result
hayjay
Your Toshiba is suffering from a faulty/Broken connection between the motherboard and the Power input socket which is a common fault on most Toshibas. your only solution is to strip down the unit and resolder the joint between the +pin and the mobo. The problem is that you have to Strip down all the parts to get at it. If you havent done it before allow about 4/5 hours. Nothing to do with charger or battery, just broken connection
tweetybird
I have a eMachine(M5309 keyboard). I am trying to replace the keyboard myself and wondering if it would be the similar procedure as you shown here for both Sony and Toshiba.
If you have an instruction for replacing keyboard for eMachine, can you please send me a copy ? Really appreciate your help !!!
ken
I am having problems with my sony vaio pcg k33. I was wondering if I can send u a picture of the lcd when the problem occurs so that you can advice me to what I should do. Many thanks.
Ann
I sooooo appreciate your diligent posts. Best Buy declared my computer dead without even looking at it, but I think your instructions saved it! THANKS!
LM
I have an HP Pavilion ze5185 and am trying to replace the keyboard. I got the old one out ok, but can’t seem to press the ribbon cable of the new one into the connector far enough for it to engage the pins. I tried reattaching the old keyboard, but can’t press that cable in far enough either. Is there a trick or a tool for doing this? Thanks!
cj2600
LM,
There is no trick. I just checked the service manual for your notebook and didn’t find any special instruction for reconnecting the keyboard cable.
Zaheer
Hi LM,
I am facing the exact problem with Toshiba Portege 3500, the keyboard cable just wont engage. Can anyone post a higher resolution picture of the cable connector open and closed like the last picture above. That will be great help.
Thanks
Zaheer
Moti
Hi LM !
I was looking for the PCG-K33 ‘shutdown’ problem QA thread.
Refering to a similar forum, a solution has been posted proposing change Decoupling Caps around the Proc which allegedly ‘dry up’. I would like to ask some questions about the PS distribution around the board; if OK ? I don’t have a service manual, yet. The problem also seems to have a ‘thermal dissipation’ component ?
Thanks,
–Moti
charles patterson
was looking for a toshiba keyboard replacement instructionsfor a model A55
Justin
I’m looking for a manual to replace the keyboard in a Toshiba Satellite L35. A few keys came off (typical cheap machine and all) I have a new one coming, and need to know how to tear it down for removal, then replacement.
Rodney Epker
Hi,
I have an Acer Aspire 5100 laptop and cannot find information on replacing my keyboard. I just purchased a new keyboard and would greatly appreciate it if you have any info that you can share with me. I would really hate to ruin my laptop not knowing what to do. Thanks for any help that you can give me.
Rodney Epker
Ken
I hope you could help guide me on the problem and probably how to fix it. Many thanks.
cj2600
Ken,
did you test your laptop with an external monitor. External screen is white too?
Gerald
I need a bit of help replacing a dell Inspiron 2200 Keyboard
cj2600
Gerald,
You can find instructions for replacing the keyboard in this service manual.
Ken
If I plug my vaio to an external monitor, it works fine. I guess there is nothing wrong with the video card. Is it possible that the computer is over-heating that is why the lcd is behaving strangely?
cj2600
Ken,
I don’t think so. Even if the laptop overheats, it still should work fine for a while when it’s cold.
It could be either bad motherboard or faulty LCD screen. Unfortunately at this point you’ll have to guess because the only way find out what is wrong is testing the laptop with another working LCD screen.
Ken
Thanks for the prompt reply. The LCD is actually usable for the first few hours straight then when I restart my computer, the LCD problem arises. I am afraid Il be spending a huge amount to have it repaired which makes me think if its worth it.
Rommel
I have a Toshiba satellite L35-S2161. It went dead after hybernating. No power lights at all. I toot out the battery and tried it again to no avail. I lost the manual and can’t find anything online.
Does this model needs a working battery to power up? What could be the problem with it?
TIA
frank
i need to replace the power button flat cable but can not find a site to repalce it do you have any ino on sites that have the part
thanks
frank
frank
sorry forgot to put the model i have the pcg-k33
andreas
i broke the ZIF connector. not the base but the green little cover that you pull to release the cord. i managed with sm tape to keep it attached there but a line of my keybord is not working (“9″o”l”.”). any suggestions?
cj2600
andreas,
Unfortunately, if the connector is broken I don’t think you can fix it. You still should be able to use the laptop with an external keyboard.
Please let us know if you find the solution.
Manne
I would like to ask, hope you can help me. my laptop keyboard sending a notice STICKY KEY. I cant type smoothly.
thanks
Manne
Jeff Evenson
Can anyone guide me to instructions on replacing the key board on a 2005 emachines M5309
Ergun
I have a keyboard typing an arbitrary key continuously. Only one key for each windows session but not a specific one. Does anyone know what the problem is?
cj2600
Ergun,
Did you test the laptop with an external USB keyboard? Did you test the laptop in Safe mode?
Ergun
Yes, i tried both and many other things.It’s okey with usb one but nothing changes in safe mode. Lastly remove the keyboard and extracted all the keys. There is nothing visible on the sheet board of the keyboard. It was a keyboard of msi-vr330. If anyone knows that keyboard is technically suitable for a msi-m670, please let me know. I’m planning to test it on this laptop.
cj2600
Ergun,
Apparently the laptop keyboard is defective and has to be replaced.
It’s possible that there is nothing wrong with the keyboard itself and you have a problem with the keyboard controller on the motherboard. This kind of failure is not common but possible. The only way to find out what is wrong is testing the laptop with another keyboard.
Just in case. Did you try reinstalling the operating system? You can boot the laptop from Knoppix CD (live Linux) and test the keyboard in there. Knoppix runs directly from the CD bypassing Windows.
If you still experience the same problem even with Knoppix, this is not related to Windows OS. This is hardware related issue.
If the problem is gone when you work in Knoppix, it’s possible that you problem is related to Windows. Try reinstalling Windows in this case.
Alipari
Have a VAIO VGN-FE41Z. N key on keyboard has become unreliable and needs to be pressed hard to act. Have taken off the key and cleaned under it. Still no good, Even when u press directly on the round plastic thing under the key, it still needs to be pressed hard to type the letter n please advise. Your help on this site is wonderful!!
Alipari
Sorry… just to clarify it’s only one key ie the letter N i have problem with
RoyB
I managed to hurt a couple of keys on my Toshiba Satellite L25-S1216. Any tips/techniques for reattaching keytops?
Thanks.
playmax
i`ve removed my keyboard and now after i plug it again it doesn`t work, the laptop works fine but i can`t press anything with my keyboard, i got an Acer Aspire 3694 can i get a little help with it pls?
cj2600
Alipari,
I guess it’s time to replace the keyboard. I doubt that you can fix this problem.
cj2600
playmax,
Check the connection between the keyboard cable and the motherboard. Make sure the cable is properly connected, reseat the cable.
Jana
Hi, I’m trying to reformat my Asus AD2000 – but having trouble because my keyboard is apparently stuffed. Asus Service Centre Melbourne said it was only the keyboard, but now Asus Service Centre Sydney (moved recently) now say its the keyboard controller on the motherboard. But I am using a USB keyboard fine – so shouldn’t the keyboard controller on M/B still be fine? 🙁
Anyways, all I want is to be able to reformat at least to lift the game of my tired old laptop – as I have scoured the globe (it feels like) but cannot find a replacement keyboard anywhere and Asus (gee they are helpful! not) say that they don’t or won’t stock the keyboard controller/motherboard – they advise just buy a new laptop. Can you offer any advice for someone in this situation? Cheers, Jana
cj2600
Jana,
I couldn’t find a replacement keyboard either even on eBay. Are you sure AD2000 is the correct model name?
Laptop Repair
IT’s always challenging and scary to replace your first laptop keyboard, but once you have gone through the process of doing just that with more than a couple then its may just become a routine.
hero
Thats SO funny I only have TWO laptops and BOTH of them are in this tutorial!
thanks!
-hero
admin_papa
Hi Folks!
Just wanted to share my new experience.
If your Windows XP denies to run due to an error related to missing HAL.DLL, invalid Boot.ini or any other important system boot files you can repair this by using the XP installation CD. Simply boot from your XP Setup CD and enter the Recovery Console. Then run “attrib -H -R -S” on the C:\Boot.ini file and delete it. Run “Bootcfg /Rebuild” and then Fixboot
Regards,
Carl
jex
thanks very much guys,i had learn some troubleshooting tips about some loptops, hope to learn some more
Mark
I broke the little plastic, keyboard-to-motherboard, lock-down connector on the Toshiba. Wish I had read your page before (you warn above that it’s fragile).
Any idea where to research/purchase them online?
Thanks,
Mark
Mark
Re: my prior entry below–
In the meantime, I wedged the keyboard’s cable-strip into the connector using a business card cut to size. So far it’s working great (I typed this using that keyboard), but I would like to do it right if at all possible.
Thanks,
Mark
kevin.mathreja
hi friend i need a urgent help
im having a sony vaio VGN-FE41E laptop ,n the problem is that im living in a small island of spain n here v dont have any good laptop repair center so i thought may b u can help me. the problem in my laptop is the screen it loose from the right side of the laptop so when ever i open or close my laptop it wont open or close properly i think its just the screw which is gone lose but i need instruction to open the laptop as iv paid 1200eur for it so i dont want to do some thing wrong
if u can help ill b greatfull to u
thanx 4 ur time
kevin
Anthony Kelly
I love this guide, and whoever wrote it. The keyboard on my Toshiba satellite (the exact same one as is pictured above) has been broken forever, and this guide helped me fix it. I can type “J” again! Yaaaay.
Amar
Hi,
I really love and appreciate the information posted here. I have a compaq presario 2500 model laptop brought few years back. It works exceptionally good except for keyboard problem. I showed it in service center and it looks like few keys have got stuck and the key board has to be replaced. They are charging a high cost for the replacement. Can you guide me how it can be done by my self. All the information provided is greatly appreciated.
paul hagan
Thanks so much. I had no idea this was so easy. I was even starting to think, “maybe I should just get a new laptop.” I fixed my Toshiba Satellite 2435 for $23.90!!
Bhaskar
This site does help a lot in fixing the problems with laptops easily. I really appreciate the effort. While fixing my SONY VAIO PCG-K33 model, accidentally the edges of keboard connector cable (not the motheboard seating slot) have gone bad and some of the keys are not functioning. Is there any cable stripping tool that helps to cut the edges and make those edges again to insert into the motherboard slot. Appreciate your help! Thanks in advance.
Amit
My Sincere thanks to the team for wonderfully explaining the stuff. I was very upset because my laptop keyboard was typing unwanted letters / symbols. Now with the help of pictures given here I successfully managed to reach to the ribbon cable and removed it. Wow! i never thought it to be that simple. I am now using a USB keyboard. Thanks a million again for saving me from so much trouble.
Karen
My daughter disabled the keyboard on her Toshiba Satellite A105 by dumping tea on it. Using these instructiions (especially the excellent photos) we were able to easily install a new keyboard at a modest cost for the part. THank you so very much for this information!
Ron
On a Toshiba PC you need to remove 3 screws from the battery compartment before the bezel will pull away from the unit. Best to remove all 8 from the compartment so as not to break it
Corwin
I have a VGN-C140G Sony Vaio. Could you please send me instructions on how to remove the keyboard?
Thank you
Long Nguyen
I have a Sony Vaio VGN-FS940. Could you please send me instructions on how to remove the keyboard?. Thanks.
Parviz
While removing the ribbon cable I broke the black piece which holds the ribbon cable, where can I find one?
Thanks
Gil
After a spill necessitated replacing the keyboard on SatellieA135, about 1/2the keys, mainly on the left side of the keyboard, don’t work. I can’t seem to press the ribbon cable of the new one into the connector far enough for it to engage the pins. I tried reattaching the old keyboard, but can’t press that cable in far enough either. There seems to be white mineralization on some pins in the connector. How can I clean it off so the cable fits properly and makes contact with all the pis?
cj2600
Gil,
I guess you can try spraying the connector with a contact cleaner, something like ProGOLD contact conditioner.
damon
hey there i seen that u helped a lot of things so far so i ask u of this.. i have a toshiba A100 laptop and well theres the 7, u, j, n the up button dont work i have removed the keyboard like said above but still nothing but an external keyboard does work perfectly but as im selling it i need to fix it… so if i bought a new one n it didnt work what would i be looking at then for what to do wise?
thanks a lot!!!!!
Melanie
Thank you so much! You saved me a ton of money after I spilt water all over the keyboard of my toshiba A135. I ordered the replacement off Ebay for $18.25 including shipping. And your excellent instructions allowed me to so easily replace this myself. Awesome!!!!
YankeeEsq
Thanks for the description re the Toshiba keyboard. It helped much.
Just want to note that the pictures showing the keyboard connector ribbon locks could be larger. It’s next to impossible to see, which is a problem cause they are so damn small in real life.
To those trying to figure them out, there are 2 tabs, at the corners of where the ribbon connector plugs in. They slide up (towards the monitor, parallel to the surface you are working on) (NOT up toward you looking down at the computer from above).
Thanks for the help.
Laurie
awesome.. thanks, had trouble figuring out the locks too. but eventually got them to lift. thanks you thank you!!
Raj
Need to replace the keyboard on my Toshiba satellite ,will give it a try and see if it works.
dave
thanks for your help. I needed to replace a vaio keyboard, and I am non techie. Your instructions worked perfectly.
Eugene
I was fixing the motherboard on my laptop and lost the connector lock that held the ribbon in place to the motherboard…anyone know where I can find a replacement…
HP TX1000
nina
i have a Compaq Presario CQ50-110US Notebook PC would you be able to help in guiding to install new keyboard. Thanks
Danny
My laptop (Sony VAIO VGN-FE770G) was Coke damaged by my 5 year old son. I have replaced the keyboard with a new one.
Unfortunately, this didn’t solve my problem – incorrect typing : I type letter “a” it types “ade”, I type “s” it types “swq”, and so on… Every letter is typing this way.
Can someone help, plase…
Thanks in advance!
nicky
hi! i have a OCZ 17′ laptop (OCZDIY17B1-US). can you show me to open its keyboard ! thanks.
joko
plis how to replace keyboard modul axioo neon
mary claire ida ricare
hai.. is there any available keyboard model for toshiba satellite L310? please reply..
MaryAnne
Hi, I have a Compaq Presario V2000. The key board got wet, water spilled on it. It has dried out and still works great but the keyboard does nothing. What do I need to do???? Thanks!
cj2600
MaryAnne,
Hopefully the water didn’t damage the motherboard.
If the keyboard doesn’t work, you’ll have to replace the keyboard.
cj2600
mary claire ida ricare,
I don’t understand your question.
chris
am so happy that i read this article
sam2146
can anyone plz tell me how to remove hcl laptops keyboard…
CHIMMU
I have a Toshiba Mini Notebook (NB 200). Now am facing a problem with the same. I could not start the same and work with. It is showing the following Message after the Toshiba Window. The message is as follows:
“The windows could not start because of an error in the software.
Please report this problem as Load needed DLLS for KERNEL.
Please contact your support person to report this problem”.
Kindly please help me to solve this problem.
I have kept lot of data in its Hard Disk and now i couldnt able to view and also i failed take the Back up. Could you please guide me how could i take my stored data??
In anticipation of your favourable reply.
Reg256
Many thanks for an informative article.
I searching for guidance in removing keyboard for a VM Flybook, can you point me to a guide that will help.
Thanks
Reg
Ralph Bohorquez
Thankyou for explain how to remove the key board now I can repair my own loptop Ralph
Kim Sanders
Is there no way to repair a Toshiba Satellite keyboard? Only some of the keys and the enter key aren’t working. Hoping for a simple fix, maybe. Thanks, Kim
angel
Thanks for the article really helped.
GrimNir
Hi Great post, I’ve used the instructions on other laptops. However I now have to remove the keyboard from a zoomstorm notebook freedom 10-270. There isn’t an obvious bit above to pry away. The notepad was dropped and the keyboard came out. rather than bring it to me straight away he tried to just shove the keyboard back on and now the keyboard doesn’t work. I’m wary of damaging it further by prising the keyboard off again and would like some advice on how to remove it please.
cj2600
@ GrimNir,
It’s possible the keyboard is secured by hidden spring loaded latches on the top.
Also, remove all screws from the bottom of the laptop. It’s possible some of them securing the keyboard.
Hope it helps.
Jeff
Thanks for the instructions. I used them on a compaq F700 and it worked great.
julia
wat if someone spills water on the whole computer and the whole keyboard does not work
cj2600
@ julia,
First of all, you stop using the laptop right away. Unplug the AC adapter and remove the battery.
After that you disassemble the laptop for further investigation.
meek-meek
i’v just reformat my lop top but when i open my lop top again there are some keys that are not functioning., at fist it was just the keys (qwert)they are replaced by (12345) then after i restart my lop top it turns out to be the more keys are not functioning. can you help me resolve this problem pls…
cj2600
@ meek-meek,
Most likely this is hardware related failure.
It’s hard to tell what is causing the problem. Could be one of the following:
1. Bad connection between the keyboard and motherboard.
2. Keyboard failed.
3. Motherboard failed.
First, I would try reconnecting the keyboard cable on the motherboard. If it doesn’t help, try replacing the keyboard. If replacing the keyboard doesn’t fix the issue either, most likely there is a problem with the motherboard (probably failed keyboard controller). In this case the laptop not worth fixing because the whole motherboard has to be replaced.
Justgran
I have a Toshiba L355D laptop. I am trying to remove the bezel in order to replace the inverter and I cannot get the bottom of the bezel detached. Is there any way to do this without taking the entire top of the laptop apart? Thanks for any suggestions.
terrychancellor
this is a new keyboard ordered from you guys 4 keys wnot work old keyboard works changeing back and forth the b key bracket is brohe on old board ineed rma for return exchange
cj2600
@ terrychancellor,
I think this is a mistake. I’m not selling any keyboards on this site.
kfir
Hi,
thanks for this tutorial. I replaced LG E500 keyboard, and it is very similar to the sony laptop in your post.
After I took out the plastic cover, the keyboard was attached with 5 tiny screws. Really simple replacement. Note, no need to open the laptop from the bottom, just from above.
Regards,
Kfir
graeme
Hi
I was taking apart a packard bell dot se netbook to clean it when i was re-assembling it the keyboard ribbon cable will not fully engage, the white line
on the ribbon is not lining up with the motherboard connector i tried blowing out the connector with compressed air and cleaning the ribbon with isopropol
but still no good im wondering if im doing it right the ribbon goes between the brown and white connectors and then you push down locking tabs on each side of the connector what do you think time for a new keyboard? can i replace the ribbon cable on keyboard or is the connector on motherboard broken i hope not it looks ok
Graeme
Frank Ross
I purchased a new Acer Aspire V5-431-4846 Keyboard that I the one that I received was different the the one
that was discribed on the ad. I have two screw holes on my
original V5-431-4846 Keyboard. but I dont see them on the one that was sent to me but the picture shows my exact Keyboard in your ad? not the one that you sent me? I need to take the Frame off the Old Original Keyboard that I had to
make it fit in and screw down.. There is a way to remove the Old Original Frame and reinstall it in the New Keyboard that I just purchased. Can you please tell me the steps to do this? Thank you.
Frank Ross
Model : Acer Aspire V5-431-4846
Diam : 12 in Long.. by 4 1/2 in Wide
Do you have instructions on how to safely remove the original brass screw holes from the old keyboard also the Frame Bezel
so that I can reinstall them on your New Keyboard?
cj2600
@ Frank Ross,
No, I don’t have a guide for this model.
baking
Is there some kind of tool for connecting ribbon cables in tight places? The ribbon cable to the keyboard is directly behind the middle (rather than the edge) of the keyboard, and has less than an inch of slack. It’s impossible to reach under the keyboard to attach it, because a hand is thicker than the cable slack.
Seun
Please my Asus x200M notebook PC keyboard is not working only wour keys works. Please advice
pearl
hi, i have an asus transformer t100 and im having problems with the keyboard. the letter and number keys work fine but as soon as you start hitting any symbol key or the shift key, the entire keyboard will stop working. same happens even if i go to the BIOS screen.. i restored it to factory default settings and i still have the same issue. please advise.. thanks!